LiveSqueezy
  • Home
  • All Recipes
  • Goal
  • About
  • FAQ
  • Contact

Hawaiian Pork Burrito Bowls

7/31/2017

0 Comments

 
Picture
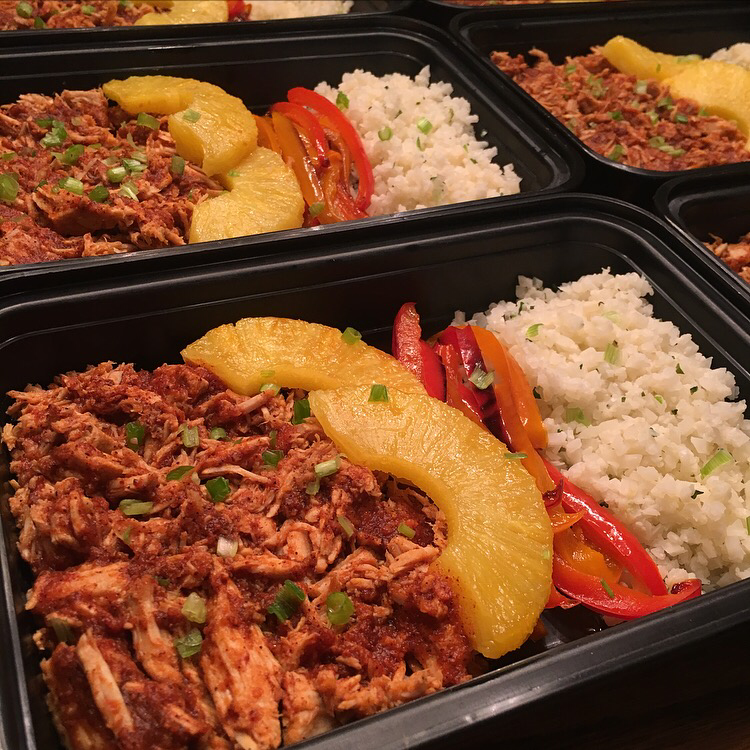
Another seriously delicious taco-type bowl for this week! Though I think this burrito bowl tasted more like tacos then last weeks taco bowl. Nonetheless, I loved both. This one was especially fun to put together and just make to my liking. The only ingredient change I made was using 1 tablespoon of cumin instead of 2 for the enchilada sauce because I'm just not a huge fan of cumin. Also, the original recipe made this with quinoa, which I substituted for a cilantro lime cauliflower rice, so I guess I technically made two ingredient changes. I thought the cauliflower rice was a great pair with everything and a perfect paleo option. I actually couldn't pick out the lime or cilantro flavor once mixing everything together either, so you can definitely get away with making a really plain cauliflower rice (or just make regular rice if you are not paleo) since there is plenty of enchilada sauce. Speaking of that sauce, I purposely only added some back to the shredded pork, so I had a ton of it leftover. Just throwing that out there in case anyone else doesn't like a ton of sauce or they see how mine turned out and would rather have more sauce. This meal is worth making and one that I will definitely be making again!

Hawaiian Pork Burrito Bowls 
Ingredients:

Enchilada sauce:
  • (14.5 oz) can tomato sauce
  • 2 tablespoon tomato paste
  • 2 tablespoon chili powder
  • 2 tablespoon cumin (I only used 1 tablespoon, personal preference) 
  • 1 teaspoon onion powder
  • 1 teaspoon garlic powder
  • 1/4 teaspoon paprika
  • 1/8 teaspoon cayenne
  • 1/4 teaspoon salt
  • 1/4 teaspoon pepper
  • 1 cup pineapple juice
Pork:
  • 1 tablespoon coconut oil (or olive oil)
  • 2 lbs pork sirloin roast
  • 2 teaspoon cumin
  • 1 teaspoon chili powder
  • 2 teaspoon salt
  • 2 teaspoon pepper
Garnish:
  • 1/2 tablespoon coconut oil
  • 1 large cauliflower, riced (I used two 12 oz bags of frozen cauliflower rice)
  • 2 cloves garlic
  • 1 lime
  • 1/2 tablespoon coconut oil
  • 2 bell peppers, thinly sliced (I used red and orange)
  • 1 green onion, thinly sliced
  • 1 pineapple, sliced into rings
  • Avocado, sliced 
  • Cilantro, chopped
Directions:
Enchilada sauce:
  1. In a crock pot, add the ingredients for the enchilada sauce: tomato sauce through the pineapple juice. Whisk until well combined.
For the pork:
  1. In a large skillet, add the coconut oil and heat over medium high heat.
  2. Season all sides of the pork with the cumin, chile powder, salt and pepper.
  3. Add the pork to the skillet and sear on all sides, about 2 mins per side. Once seared add to a slow cooker. Spoon some of the enchilada sauce over the top of the pork. Cook on high for 4 hours, or until done.
  4. Remove the pork from the slow cooker and onto a large plate. Shred with two forks. Place back into slow cooker and mix well with the sauce.
To serve:
  1. (If making own cauliflower rice) Remove the leaves from the cauliflower and cut the cauliflower from the core so that you only have the florets. Place the cauliflower florets into the food processor and process until riced. (If you have a large amount of cauliflower florets you may need to do this in two parts.)
  2. In a large skillet, heat the coconut oil over medium heat. Mince the garlic and add to the cauliflower in the pan. Cook over medium heat for about 5 minutes, stirring constantly. When cauliflower is slightly toasted, and garlic cooked, remove from heat.
  3. Toss with cilantro and juice from the whole lime.
  4. Add coconut oil to the skillet. Once melted, add the peppers and sauté for 5 minutes or until soft. Remove from the heat and add the pineapple slices. Cook until slightly browned, about 1 minute.
  5. To serve, add cauliflower rice to a bowl, top with the pepper mixture then the pork. Garnish with the pineapple rings, avocado and cilantro.

​Original recipe found here
0 Comments

Balsamic Grilled Chicken, Brussels with Bacon, and Sweet Potato Applesauce Mash

7/31/2017

0 Comments

 
Picture
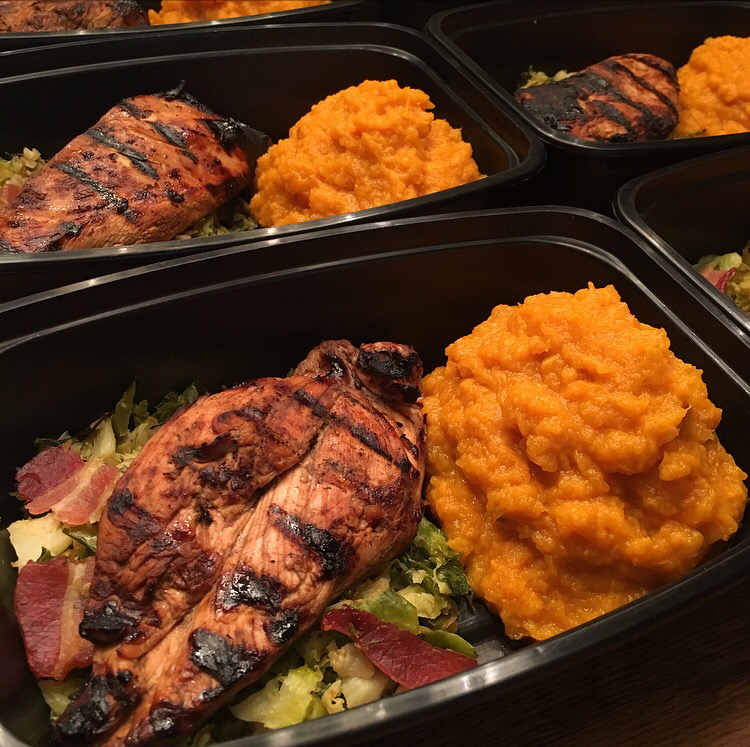
I was out of town this past weekend, so I planned ahead for an easy and simple meal prep Sunday. This is my version of the classic chicken, broccoli, and rice meal prep and it is way more tastier and enjoyable. Actually, the Roasted Brussels with Bacon and the Sweet Potato Applesauce Mash are probably my top go-to sides to meal prep. I love them so much I could probably eat them for every meal if I had to. There is little prep for both of them and although it takes some time roasting in the oven, you can be efficient with that time and get another meal done while you wait. You can also make this Balsamic Grilled Chicken during that time, if it's done marinating. Nothing fancy about the chicken, if you like balsamic chicken you will enjoy it. This meal is a comforting and simple one that I cannot wait to eat all week!

Balsamic Grilled Chicken
Ingredients:
  • 2 lbs boneless/skinless chicken thighs (I used chicken breasts)
  • ½ cup balsamic vinegar
  • 2 tbsp olive oil or avocado oil
  • 5 cloves garlic, minced (or 1 ½ teaspoons garlic powder )
  • 1 teaspoon sea salt
  • ½ teaspoon black pepper
Directions:
  1. Combine all of the marinade ingredients in a non-reactive bowl or Ziploc bag. Mix well. Add the chicken and mix again. Cover the bowl or seal the bag, and place into your fridge for at least 2 hours, and up to 24. I typically marinate the chicken overnight - the longer the better!
  2. Preheat your grill to medium low heat. Place the chicken on the grill, cook for 7-10 minutes, then flip the chicken and cook the other side for 7-10 minutes, or until cooked through. So good!

​Original recipe found here

​Roasted Brussels with Bacon
Ingredients:
  • 1-2lb Brussels, shaved 
  • 6 strips of Bacon
  • 1 Tbsp Raw Honey (optional)
  • Salt to taste
Directions:
  1. Preheat oven to 425° F, and line a cookie sheet with bacon strips.
  2. Cook bacon for 8 minutes, flip strips over, and cook for an additional 6-8 minutes.
  3. In a food processor, add the Brussels and shred to liking. 
  4. Once bacon is cooked, remove from cookie sheet and set aside. Place shaved Brussels on the cookie sheet with leftover bacon fat. Add honey and salt and mix around.
  5. Bake Brussels for 10 minutes, take them out and mix around, then bake for another 10 minutes. Keep an eye on these to make sure they do not burn! 
  6. Cut the cooked bacon into bite size pieces and mix into the Brussels. Cook for an additional 3-5 minutes (I will bake for another full 10 minutes though if I have closer to 2lb of Brussels.)
  7. Enjoy!

Sweet Potato Applesauce Mash 
Ingredients:
  • 2 pounds (1000 grams) sweet potato
  • ½ pound (225 grams) apples or 1 cup unsweetened store-bought applesauce
  • Generous pinch of sea salt
  • 1 tbsp (15 mL) ghee, optional (I did not include) 
Directions: 
  1. Preheat oven to 400°F (200°C) and line a baking sheet with parchment paper or aluminum foil.
  2. Roast the sweet potatoes for about an hour. Let them cool.
  3. If you’re making the applesauce from scratch, do this while the sweet potatoes are roasting. Peel and dice the apples. Put into a small pot with a 2–3 tablespoons of water and cover with a lid. Cook over medium-low heat until the apples are very soft. Remove the lid and cook until most of the water has evaporated.
  4. Peel the skins off the sweet potatoes. Combine with the applesauce in a large bowl and mash with a hand masher until it’s to your desired consistency, or use a food processor.

​Original recipe found here
0 Comments

Pulled Pork Taco Bowl

7/24/2017

0 Comments

 
Picture
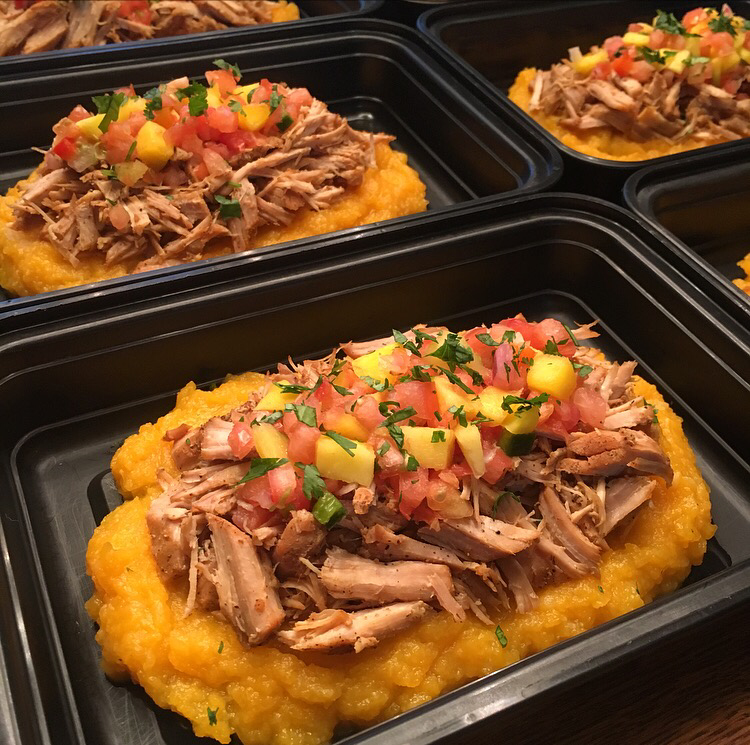
The original recipe for this was Pulled Pork Taco Bites with the pork served on roasted butternut squash slices. There was no way I was making tiny taco bites for a weeks worth of meals though, so I improvised and came up with this Garlic Butternut Squash and Cauliflower Mash. Sounds gross and I totally questioned myself all weekend if I should experiment with this or not, but I did anyways and I am so glad I went through with it. Not only did the mash turn out tasting delicious, but it was a seriously tasty pair with the pulled pork and mango salsa! If you are doubting the cauliflower part of the mash, then just leave it out, but honestly I didn't taste a bit of cauliflower and it was a sneaky way of adding some more nutrients into the meal. For the pork I used my new InstaPot again, but you can also make it in the slow cooker if you have that. There are also recipes for Mango Salsa, Traditional Salsa, and Chunky Guacamole for topping choices, so all of the variety! I personally loved the mango salsa, but that was the only one I tried. You can also check out your local grocery store's fresh made salsa and see if their ingredients are paleo-approved if you want to save some time in the kitchen. This meal was seriously as amazing as it looks and definitely one I recommend trying!

​Pulled Pork 
Ingredients:
  • 3-4 pound pork shoulder 
  • 1 1/2 tsp sea salt
  • 1 tsp freshly ground pepper
  • 1/2 tsp garlic powder
  • 1/2 tsp cumin
  • 1/2 tsp chipotle chili powder
  • 1 large yellow onion, peeled and thinly sliced
  • 1 cup chicken or beef broth 
  • Garnish: sliced purple cabbage, chopped cilantro and lime wedges, if desired.
Directions:
  1. Combine all spices and mix well.
  2. Place onions and broth in crock pot or instant pot.
  3. Rub pork on all sides with spices.
  4. Add pork to crock pot or instant pot.
  5. For Crock Pot: Set crock pot on low for 10 hours or high for 6 hours. (Low for 10 hours will turn out more tender.)
  6. For Instant Pot: Close lid and make sure release valve is sealed. Press 'meat' option and set to 50 minutes. When meat is done, carefully release valve with oven mitt or spoon to release pressure.
  7. When meat is done, remove from pot and place on cutting board. Discard liquid and onions.
  8. Use to forks to shred, discarding fat along the way.
  9. If you want those browned crispy edges, sear in a hot pan for a few minutes!
  10. Top with salsa (see below) of your choice and garnish with sliced purple cabbage and chopped cilantro, if desired.

Topping Recipes:
Mango Salsa
  • 1 large mango, peeled, cored and diced
  • ¼ of a medium red onion. finely diced
  • 2 tsp cilantro, freshly chopped
  • juice of half a lime
  • ½ – 1 tsp serrano chile, finely minced (depends on how much heat you want!)
  • ½ of a small red bell pepper, diced
  • pinch of sea salt 
Traditional Salsa
  • 2 medium tomatoes, diced
  • ½ of one medium white onion, diced, see how here
  • ¼ of one green bell pepper, diced
  • ½ -1 tsp serrano chilis finely chopped, see how here
  • 2 T fresh cilantro, chopped
  • Juice of half a lime
  • sea salt, to taste
Chunky Guacamole 
  • 3 avocados, peeled and diced
  • Juice of half a lime
  • ½ cup Traditional Salsa (recipe above)
  • 1 ½ tsp chopped garlic
  • 1 tsp olive oil
  • ½ tsp Serrano chili, minced (optional)
  • sea salt, to taste
Directions:
Mango Salsa:
  1. Combine all ingredients and toss. Cover and refrigerate till serving. (see link above for handling chilis)
Traditional Pico De Gallo:
  1. Combine all ingredients except Serrano chili. Add 1/2 teaspoon of chili at a time, mixing and tasting in between additions. When the heat is right, cover and refrigerate till serving.
Chunky Guacamole:
  1. Squeeze lime juice over diced avocados. Add traditional salsa, garlic, oil, sea salt and gently toss.

​Original recipe found here


Garlic Butternut Squash and Cauliflower Mash:
Ingredients:
  • 1 Butternut Squash
  • 1 head of garlic
  • 1 head of cauliflower (I used one 16oz bag of frozen)
  • ¼ - 1 cup of chicken broth (to your liking - I didn't end up using any)
  • 3 Tbsp. Ghee or Coconut oil
  • 1 tsp. of cinnamon
  • 1 tsp. of salt
Directions:
  1. Preheat the oven to 425F.
  2. Split the squash in half, and scoop the seeds out.
  3. Drizzle 1 T of ghee or coconut oil over the squash. Flip the squash over so the flesh is facing down into a high-rimmed baking dish.
  4. Remove any extra papery layers from the outside of the garlic bulb. There should still be a papery layer keeping the individual cloves intact. Cut 1/4 inch off the top of the garlic bulb to expose the individual cloves nestled inside. 
  5. Drizzle 1 T of ghee or coconut oil over the exposed garlic bulb, and then place the bulb, with the exposed cloves facing up, in between the butternut squash halves (or any other empty space in your baking dish). Cover the pan with foil and roast for 30 minutes, then remove the foil and continue to roast the squash and garlic until soft (about 15 more minutes, depending on the size of your squash). If the garlic clove is starting to burn, flip it over so the exposed cloves are facing down for the remaining 15 minutes. The end goal is a soft squash and soft garlic cloves.
  6. Once the butternut squash and garlic are almost done roasting in the oven, place the cauliflower in a pot. Add just enough water to cover the cauliflower. Bring to a boil, and then reduce to a lively simmer. Simmer the cauliflower until soft, about 10-12 minutes. Drain the water from the pot. (You can also steam the cauliflower instead.)
  7. Squeeze the individual garlic cloves away from the papery outside and into the pot of (drained) cauliflower. Scoop the flesh of the roasted butternut squash away from the outside skin and into the pot. Add 1 T of ghee or coconut oil. 
  8. Use a mixer or masher to blend everything together. (I used a food processor first for the cauliflower just to make sure it was mixed smoothly, then added it with the butternut squash to a food mixer to finish blending together.) Add the broth to the mashed veggies, adding as much as needed to reach your desired consistency. 
  9. Stir in the salt and cinnamon to taste. 

Inspired by this recipe
0 Comments

Eggs and Bacon in Sweet Potato Cups

7/24/2017

0 Comments

 
Picture
This was a fun and easy one to make! Only 5 ingredients and not too much prep involved either. Instead of grating the sweet potato, I peeled and cut the sweet potato into smaller chunks, then threw them in the food processor to shred into smaller hash-like pieces. Also, make sure to add salt and pepper to the sweet potato hash before lining the muffin pan; I almost forgot to do that. After the sweet potato cups were made, all I had to do was crack an egg into each muffin, top with bacon, and put back into the oven. Easy as that! I also added a dash of salt on top of the eggs before putting back into the oven as well. This recipe makes 12 egg muffins, so if you only want 6 muffins then you can easily reduce the ingredients in half. I see this recipe being a repeat breakfast option for sure!

Eggs and Bacon in Sweet Potato Cups
Ingredients:
  • 1 medium sweet potato
  • 2 tbsp coconut oil (or baking fat of choice)
  • 12 large eggs
  • 4 slices bacon
  • Salt and pepper, to taste
Directions:
  1. Preheat oven to 400 degrees.
  2. Grease a muffin pan with a tablespoon of coconut oil.
  3. Grate the sweet potato so you have about 2 cups.
  4. Mix in 1 tbsp of coconut oil, salt, and pepper with the sweet potato so they are evenly mixed.
  5. Evenly divide the grated sweet potato into 12 muffin holes and press them down the bottom and sides so they form small cups.
  6. Bake for 15 minutes.
  7. Meanwhile, cut bacon slices into small bits and fry them until they just start to crisp.
  8. When the sweet potato cups are done, crack an egg into each one carefully without breaking the yolk.
  9. Sprinkle with salt and pepper and evenly sprinkle bacon bits on top of the eggs.
  10. Bake for 15-20 minutes until the egg whites are set.
  11. Let it cool for 10 minutes before taking them out of the tin.

​Original recipe found here
0 Comments

Honey Mustard Chicken, Asparagus, and Sweet Potatoes

7/24/2017

0 Comments

 
Picture
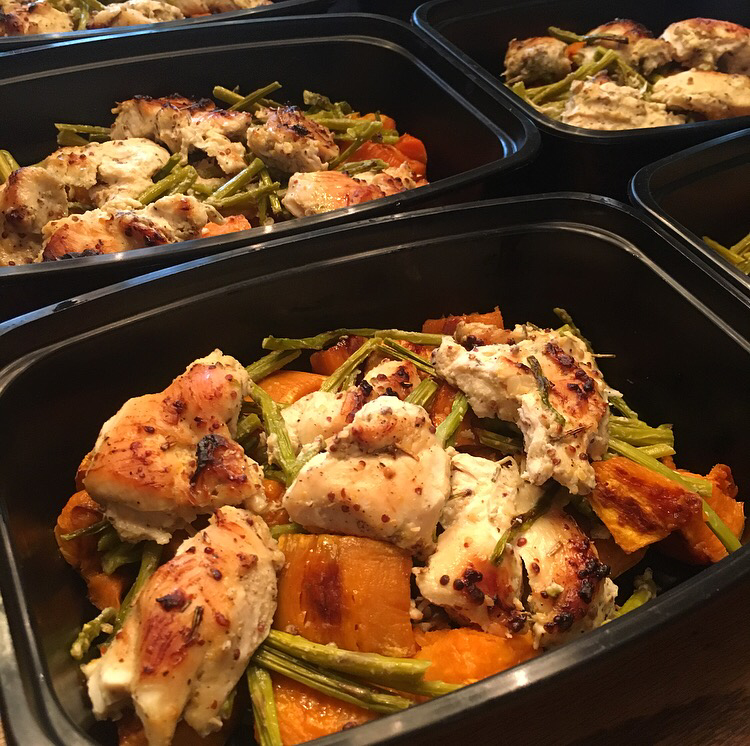
The original recipe was a maple mustard combination, but I am a huge fan of honey mustard, so I swapped the maple syrup out. I definitely make a lot of meals that call for honey, which is always questionable in the paleo and nutrition world, so I wanted to give my quick thoughts on both sweeteners. First, always check the ingredient label and buy unprocessed honey and maple syrup. Second, although these ingredients are a natural food source, they are still sugar and should be eaten in moderation. I try not to use TOO much in my meals and almost always reduce what the recipe calls for, so that when I portion my meals out I never actually have a tablespoon of the ingredient in each meal. Basically, I use them in moderation and believe they are the best sweetener or choice if I am going to use one. That is my take on them though. PaleoLeap has an article on the honey and maple syrup debates as well, and more information on Paleo in general, if you want to research more and form your own opinion. 

About the recipe though... I mention below that I roasted the sweet potatoes separate from the chicken and asparagus. I only did this because I diced up a ton of sweet potatoes though, so if you don't use too many sweet potatoes you might be able to fit everything on one baking sheet. Besides that, this recipe was super simple to prep and bake on one pan. I definitely suggest broiling for 3-5 minutes at the end to make everything a little crispier too. If you like honey mustard (or maple mustard), then I think you will also enjoy this one!

Honey Mustard Chicken, Asparagus, and Sweet Potatoes
Ingredients:
  • 2 lb chicken breasts, pounded until thin
  • 3-4 Sweet Potatoes, cut into 1 inch cubes
  • 1 bunch of Asparagus, end trimmed
  • ¼ cup olive oil
  • 3 tablespoons raw honey (or 100% maple syrup)
  • 4 tablespoons whole grain mustard (I used OrganicVille Stone Ground Mustard)
  • 1 teaspoon rosemary
  • 1 teaspoon salt
  • 1 teaspoon pepper
Directions:
  1. Clean, cut and pound chicken until thin.
  2. Combine olive oil, honey (or maple syrup), mustard, rosemary + pepper until mixed.
  3. Marinate chicken for a minimum of 30 minutes in a Ziploc bag (the longer you can marinate the better).
  4. Remove chicken from bag + place on non-stick foil or greased baking sheet. (Don't throw out the marinade!)
  5. Toss veggies of choice in leftover marinade in the bag + lay alongside the chicken on the baking sheet. (I only added the asparagus to the bag and ended up baking the cubed sweet potatoes on a separate baking sheet because I had a lot.)
  6. Bake at 400 for 20-25 minutes until chicken starts to brown. You can broil for 3-5 minutes to get a crispier finish if you prefer. 

​Original recipe found here
0 Comments

​Grilled Paleo Pineapple Chicken

7/17/2017

0 Comments

 
Picture
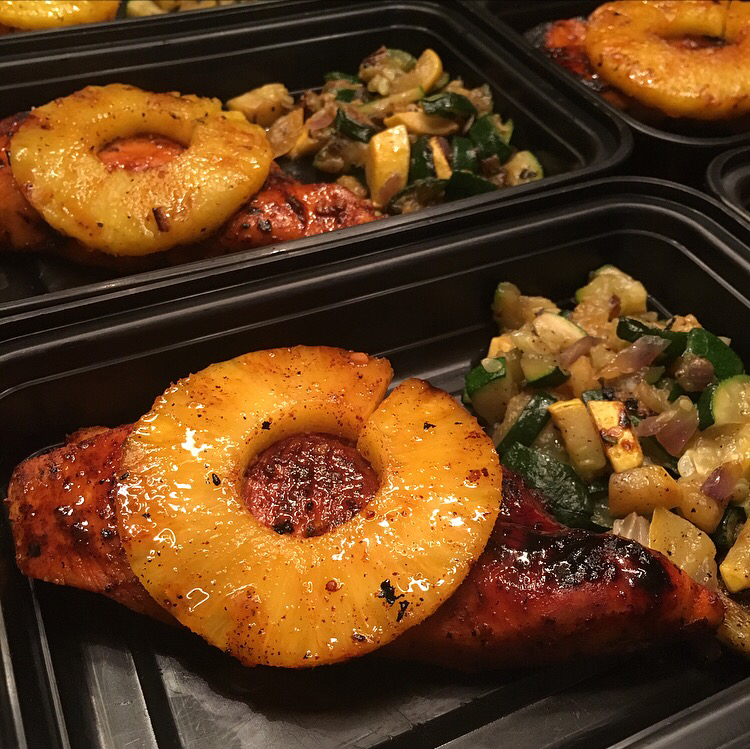
An entire meal done on the grill! Although I unfortunately got a late start on meal prep and missed out on the sun while making this. I really enjoyed this meal, but without the grilled pineapple I think the chicken breast tasted a little plain. Next time I think I would marinate the chicken in the glaze for at least an hour before grilling. Besides that though, this was the quickest recipe to meal prep and still turned out very much delicious. I paired it with grilled green and yellow squash with red onions, which is probably my favorite grilled veggie combo. I bought two 14 oz packages of pre-sliced squash and diced up half of a red onion. I tossed the veggies in a bowl with 2 Tbsp of olive oil and 1 tsp of salt (although 1/2 tsp is plenty - I just really like salt), and threw everything on the grill. We recently got these Grill Mats, which made for an incredibly easy and clean grilled veggie experience. I'll definitely be using them every time I need to grill veggies! If you need a quick and easy grill meal prep then look no further. This one is a winner!

​Grilled Paleo Pineapple Chicken
Ingredients:

Pineapple Glaze for the Chicken (make sure all ingredients are near room temp for smooth blending)
  • 1 tbsp coconut oil, melted but cooled to almost room temperature
  • 2 cloves garlic, minced
  • 2 Tbsp raw honey OR date paste*
  • 1 Tbsp coconut aminos
  • 2 tsp spicy brown mustard
  • 1 tsp chili powder
  • ⅓ cup 100% pineapple juice
For the chicken:
  • 2 lbs boneless skinless chicken breasts, pounded to ½ inch thickness and cut into strips OR chicken tenderloins
  • sea salt to sprinkle on both sides
  • ½ tsp onion powder
  • ½ tsp smoked paprika
  • pinch red pepper flakes for spice, optional
For the pineapple (if grilling pineapple along with the chicken)
  • 1 small pineapple, sliced into ½ inch thick rings
  • coconut oil to brush on the grill and pineapple
  • sprinkle sea salt
  • 1-2 tsp honey to brush on, optional
Directions:
  1. Prepare the glaze first by whisking together all the ingredients, then divide in half and set aside. You will use half while grilling and the other half to serve.
  2. To prepare the chicken, sprinkle the cut strips or tenderloins with sea salt, pepper, onion powder and smoked paprika on both sides, and brush with glaze (from the half batch reserved for grilling)
  3. Preheat your grill or grill pan to medium high heat and generously brush with coconut oil. Add the chicken and immediately brush with the glaze again. Cook on one side for 3-4 minutes, or until nicely browned grill-lines are present, flip, brush on more glaze and continue to cook until just done, about 3 more minutes, depending on the thickness of your chicken. Do not overcook - test to see if juices run clear and remove immediately.
  4. If grilling pineapple along with the chicken, brush the grill with coconut oil and grill the pineapple on med-high heat until nicely caramelized. Sprinkle with sea salt and brush with a small amount of honey if desired.
  5. Serve the chicken with the pineapple and remaining glaze/sauce set aside for serving. Cauliflower rice would also be delicious with this!
Notes:
*To make date paste, blend ⅓ cup dates (softened first in hot water if too dry) with 2 Tbsp water in a high speed blender until pureed. Add drops of water as needed to create a smooth consistency.

​Original recipe found here
0 Comments

Pressure Cooker Pulled Pork Stuffed Sweet Potato

7/17/2017

0 Comments

 
Picture
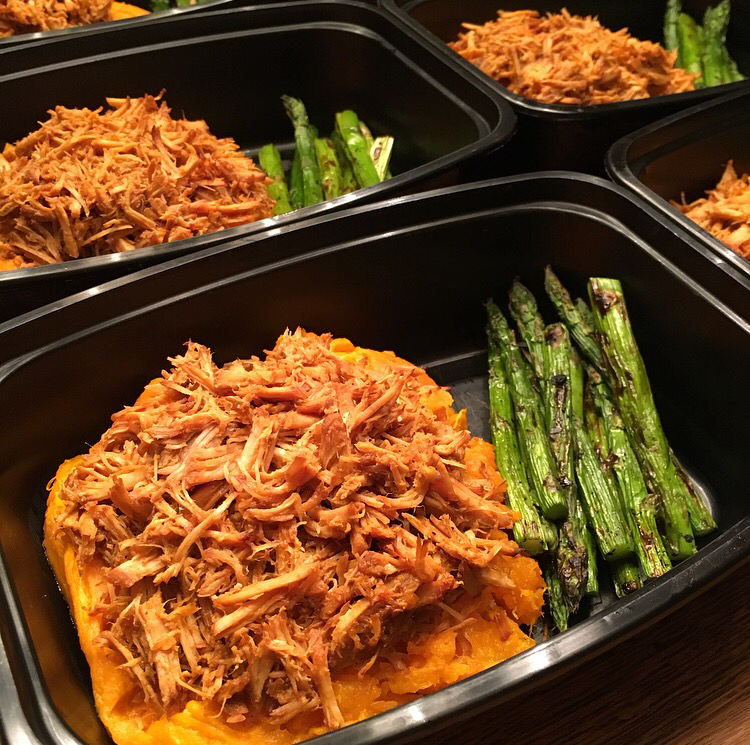
I've had my eye on the Instant Pot for a while now after hearing how amazing it was from friends and also how much time it would help save doing meal prep. Since Amazon decided to flash it in my face on Amazon Prime Day I finally pulled the trigger and got it. For those who do not have a pressure cooker, majority of those recipes can still be done in the crock pot for 6-8 hours and without the added liquid (so for this pork recipe you would not add the 1/2 cup of water). Anyways, since I was out of town all weekend and my Instant Pot was delivered in time, I obviously had no other option except to put it to use right away. This pulled pork recipe was a winner since it includes very few and simple ingredients and I already had a bottle of Steve's PaleoChef Peach BBQ at home. Another paleo BBQ sauce option I often use is Tessemae's BBQ sauce, which is equally as delicious and also sold at Whole Foods. Anyways, besides the slow down from just being a first time user of the Instant Pot, this meal was complete in under an hour and a half. I baked 5 large sweet potatoes in the oven at 425 degrees for 40 minutes, flipped them over, and baked for an additional 40 minutes. I also threw the asparagus on the grill while I was in the middle of grilling everything for my ​pineapple chicken meal this week. With being out of town all weekend and starting meal prep late on Sunday, choosing meal prep recipes that are quick and simple are a must, but so is choosing recipes that can be made at the same time. It really helped reduce the stress of coming home late and having to get meal prep done by having one meal completely made on the grill while the other one was in the Instant Pot and in the oven. Just a meal prep tip I wanted to throw out there. Anyways, if you like BBQ then you will enjoy this pulled pork. I thought it was delicious and absolutely loved this classical meat, baked sweet potato, and veggie meal prep!

Pressure Cooker Pulled Pork 
Ingredients:
  • 2 lbs Pork shoulder
  • 1 tbsp Onion powder
  • 1 tsp Garlic powder
  • 1 tbsp Mustard powder
  • 2 tsp Salt
  • 1/2 tsp Pepper
  • 1/2 c BBQ sauce + more sauce to taste (I used ​Tessemae's BBQ sauce)
  • 1/2 c Water
Directions:
  1. Cut pork shoulder in half so you have two 1lb pieces.
  2. Mix all of the dry ingredients together and rub them on to the pork.
  3. Place pork into the pressure cooker and add BBQ sauce and water.
  4. Fasten the lid in place and cook on high for 1 hour.
  5. When the hour is up let the pressure cooker do a natural release (15 - 20 minutes).
  6. Remove the meat from the pressure cooker and shred the pork. Add more BBQ sauce to the meat if desired.
  7. Enjoy!

Original recipe found here
0 Comments

Paleo Egg, Sausage, and Sweet Potato Muffins

7/10/2017

0 Comments

 
Picture
Another yummy egg muffin recipe! There are seriously so many ways to mix up the egg muffin. We had left over spiralized sweet potatoes that had to be put to use, so I incorporated those into this weeks egg muffin. I found a chorizo muffin recipe (link is below) for inspiration and ended up using breakfast sausage and adding caramelized onions with the left over spiralized sweet potato noodles. These muffins were for my mom, so I did not actually eat them, but if I were to pick my favorite one that I've made so far I think it would be this one! I love breakfast sausage, onions, and sweet potatoes and I took my time cooking them before assembling in the muffin pan and baking, so I just know they had to of turned out amazing. Give them a try and let me know if you enjoyed them!

​Paleo Egg, Sausage, and Sweet Potato Muffins 
Ingredients:
  • 1 lb pork sausage (no added sugar)
  • 8 eggs
  • ½ tsp salt
  • ½ tsp garlic powder
  • ½ onion, diced
  • ½ medium sweet potato(or one small sweet potato), grated or spiralized
  • Coconut oil
Directions:
  1. In a large pan, melt coconut oil and add diced onions. Cook for about 5-8 minutes and set aside.
  2. Add more coconut oil to the pan if needed, then toss grated sweet potato and cook until soft (about 8-10 minutes). Remove and set aside with onions.
  3. Add breakfast sausage to pan and cook until browned.
  4. While sausage is cooking, generously grease muffin pan with coconut oil or spray.
  5. Add sweet potatoes to bottom of each muffin pan and top with onion.
  6. Add browned sausage into muffin pans.
  7. In a large bowl, whisk eggs, salt, and garlic powder. 
  8. Pour eggs into muffin tins.
  9. Bake at 350 for 15 minutes or until completely cooked through (a toothpick inserted in the middle of the muffin will come out without runny egg).
  10. Remove and enjoy!

Inspired by this recipe 
0 Comments

Grilled Honey Lime Cilantro Chicken, Sweet Potato, and Brussels Salad

7/10/2017

0 Comments

 
Picture
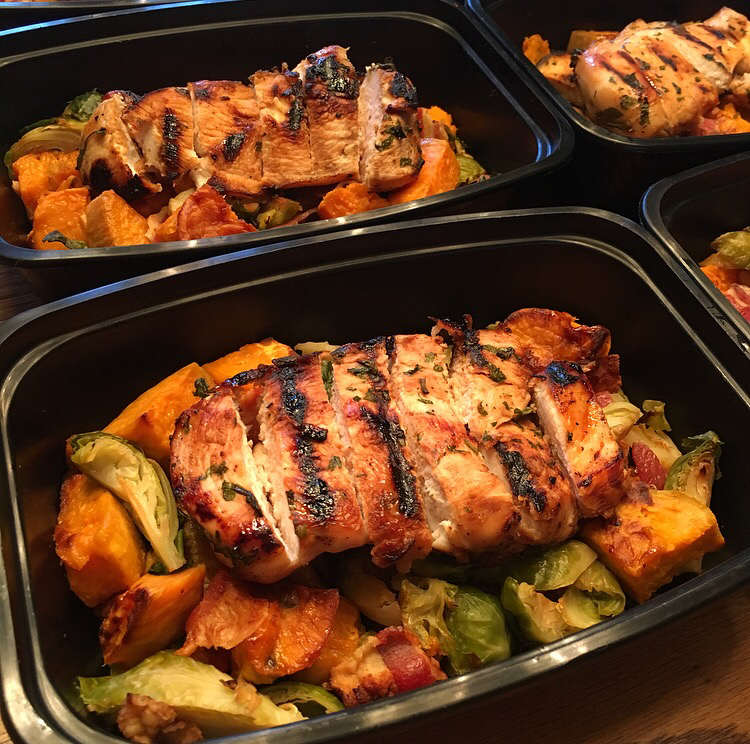
Like the crockpot beef fajitas I made this week, I also prepped this chicken in a Ziploc bag the night before. Simple ingredients and very little preparation for this chicken marinade, so if you can I suggest also prepping the night before. If not, just make sure to let the chicken marinade for three hours before grilling. Since I had a crockpot meal and a grill meal for Sunday meal prep, I did not mind spending some time roasting Brussels and sweet potatoes. I tried to accurately write out the steps I followed to make them, so let me know if anything is confusing. I used two baking sheets to speed up time and cooked the bacon on those two sheets prior to roasting the Brussels and sweet potatoes. This way I was able to roast everything in bacon fat and make them taste even more yummy. That is the best way to roast anything in my opinion! This meal was inspired by this recipe, but clearly a lot different. I personally don't need any sauce to eat roasted sweet potatoes, so I basically just took the idea and added some grilled chicken and Brussels. I loved this grilled honey lime cilantro chicken and thought it paired great with the sweet potatoes. I'm also a huge fan of roasted Brussels (in bacon fat), so this meal was perfect and tasted absolutely delicious. If you give my version or the original recipe a try, let me know if you enjoyed it! 

Grilled Honey Lime Cilantro Chicken 
Ingredients:
  • 2 pounds boneless, skinless chicken breasts, or thighs
  • ¼ cup lime juice (This was juice from 1 lime for me)
  • ½ cup honey
  • 2 Tablespoons Coconut Aminos
  • 1 Tablespoon olive oil
  • 2 garlic cloves, minced
  • ½ cup cilantro, finely chopped
  • ½ teaspoon salt
  • ¼ teaspoon pepper
Directions:
  1. Put chicken in a ziplock bag. In a small bowl combine lime juice, honey, coconut aminos, olive oil, garlic, cilantro, salt and pepper. Pour the sauce over the chicken and seal the bag and let marinade for 3 hours or overnight.
  2. Preheat your grill to medium high heat. Grill each side of the chicken for about 3-4 minutes or until cooked throughout and no longer pink.

Original recipe found here


Roasted Sweet Potatoes and Brussels
Ingredients:
  • 2 lb Brussels, halved
  • 3-5 large sweet potatoes peeled and cut into ½-1 inch cubes 
  • 1-2 tbsp reserved bacon fat, or other cooking fat
  • generous pinch sea salt
  • 6 slices sugar-free bacon 
Directions:
  1. Preheat your oven to 425 degrees F and line two large baking sheets with parchment paper.
  2. Place 3 strips of bacon on each baking sheet and bake in the oven for approximately 10 minutes (or until crisped to your liking).
  3. Remove bacon and set aside. Leave remaining bacon fat on pans.
  4. On one pan, toss halved Brussels in bacon fat and add salt. Spread out in a single layer on the baking sheet and place in oven for 10-12 minutes. Toss Brussels, then put back in the oven for an additional 10-12 minutes. 
  5. On the second baking pan, toss cubed sweet potatoes in bacon fat and add salt. Spread out in a single layer on the baking sheet without overlapping, and place in oven for 20 minutes. Turn or gently toss sweet potatoes, then put back in the oven for an additional 20 minutes, or until soft and lightly browned. (If you have a lot of sweet potatoes you will have to repeat this step with the remaining sweet potatoes, or use the additional Brussels baking sheet once they are done roasting). 
  6. While the potatoes roast, cut the cooked bacon into bite size pieces.
  7. Once the Brussels sprouts and sweet potatoes are done roasting, toss together in large bowl with bacon pieces.
  8. Enjoy!

Inspired by this recipe 
0 Comments

Crockpot Beef Fajitas over Cauli-Fried Rice

7/10/2017

0 Comments

 
Picture
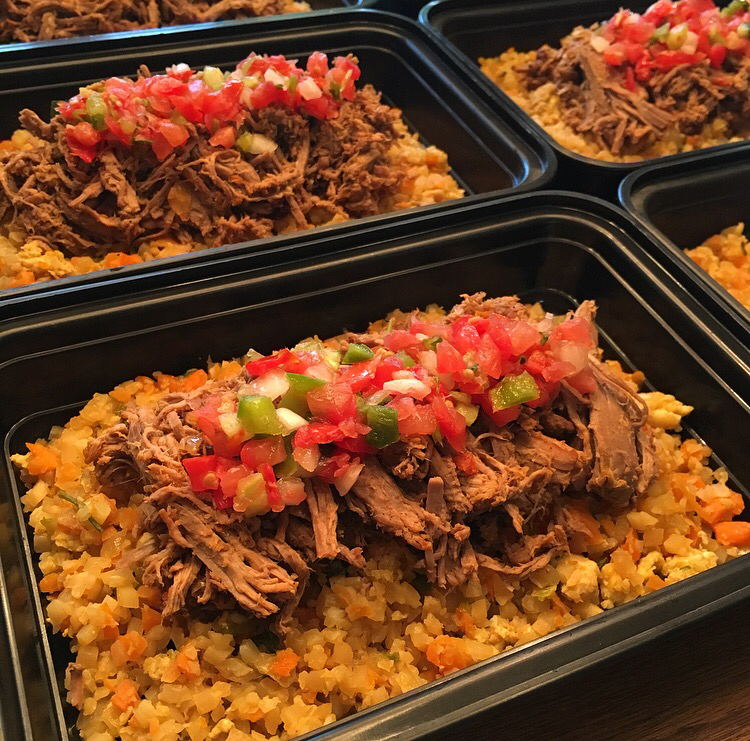
This meal was seriously so amazing! I prepped the crockpot ingredients in a large Ziploc bag the night before, so I could easily throw everything in the crockpot first thing Sunday morning. Of note, I also added a cup and a half of beef broth to the crockpot  before starting it because I thought it needed some more liquid (that was not in the original recipe). I set the beef to slow cook for 8 hours and prepared the cauliflower fried rice later in the day. This is the same cauliflower fried rice I made a few weeks ago and one that I will definitely be making a lot more of! I think it's my new favorite cauliflower rice recipe and it is one my mother has eaten multiple times without any complaints, so that means it must taste great. Once the beef was done, I shredded it and threw as many of the leftover peppers in the crockpot as I could back into the meat. I served over the cauliflower rice and topped with salsa and thought that combination was perfect. I think topping with avocado or guacamole would have also paired great with this. Not only was this meal incredibly simple and easy to prepare, but it turned out so delicious. There is no reason not give this one a try!

Crockpot Beef Fajitas 
Ingredients:
  • 2 lb boneless beef chuck shoulder roast, fat trimmed (I used closer to 3lbs of a Top Round Roast)
  • 2 bell peppers, sliced (I used 3, yellow and orange ones)
  • 1 small onion, peeled and sliced
  • 2 cloves of garlic, minced
  • 1 tablespoon honey
  • The juice from 1 lime OR 1 tablespoon apple cider vinegar (I used the juice from one lime)
  • 1 tablespoon chili powder
  • 2 teaspoons cumin
  • 1 teaspoon paprika
  • 1/4 teaspoon crushed red pepper flakes
  • Optional toppings: Avocado, Guacamole, Salsa
  • Optional: I added 1 1/2 Cup Beef Broth to the crockpot
Directions:
  1. Combine all ingredients in your crockpot and cover with lid.
  2. Cook on “low” setting for 8 hours or until beef shreds easily with a fork.
  3. Serve with paleo tortillas or cauliflower rice and top with avocado, guacamole, or salsa. 

Original recipe found here


Paleo Cauliflower Fried Rice 
Ingredients:
  • 1 large onion, diced
  • 1 1/2 cup carrots, diced
  • 2 tablespoons coconut oil
  • 1 teaspoon salt
  • 1 1/2 teaspoons ground ginger (adjust to taste)
  • 1 teaspoon garlic powder
  • 1 large cauliflower, grated (I used two 12 oz bags of frozen cauliflower rice)
  • 1/2 cup coconut aminos
  • 2 eggs, scrambled
  • 1/2 cup diced green onions
Directions:
  1. In a large pan, cook the onion and carrots in the coconut oil until soft. About 7-9 minutes.
  2. Season with salt, ginger, and garlic.
  3. Once the carrots are tender, add the cauliflower and coconut aminos.
  4. Stir to evenly coat the cauliflower and cook for about 5 minutes.
  5. Push the mixture to one side of the pan and add the scrambled eggs. Stir until cooked, then mix in.
  6. Add the green onion, take off the heat, and serve.

Original recipe found here
0 Comments
<<Previous
    Picture

    Erika Copeland

    Sharing the recipes I prepare to help others eat more nutritious food and begin their journey to a healthier life.

    Instagram

    categories

    All
    AIP
    Beef
    Breakfast
    Brussels
    Burgers
    Casserole
    Cauliflower Rice
    Chicken
    Crockpot
    Kombucha
    Low FODMAP
    Meal Prep Tips
    Nutrition Blog
    Pork
    Pressure Cooker
    Quiche
    Sausage
    Shrimp
    Snacks
    Steak
    Sweet Potatoes
    Treats
    Tuna
    Turkey
    Vegan
    Video
    Whole30

    Archives

    December 2021
    November 2021
    September 2021
    August 2021
    July 2021
    June 2021
    May 2021
    April 2021
    March 2021
    February 2021
    January 2021
    December 2020
    November 2020
    September 2020
    August 2020
    July 2020
    June 2020
    May 2020
    April 2020
    March 2020
    February 2020
    January 2020
    December 2019
    November 2019
    October 2019
    September 2019
    August 2019
    July 2019
    June 2019
    May 2019
    April 2019
    March 2019
    February 2019
    January 2019
    December 2018
    November 2018
    October 2018
    September 2018
    August 2018
    July 2018
    June 2018
    May 2018
    April 2018
    March 2018
    February 2018
    January 2018
    December 2017
    November 2017
    October 2017
    September 2017
    August 2017
    July 2017
    June 2017
    May 2017
    April 2017
    March 2017
    February 2017
    January 2017
    December 2016
    November 2016
    October 2016
    September 2016
    August 2016
    July 2016
    June 2016
    May 2016
    April 2016
    March 2016
    February 2016
    January 2016

Powered by Create your own unique website with customizable templates.
  • Home
  • All Recipes
  • Goal
  • About
  • FAQ
  • Contact