LiveSqueezy
  • Home
  • All Recipes
  • Goal
  • About
  • FAQ
  • Contact

Blueberry Banana Overnight Oats

3/25/2019

0 Comments

 
Picture
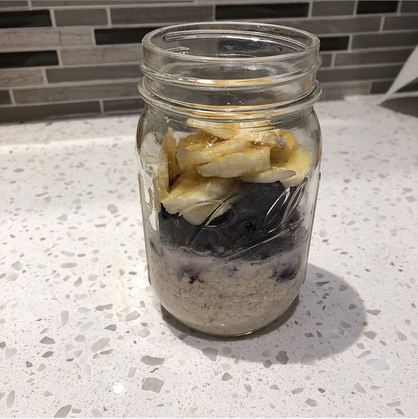
I've been meaning to post about this one for a while now! I typically eat oatmeal for breakfast everyday, but there are times where I need to eat it on-the-go or at a super early time in the morning, and that's when these overnight oats really come in handy. To get more protein in with this meal I always add in at least a 1/2 scoop of protein powder in with my dry ingredients before mixing in my coconut milk. If you skip that option, then I do recommend pairing this with some type of protein in the morning or adding Greek Y\yogurt to your oats! I personally like to add Trader Joe's salted almond butter and sometimes the whole banana, but that is just what I prefer. You can add whatever you enjoy to this mix - berries/fruit, seeds/nuts, cinnamon, etc. - and you can either eat it cold or heat it up in the morning if you prefer. For those who have a hard time prepping or eating breakfast in general, I recommend giving these overnight oats a try! It is extremely quick and easy to throw this breakfast together the night before, plus a perfect option for the busy person! It's awesome to have a delicious breakfast already prepared and ready to grab-and-go in the morning. Start your day right with these blueberry banana overnight oats and let me know how you like it!

​Blueberry Banana Overnight Oats
​Ingredients:
  • 1/2 cup GF oats
  • 1/2 cup coconut/almond milk
  • 1/2 teaspoon vanilla
  • 1/2 cup blueberries
  • 1/2 banana, sliced
  • 1 teaspoon chia or flax seeds (optional)
  • 1 teaspoon honey (optional)
  • 1-2 Tbsp nut butter (optional)
  • 1/2 - 1 scoop protein powder* (optional, can also add Greek Yogurt instead)
Directions:
  1. Add GF oats to your container of choice and pour in milk* and vanilla.
  2. Add a layer of blueberries and then a layer of banana slices.
  3. Top with seeds, drizzle of honey, and/or nut butter, if desired.
  4. Place in fridge and enjoy in the morning or a few hours later!
Notes:
*If adding a scoop of protein powder, blend with dry mix before adding liquid. Alternatively, you can also mix protein powder in a shaker bottle with milk before adding to the container. 

Original recipe found here
0 Comments

Turmeric Chicken Curry over Cauli Rice

3/18/2019

0 Comments

 
Picture
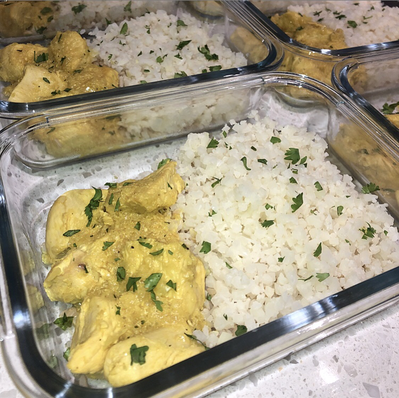
A non-Instant Pot recipe that is still really simple and done completely in one-pot! The only prep I did was dice the onions and cube the chicken breasts. Other then that I bought some frozen cauliflower rice and swapped in ground ginger for the fresh grated ginger since I still don't have a small grater for that. Not only was this meal super easy to whip together, but it was also a big hit in my house! In fact, I will probably throw it into the rotation of repeated meal prep recipes going forward, it was that delicious! I did slightly change the original recipe by combining the ½ cup coconut milk and ½ cup coconut cream, and just used 1 can of full fat coconut milk. Also, since this meal had plenty of extra sauce, I just heated up the cauliflower rice plain, as-is and skipped over sauteing it. If you need those added fats though, definitely still saute the rice - it will also only provide more flavor, which this meal does not lack whatsoever! This truly was a comforting and delicious meal that I recommend everyone giving a try!

Turmeric Chicken Curry 
Ingredients:

For the cauliflower rice
  • 2 Tbsp Coconut Oil
  • 16 oz. (about 3 ¾ cups) Riced Cauliflower
  • ½ tsp sea salt
For the chicken curry
  • 2 Tbsp Coconut Oil
  • 1 white onion, diced
  • 1-inch ginger, grated (I used ½ tsp ground ginger instead)
  • 2 cloves garlic, chopped
  • 2 lb. chicken breast, cubed
  • 1 can full fat coconut milk
  • 2 tbsp coconut aminos
  • Juice of half a lime (reserve the other half to serve)
  • 1 tsp sea salt
  • ½ tsp turmeric powder
  • ¼ tsp black pepper (omit for AIP)
  • 2 tbsp fresh cilantro, chopped (for garnishing)
Directions:
For the cauliflower rice
  1. Using a large deep pan, melt the coconut oil on medium heat. Add the cauliflower rice and lightly salt. Sauté for about 6-8 minutes or until tender. Set aside to serve with chicken curry.
For the chicken curry
  1. Using a large pan, melt the coconut oil on medium heat. Add the diced onion, ginger, and garlic and sauté for 3-4 minutes or until the onion is translucent. Remove from the pan and set aside, reserving the coconut oil in the pan.
  2. Add the chicken to the pan and lightly salt. Sauté until the internal temperature reads 165 F.
  3. Add the onion back to the pan along with the coconut milk, coconut cream, coconut aminos, lime juice, and seasonings to the pan (reserving the fresh cilantro) and stir. Simmer and stir for about 5 minutes to allow the flavors to combine and the sauce the thicken.
  4. Season further to taste and top with fresh cilantro and lime wedges. Serve with cauliflower rice and enjoy!

Original recipe found here
0 Comments

​Homemade BBQ Pulled Chicken

3/11/2019

1 Comment

 
Another video of one of my go-to Instant Pot recipes! When I first started meal prepping paleo recipes over six years ago, my biggest problem was how do I eliminate all these delicious sauces!? BBQ, honey mustard, ketchup... do I really need to purchase an expensive paleo sauce every time I want a healthier version of these? Eventually I found that this was not the case whatsoever, but instead I could make my own versions pretty easily. However, I have tried my fair share at making my own BBQ sauces, and most involve a blender and a lot of ingredients. After discovering this recipe below though, I have never attempted making a different one. This BBQ chicken recipe is SO simple and I always have these ingredients stocked just in case I need to whip up something quick for meal prep. When purchasing apple butter, balsamic vinegar, and blackstrap molasses, check the ingredients listed on the label! There should NOT be any added sugars or coloring whatsoever. Take the time to look at the different brands and labels on the shelf. Trust me, there is always one or two that are far more superior then the rest 😊. If you checked out the video by now you should already know that prepping and making this BBQ Pulled Chicken is easy peasy. I have also experimented with pouring the sauce in at the beginning (instead of water) and letting the chicken cook in the sauce. This is a perfectly fine option to do as well, but I do think pouring it over at the end provides more flavor. You also may have noticed that I used over 5lbs of chicken in the video, which typically means I'll increase the sauce ingredients some as well - just depends on how saucey you like it. Let me know if you give this one a try and how you like it!

​Homemade BBQ Pulled Chicken
Ingredients:
  • 3 pounds boneless, skinless chicken thighs (I used chicken breasts)
  • ½ teaspoon sea salt
  • ½ teaspoon garlic powder
  • ½ cup water
  • ½ cup apple butter, with no sweetener added (check ingredient label! I found this Tap 'n Apple at the generic local grocery store)
  • ½ cup balsamic vinegar
  • 2 tablespoons blackstrap molasses
  • 2 teaspoons garlic powder
  • 2 teaspoons ground ginger
  • 2 teaspoons sea salt
Directions:
  1. Add the chicken, salt, granulated garlic, and water in the Instant Pot®.
  2. Close and lock the lid. Press MANUAL for high pressure. Set cooking time to 25 minutes. Once the time is up, quick release the pressure (using the instructions on page 7).
  3. Pour out as much water/broth as you can. Reserve the broth for future soup making, if desired.
  4. Whisk the apple butter, balsamic, molasses, garlic, ginger, and salt together. Pour over cooked chicken with remaining juice.
  5. Press the SAUTÉ button on the Instant Pot®. Let the chicken and sauce simmer to evaporate some of the juices. Once some of the liquid has evaporated, CANCEL the sauté function. Shred the chicken, if desired, before serving.

Original recipe found here
1 Comment

Instant Pot Zucchini Bolognese

3/4/2019

0 Comments

 
Picture
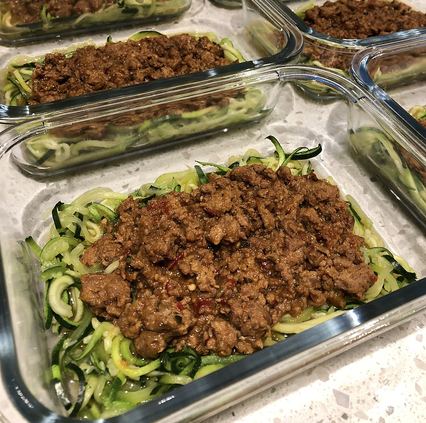
This one is a Nom Nom Paleo recipe, and as always, did not disappoint in the least bit! I actually had this one saved for a while now and finally decided it was time to try it out. I mean I preach that variety is key to getting more nutrients, but I've been eating cauliflower rice, broccoli, and chicken way too much these days. Anyways, this meal was a TASTY one to mix my meal prep up with! Before you read the Magic Mushroom Powder ingredient below and write this one off, let me throw it out there that I did not use that ingredient, nor did I go out and purchase it (although I am intrigued and love mushrooms and will probably check it out in the future). Instead, the recipe suggests using salt and adding a few drops of fish sauce, which is what I did. I'm sure you can even leave out the fish sauce though and still enjoy this meal. I mean I forgot to get a lemon, so I left that out and didn't think it drastically made a difference to the recipe. Just saying. Also, instead of the diced 1½ pounds zucchini, I grabbed a frozen bag of Wegman's Grilled Vegetables since that mix had some zucchini in it and plenty of other vegetables (eggplant, zucchini, red and yellow peppers, and onions) to add to the meal. I threw these into the food processor to dice up real tiny so that Robbie and my mom would never know they were eating all these amazing vegetables. My last note on this recipe is that I ended up getting closer to 6 lbs of sausage, 2 onions, 2 lbs of diced zucchini (really the Wegman's Grilled Veggies that I just mentioned), and then 8-10 zucchini's to spiralize and serve the meal with. That put my serving size at 24 instead of the 4 servings you get below. If that info helps you let me know and I'll start adding that to my write ups more! Also, I lied, I have one more note... If you don't have a spiralizer you can purchase some freshly pre-made zucchini noodles in the produce aisle or check out the frozen section for some (Green Giant Veggie Spirals® Zucchini is a great option and Trader Joe's also has one). The two spiralizers that I own are the Veggetti (really only usable for Zucchini though) and this 5-Blade Vegetable Slicer (great for all vegetables, including potatoes). Really simple to make your own vegetable noodles and WAY cheaper then buying them pre-made. Alright that is all. I clearly enjoyed this one a lot since I wrote so much detail about it. Like I said in the beginning though, I had this one saved for a while and I don't know why I didn't try it earlier. Just trying to convince you to do the same! Enjoy 😋

Instant Pot Zucchini Bolognese
Ingredients:
  • 2 tablespoons extra virgin olive oil or avocado oil
  • 1 large yellow onion, diced
  • 1 pound bulk Italian sausage
  • 1½ pounds zucchini, diced into ½-inch pieces
  • 3 garlic cloves, minced
  • Magic Mushroom Powder or Diamond Crystal brand kosher salt (with added umami boosters detailed in the instructions)
  • Juice from ½ lemon
Directions:
  1. Grab your Instant Pot or pressure cooker and turn on the Sauté function. When the metal insert is hot, pour in the olive oil.
  2. Toss in the diced onions and cook, stirring frequently, for 2 to 3 minutes or until slightly softened.
  3. Add the Italian sausage and break it up with a silicone spatula. Cook the sausage until it’s no longer pink.
  4. Dump in the zucchini, minced garlic, and 1 teaspoon of Magic Mushroom Powder or Diamond Crystal brand kosher salt. (The salt won’t add extra umami, so you may want to add a few drops of fish sauce or a couple of dried mushrooms to the pot for extra savoriness.) Stir well.
  5. You don’t need to add any extra liquid. Trust me—the zucchini will release enough liquid for the contents to reach high pressure. Lock the lid and program the Instant Pot to cook for 35 minutes under high pressure.
  6. When the sauce is done cooking, you can wait for the pressure to release naturally or you can manually vent it if you’re impatient.
  7. The zucchini and onions should be fork-tender and easily mashed with a spatula to form a chunky sauce.
  8. Taste the sauce and adjust the seasoning with additional Magic Mushroom Powder, salt, or freshly ground pepper. Stir in the juice from half a lemon and taste it again. (Always, always, ALWAYS taste your food and season accordingly!)
  9. When the sauce is ready, grab a spiralizer to prepare some zucchini noodles (or grab some ready-to-go spiralized veggies at the store). If I’m serving this sauce on zoodles, I drop the raw spiralized zucchini straight into the pot and toss ’em around until the hot sauce softens the zoodles to my liking.
  10. Top with your favorite herbs and dig in! This sauce freezes really well so make a batch whenever your vegetable crisper is overflowing with zucchini!

Original recipe found here
0 Comments
    Picture

    Erika Copeland

    Sharing the recipes I prepare to help others eat more nutritious food and begin their journey to a healthier life.

    Instagram

    categories

    All
    AIP
    Beef
    Breakfast
    Brussels
    Burgers
    Casserole
    Cauliflower Rice
    Chicken
    Crockpot
    Kombucha
    Low FODMAP
    Meal Prep Tips
    Nutrition Blog
    Pork
    Pressure Cooker
    Quiche
    Sausage
    Shrimp
    Snacks
    Steak
    Sweet Potatoes
    Treats
    Tuna
    Turkey
    Vegan
    Video
    Whole30

    Archives

    December 2021
    November 2021
    September 2021
    August 2021
    July 2021
    June 2021
    May 2021
    April 2021
    March 2021
    February 2021
    January 2021
    December 2020
    November 2020
    September 2020
    August 2020
    July 2020
    June 2020
    May 2020
    April 2020
    March 2020
    February 2020
    January 2020
    December 2019
    November 2019
    October 2019
    September 2019
    August 2019
    July 2019
    June 2019
    May 2019
    April 2019
    March 2019
    February 2019
    January 2019
    December 2018
    November 2018
    October 2018
    September 2018
    August 2018
    July 2018
    June 2018
    May 2018
    April 2018
    March 2018
    February 2018
    January 2018
    December 2017
    November 2017
    October 2017
    September 2017
    August 2017
    July 2017
    June 2017
    May 2017
    April 2017
    March 2017
    February 2017
    January 2017
    December 2016
    November 2016
    October 2016
    September 2016
    August 2016
    July 2016
    June 2016
    May 2016
    April 2016
    March 2016
    February 2016
    January 2016

Powered by Create your own unique website with customizable templates.
  • Home
  • All Recipes
  • Goal
  • About
  • FAQ
  • Contact