LiveSqueezy
  • Home
  • All Recipes
  • Goal
  • About
  • FAQ
  • Contact

Fail-Proof, AIP Recipe with Ground Turkey

11/30/2020

0 Comments

 
Picture
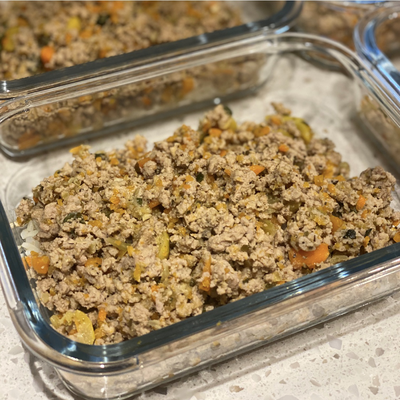
This was a very comforting, chicken-noodle tasting kind of recipe! The original recipe calls for ground beef, but I used ground turkey instead as we navigate an elimination diet in our house. The recipe also calls for making this on the stovetop, however since I significantly increase serving size and ingredients I opted for making this in the Instant Pot on the sauté mode. Six pounds of ground turkey is not getting cooked in one or even two batches on the stovetop. I definitely encourage using the food processor to thinly chop the vegetables as it saves you time chopping them yourself and they will cook faster. Plus, everything tastes better bite-size, in my opinion! This is how you can sneak more vegetables into your kids and family member's lives who don't enjoy eating their veggies. Anyways, I scaled back the broth some but kept the ingredient amounts the same for everything else.  We really enjoyed this meal all week long and like I mentioned before, it reminded us of a chicken noodle soup. If you're experimenting with an elimination diet or just trying to get back to eating whole foods then this is a great recipe for you! 

Fail-Proof, AIP Recipe with Ground Turkey (Paleo, GF, DF)
Ingredients:
  • 2 Tbsp Extra Virgin Olive Oil
  • 1/2 White Onion  
  • 2 Bay Leaves  
  • 3 Large Carrots  
  • 3 Stalks of Celery  
  • 2 Zucchini  
  • 1.5 lbs Grass Fed Ground Beef (I used Ground Turkey instead)
  • 2 cups of Bone Broth  
  • 1 tsp Himalayan Salt  
  • 1 Tbsp Dried Italian Herbs
Directions:
  1. Shred all the vegetables (except for the onion) in a food processor (if you don’t have one, you can use a blender or do it manually with a grater) and set aside.
  2. Heat up the olive oil in a large pan, thinly chop the onion and throw it in the pan to make a soffritto, letting the onion sizzle until soft.
  3. Add in the shredded vegetables, together with one cup of bone broth and the 2 Bay leaves and let cook for 20 minutes with the lid on.
  4. Add in the ground beef, mix well and add more broth as needed, together with salt and dried herbs.
  5. Cook with the lid on, on low heat for 1 hour and 40 minutes. Remove the Bay leaves and enjoy!

Note:
For a quicker version of this AIP recipe with ground beef, add less broth and cook on higher heat for 30 minutes after you add in the beef.

​Original recipe found here
0 Comments

Cowboy Butter Chicken with Zucchini Noodles

11/16/2020

0 Comments

 
Picture
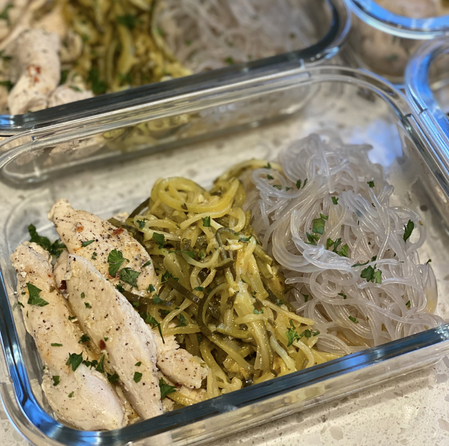
Apparently cowboy butter is a thing? I never knew, but I am glad I gave this recipe a try! Super light tasting and packed with all the flavor. It was a refreshing change to the typical meal prep recipes I try out too. This is a 15 minute one-skillet recipe once you have all your ingredients prepped and ready to go. I ended up doing 4 batches of this recipe though, so this took a little longer for me. If you don't own a sprializer or are short on time then you can almost always find pre-spiralized zucchini at the grocery store. I ended up spiralizing mine the night before and that actually allowed me to drain out the excessive water a little better. I also paired this with some sweet potato glass noodles to get my carb source in and I loved that combo. Even if you don't try this for meal prep this is definitely a great recipe to have on hand for a quick meal to whip up. I'll definitely be saving this one to make again soon. 

Cowboy Butter Chicken with Zucchini Noodles
Ingredients:
  • 3 chicken breasts, skinless and boneless, cut into strips
  • 3 or 4 medium zucchinis
  • 4 tablespoons ghee, divided (or grass-fed butter)
  • Juice and zest of half a lemon
  • 4 cloves garlic, minced
  • 1 tablespoon Dijon mustard
  • Pinch of cayenne pepper
  • 1/4 teaspoon paprika
  • 1/4 cup (60ml) low-sodium chicken broth
  • 1 tablespoon Frank's Red Hot Original hot sauce 
  • 2 tablespoon fresh chopped parsley
  • 1 tablespoon freshly chopped chives
  • 2 teaspoons minced thyme
  • 1/4 teaspoon crushed red pepper flakes
  • Salt and freshly ground black pepper
  • Lemon slices, for garnish
Directions:
  1. In a large bowl or shallow plate, season and combine chicken strips with salt, and pepper. Set aside.
  2. Wash and trim the ends of the zucchini. Make the zucchini noodles using a spiralizer or a julienne peeler. Set aside in a salad bowl.
  3. Heat 1 tablespoon butter in a large skillet over medium-high heat. Once melted, add the chicken strips in one layer and cook for one minute without stirring.
  4. Add minced garlic, and red chili pepper flakes then stir up the chicken strips to cook on the other side for a couple of minutes, until almost cooked through. Remove from the skillet and set aside to a plate. Make sure not to overcook chicken at this time – otherwise, it could dry up.
  5. In the same skillet, melt 3 remaining tablespoons butter, then stir in lemon juice and zest, Dijon mustard, hot sauce, cayenne, paprika, and chicken broth. Bring to a simmer and allow to reduce for 2-3 minutes, stirring regularly.
  6. Stir in the fresh parsley, chopped chives, and minced thyme, then add the zucchini noodles and toss for 2 or 3 minutes, until zucchini are cooked through and the sauce has reduced a bit (zucchini will render some water). Return the cooked chicken strips back to the pan and cook for another minute. Serve your cowboy butter chicken with zucchini noodles immediately, garnished with more herbs, red chili pepper flakes, and lemon slices. Enjoy!
Notes:
  1. Zucchini tends to render a lot of water when cooking, so you can sprinkle with salt after spiralizing and allow to sit for a couple of minutes to take off excess water. Rinse well to get rid of salt and drain thoroughly in a colander before cooking.
  2. You can buy pre-spiralized zucchini and sliced chicken breast in your grocery store, prepping will be even faster!

Original recipe found here
0 Comments

Chunky Monkey Paleo Banana Cookies

11/9/2020

0 Comments

 
Picture
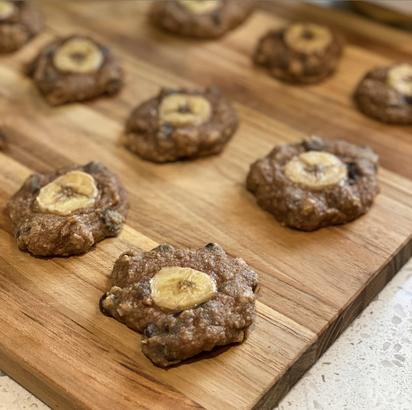
Technically you can eat these for breakfast, so I am totally passing this as a meal prep recipe. These turned out so delicious and are probably my new favorite paleo cookie! I typically just enjoy the classic chocolate chip, but the walnut, coconut, raisin, banana, and dark chocolate combo is on point. Not to mention this was an extremely easy recipe to whip up and the ingredients are simple. These made about 18 cookies for me and took the full 18 minutes, which I might even stretch to 20 next time. I took most of these to a friends house to enjoy, and the rest didn't make it to the next day. Will definitely be making these many more times! 

Chunky Monkey Paleo Banana Cookies
Ingredients:
  • 2 medium ripe bananas, sliced (+ slices for topping, optional)
  • 1/2 cup almond butter (can sub peanut butter if not paleo)
  • 1/4 cup water
  • 1 tablespoon vanilla extract
  • 1 cup almond flour
  • 1 teaspoon baking powder
  • 1 teaspoon cinnamon
  • 1/2 teaspoon salt
  • 1/4 cup dark chocolate chips
  • 1/4 cup chopped walnuts
  • 1/4 cup coconut
  • 1/4 cup raisins
Directions:
  1. Preheat your oven to 350 degrees. Line 2 baking sheets with parchment paper.
  2. Add the banana slices, almond butter, water, and vanilla to a large bowl and beat with electric beaters until mostly smooth. Add the almond flour, baking powder, cinnamon, and salt and beat until combined. Fold in the chocolate chips, walnuts, coconut, and raisins.
  3. Drop the dough (it will be sticky) into 12 equal mounds on the baking sheets. Press a banana slice into the top of each cookie to flatten it out a little.
  4. Bake for 16-18 minutes, or until the bottoms are golden then remove the cookies from the oven and let them cool.

Original recipe found here
0 Comments

Paleo Chicken Burrito Bowls

11/2/2020

0 Comments

 
Picture
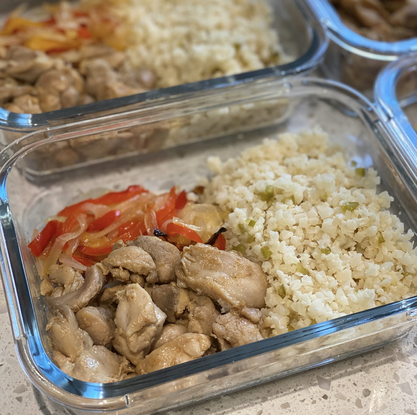
Don't let this plain picture fool you! This meal was seriously packed with SO much flavor. Top with some salsa and guacamole or avocado and you've got yourself a real delicious burrito bowl. Now I will admit that if you have to quadruple the recipe like I did, then meal prep just got a little longer. I had to do a ton of slicing and dicing, then cooked the chicken in four batches. If you can get pre-sliced peppers and onions then that always helps speed meal prep up a bit. I also opted for not making the homemade guacamole, but if you have the time definitely go for it. I especially loved the cauliflower rice recipe too! It is packed with so much flavor and was different then any recipe I have tried before. Even if you don't make this exact recipe the cauliflower rice portion is worth saving and trying out. Overall, a super delicious meal and recipe grabbed from the The Paleo Running Momma blog! 

Paleo Chicken Burrito Bowls
Ingredients:

chicken:
  • 1 1/2 lbs boneless skinless chicken thighs
  • 1 Tbsp coconut oil ghee, or avocado oil
  • 3/4 tsp sea salt
  • 1 tsp onion powder
  • 1 tsp garlic powder
  • 1 tsp cumin
  • 1 1/2 tsp chili powder
  • Large pinch Chipotle powder or more, to taste
  • Juice of 2 limes
cauliflower rice:
  • 1 lb cauliflower rice I purchased this pre-"riced”
  • 1 Tbsp coconut oil ghee, or avocado oil
  • 3/4 tsp sea salt
  • 1-2 Tbsp fresh lime juice
  • 1 jalapeño pepper minced
  • 3/4 tsp onion powder
  • 3/4 tsp garlic powder
  • Dash chipotle powder
peppers and onions:
  • 1 large onion sliced thin
  • 1 large red bell pepper sliced thin
  • 1 Tbsp coconut oil or other cooking fat
  • sea salt to taste
guacamole:
  • 2 avocados
  • 1/4 cup onion minced
  • 2 clove garlic minced
  • 1 jalapeno pepper minced
  • 2 Tbsp Tbsp fresh lime juice or to taste
  • 2 Tbsp chopped fresh cilantro plus more for garnish
  • Sea salt to taste
optional toppings:
  • Salsa, fresh herbs, sliced jalapeño
Directions:
for the rice:
  1. Heat a large skillet over medium heat and add oil or ghee. Add the riced cauliflower and stir to coat. Cover skillet and cook for about 2-3 minutes to steam.
  2. Uncover and stir, then add the jalapeño, salt, seasonings and lime juice. Cook and stir another minute or two uncovered until you have desired texture, then remove from heat and set aside.
for chicken, peppers & onions:
  1. Cut chicken thighs into bites size pieces. Season all over with all seasonings (not the lime) and heat a large skillet over medium high heat (you can move the rice to a bowl and use the same one) and add 1 Tbsp cooking fat.
  2. Add chicken and brown all over, stirring as needed. Stir and cook over medium/medium high heat for 7 mins or until cooked through. Lower heat a bit and add the lime juice, stir and continue to cook another 2-3 minutes, then remove from heat and place in a bowl.
  3. Keep the heat on medium and add another Tbsp fat to the skillet. Add peppers and onions and stir to coat with fat. Sprinkle with a bit of sea salt to taste, and continue to cook, stirring occasionally, about 5 minutes or until softened and browning, then remove from heat.
  4. To make the guacamole, mash together the avocado with the rest of the ingredients, adjusting seasonings to taste.
assemble bowls:
  1. Layer the cauli rice, chicken, peppers and onions in bowls, then top with guac and any other desired toppings. Serve right away and enjoy!

Original recipe found here
0 Comments
    Picture

    Erika Copeland

    Sharing the recipes I prepare to help others eat more nutritious food and begin their journey to a healthier life.

    Instagram

    categories

    All
    AIP
    Beef
    Breakfast
    Brussels
    Burgers
    Casserole
    Cauliflower Rice
    Chicken
    Crockpot
    Kombucha
    Low FODMAP
    Meal Prep Tips
    Nutrition Blog
    Pork
    Pressure Cooker
    Quiche
    Sausage
    Shrimp
    Snacks
    Steak
    Sweet Potatoes
    Treats
    Tuna
    Turkey
    Vegan
    Video
    Whole30

    Archives

    December 2021
    November 2021
    September 2021
    August 2021
    July 2021
    June 2021
    May 2021
    April 2021
    March 2021
    February 2021
    January 2021
    December 2020
    November 2020
    September 2020
    August 2020
    July 2020
    June 2020
    May 2020
    April 2020
    March 2020
    February 2020
    January 2020
    December 2019
    November 2019
    October 2019
    September 2019
    August 2019
    July 2019
    June 2019
    May 2019
    April 2019
    March 2019
    February 2019
    January 2019
    December 2018
    November 2018
    October 2018
    September 2018
    August 2018
    July 2018
    June 2018
    May 2018
    April 2018
    March 2018
    February 2018
    January 2018
    December 2017
    November 2017
    October 2017
    September 2017
    August 2017
    July 2017
    June 2017
    May 2017
    April 2017
    March 2017
    February 2017
    January 2017
    December 2016
    November 2016
    October 2016
    September 2016
    August 2016
    July 2016
    June 2016
    May 2016
    April 2016
    March 2016
    February 2016
    January 2016

Powered by Create your own unique website with customizable templates.
  • Home
  • All Recipes
  • Goal
  • About
  • FAQ
  • Contact