LiveSqueezy
  • Home
  • All Recipes
  • Goal
  • About
  • FAQ
  • Contact

Spicy Tuna Cakes

4/23/2018

0 Comments

 
Picture
A Nom Nom Paleo recipe! My sister has made this a couple times and loved it, so she suggested I make it for our mom too. This batch ended up making me 14 muffins, and after talking with my sister we both agreed that the extra 1/3 cup of sweet potato was definitely too much. Other then that though, this recipe as-is turned out pretty tasty! Since I didn't actually eat this though, I am going off my sister's opinion, who doesn't even like sweet potatoes, and my picky mom who devoured these every morning without complaint despite the visible "green things." Anyways though, I asked my sister for her review, and this is what she had to say... "The tuna cakes were the perfect lunch. They were easy to make and they had a sweet-spicy combination. I am not a fan of sweet potatoes at all, but in this recipe they were the perfect combination with the tuna." Let me know if you give them a try and what you think! 

​Spicy Tuna Cakes
Ingredients:
  • 3 tablespoons melted ghee, divided
  • 10 ounces canned albacore tuna packed in water, drained
  • 3 scallions, thinly sliced (about ⅓ cup)
  • 2 tablespoons finely minced fresh cilantro
  • 1⅓ cup mashed baked sweet potato
  • finely grated zest from ½ medium lemon
  • 1 tablespoon minced jalapeño pepper
  • 2 large eggs
  • ½ teaspoon red pepper flakes
  • Kosher salt
  • Freshly ground black pepper
  • 3 medium lemons, cut into wedges (optional)
Directions:
  1. Preheat the oven to 350°F, and use a brush to grease a 12-cup regular sized muffin tin with one tablespoon of melted ghee. (Or skip this part and just line the tin with parchment muffin liners!)
  2. In a large bowl, mix together the tuna, scallions, and cilantro. Add the mashed sweet potato to the tuna mixture, and gently combine.
  3. Then, mix in the lemon zest, jalapeño, the remaining two tablespoons of ghee, eggs, and red pepper flakes. Season with salt and pepper to taste. I normally use 1½ teaspoons of Diamond Crystal brand kosher salt, but your taste may vary. (Not sure if you’ve added enough S&P? Take a small portion and fry up a little pancake to see if the seasoning is right!)
  4. Use your hands to mix everything together because that way you can make sure that the fish chunks aren’t overly broken up.
  5. Scoop a ¼ cup of the mixture into each greased muffin tin cup and flatten with the back of a spoon.
  6. Bake the tuna cakes for 20-25 minutes or until an inserted toothpick comes out cleanly.
  7. Transfer the cakes to a wire rack to cool. The easiest way I’ve found to get them out is to put the wire rack on top of the muffin tin, flip everything upside-down, and tap them gently on the counter. 
  8. Grab a lemon wedge and squeeze some juice on your tuna cake before your pop it in your mouth. They’re fantastic right out of the oven. Alternatively, store them in the fridge in a air-tight container for up to four days, and when you’re ready to eat, skillet-fry the cakes in some melted fat over medium heat. Crisp the edges, and you’re good to go.

Original recipe found here
0 Comments

​Easy Baked Chicken Breasts with Roasted Spiced Sweet Potatoes

4/23/2018

0 Comments

 
Picture
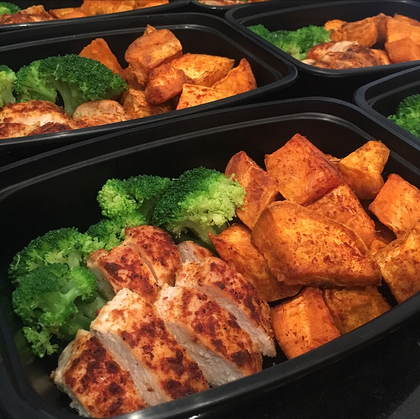
I haven't made roasted sweet potatoes in a long time, mainly because I have to roast A LOT of sweet potatoes to get my desired 8 oz in each meal, but I was craving them and decided it was time to make them again. Since the roasted sweet potatoes were the deciding factor for this meal, I found an incredibly easy and delicious baked chicken to pair with it! The only spices I threw on the sweet potatoes were salt and paprika, and since I did that I also threw some paprika on the chicken as well. Of note, if you increase the chicken amount make sure to increase the spice amount too. Rookie mistake on my part and I came across some bites that were definitely less spiced then others. I'd actually just recommend increasing the spice amount anyways to make sure the chicken turns out tasty. Overall, this meal was simple to throw together with very limited ingredients, which always makes for a great meal prep!  

Easy Baked Chicken Breasts 
​Ingredients:
  • 4 boneless, skinless chicken breasts
  • 2 tablespoons Extra Virgin Olive Oil
  • 1 teaspoon kosher salt
  • 1/2 teaspoon black pepper
  • 1/2 teaspoon garlic powder
  • 1/2 teaspoon onion powder
  • 1/2 teaspoon chili powder
Directions:
  1. Preheat oven to 450 degrees. Pound chicken breasts lightly so they are of even thickness.
  2. Pour olive oil in a 13" x 9" baking dish. Lightly dredge the chicken through to coat it, then place chicken breasts side by side in the dish.
  3. In a small bowl, whisk together salt, pepper, garlic powder, onion powder and chili powder. Sprinkle the seasoning mixture over both sides of the chicken and rub it in with your hands. Place chicken breasts side by side, making sure there is no overlap.
  4. Bake in a preheated oven for 15-20 minutes, until juices are clear or a meat thermometer reads 160-170 degrees. *Note - depending on the size of your chicken breasts, it could take longer. Mine were pounded to less than an inch thick.
  5. Cover with foil and allow to rest for 5-10 minutes while the juices settle before slicing.
  6. Serve hot.

Original recipe found here


My Roasted Sweet Potatoes
Ingredients:
  • 4-6 Sweet Potatoes (Depending on how much you want to make. 5 medium sized sweet potatoes usually gets me 6 oz of sweet potato fries for 6 meals. I think my idea of medium sized is bigger than most though.)
  • Olive oil spray
  • Sea salt (I actually use Garlic Sea Salt on everything I cook)
  • Optional: Cinnamon, Paprika, any other Spices
Directions:
  1. Preheat oven to 425 degrees
  2. Skin and cut the sweet potatoes into whatever shape you want. I either do fries, wedges or circles.
  3. Spray baking pan with olive oil. Lay down sweet potato fries flat (please do not just dump a pile on the pan).
  4. I fill my Misto with olive oil and lightly spray the fries, then add some sea salt (sometimes cinnamon too).
  5. Bake for 15-20 minutes. Take out of the oven and move them around or flip them over. Bake for another 15-20 minutes.
  6. Keep an eye on them, if they are thin bake for less time, and vice versa. Key is to move them around or flip them over half way through baking them. I usually make mine thicker, so I bake them for at least a total of 40 minutes.
0 Comments

Paleo Sweet Potato Blueberry Breakfast Bars

4/23/2018

0 Comments

 
Picture
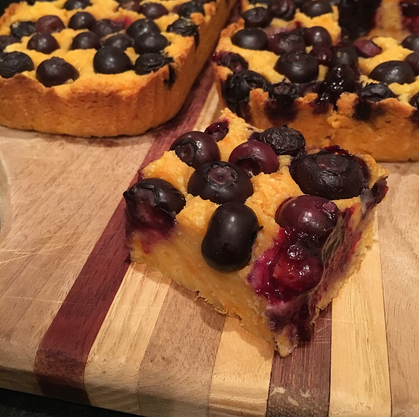
I am currently running our spring nutrition challenge at the gym and we had a potluck this past weekend, so this is what I made for it! A potluck full of delicious Paleo friendly foods... what more could you ask for!? Alright maybe that's just my kind of potluck, but for once I didn't get made fun of for bringing the Paleo dish to the party. Anyways, I selfishly made this one because I've been wanting to try it for a while and it's highest in carbs, which I am always in need of. Not only was this a really simple recipe to make, but it turned out so freakin' delicious! It had more of the consistency of bread rather then a mashed sweet potato and those warm blueberries on top... oh my gosh, just amazing!! The 9x5 loaf pan is small, so I ended up making two loafs for the potluck. I cut each loaf into 8 bars, which put each bar at 13g Carbs, 5g Fat, and 4g Protein (using the measurements I indicated below). I don't know if I would call this breakfast since one bar is definitely not a substantial amount of food, but this was a great snack or post-meal treat. If you think this looks even a little bit yummy, then I definitely recommend you give this one a try! I will for sure be making it again soon.

Paleo Sweet Potato Blueberry Breakfast Bars
Ingredients:
  • 3/4 cup mashed sweet potato (I measured 160g)
  • 1 tablespoon vanilla extract
  • 1 tablespoon coconut oil, melted
  • 1 tablespoon raw honey
  • 1 egg
  • 1/2 cup almond meal
  • 1/8 cup coconut flour
  • 3/4 teaspoon baking powder
  • 1/2 cup blueberries (I measured 115g)
Directions:
  1. Preheat oven to 350 degrees
  2. Roast or microwave one large sweet potato until soft. Scoop out the inside and reserve 3/4 cup
  3. In a medium bowl, combine the mashed sweet potato, vanilla extract, melted coconut oil, raw honey, and egg
  4. Add the almond meal, coconut flour, and baking powder. Mix well
  5. Grease a 9×5 inch loaf pan and pour in the batter, pushing it into all the corners and middle of the pan to avoid large air bubbles. Smooth out the top
  6. Place the blueberries in a single layer on the top and gently press the berries into the batter
  7. Bake for 35-40 minutes, or until the middle is set
  8. Let cool and cut into small bars. Serve immediately or refrigerate to store

​Original recipe found here
0 Comments

Creamy Whole30 Bacon Mushroom Chicken over Cauliflower Rice

4/9/2018

0 Comments

 
Picture
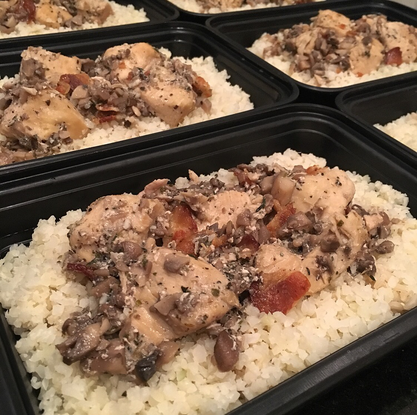
I haven't made a meal with mushrooms or bacon in way too long! If you are a fan of a creamy mushroom meal then you will definitely enjoy this one. The recipe below is my version for 6 servings, but the original recipe link below has the feature where you can adjust serving size, which will then adjust the ingredient amounts for you. As for this recipe, I picked up some Wellshire Sugar-Free Bacon from Whole Foods, used chicken breasts instead of thighs, and used Native Forest Organic Light Coconut Milk; however, I recommend using the classic full-fat coconut milk if you are making this recipe. Since I used chicken breasts, cut into smaller pieces, I just left everything on the stove top and did not cook in the oven at all. While the chicken was cooking I heated up a few bags of Green Giant Riced Cauliflower on the stove top as well. I went super plain with the cauliflower rice again because the meal had plenty of sauce. I promise I'll make a more flavorful cauliflower rice soon! Anyways, overall this was an extremely simple recipe for meal prep and it turned out tasting so yummy!

Creamy Whole30 Bacon Mushroom Chicken Thighs
Ingredients:
  • 6 slices bacon diced (no sugar added)
  • 6 bone-in chicken thighs (I used chicken breasts instead)
  • salt and freshly cracked pepper
  • 3 teaspoons Italian seasoning
  • 4 cloves garlic minced
  • 8-12 ounces baby bella mushrooms, sliced
  • 1.5 cup coconut milk
  • 1/2 teaspoon salt
  • 7 sprigs fresh thyme
Directions:
  1. Preheat oven to 375 F.
  2. In a large oven-proof skillet, cook bacon over medium heat until crisp and fat is rendered. Transfer cooked bacon to a plate and pour out all but 1-2 tablespoons bacon grease. Increase heat to medium-high.
  3. Season both sides of chicken thighs generously with salt, freshly ground pepper, and Italian seasoning. Carefully place chicken thighs in the skillet skin-side down, taking care to place them so they will cook evenly without having to move them. Cook for about 7 minutes or until skin side is nicely and evenly browned and releases easily from the pan. If the skin sticks, continue cooking until skin releases easily. Flip chicken thighs over.
  4. Transfer skillet to oven and cook for 13 minutes or until internal temperature reaches 160º F. Carefully transfer chicken thighs to another plate and place skillet on stovetop. Take special care to always, always use a pot holder from this step forward; the handle will stay very hot.
  5. Add sliced mushrooms and cook on medium high heat for about 4 minutes, or until golden brown and a bit softened, stirring only once midway. Add garlic and, stirring constantly, sauté about 30 seconds to 1 minute, or until fragrant.
  6. Add coconut milk, salt, and sprigs of fresh thyme to the skillet. Increase heat and bring to a gentle boil, then immediately reduce the heat to low. Simmer for about 2-4 minutes, until flavors are blended and sauce is reduced a bit.
  7. Add bacon and stir. Taste sauce and add more salt and pepper as desired. Return chicken thighs to skillet and coat with sauce. Serve with mashed potatoes or cauliflower rice and some leafy greens.

Original recipe found here
0 Comments

Roasted Balsamic Chicken with Brussels Sprouts and Sweet Potato Mash

4/9/2018

0 Comments

 
Picture
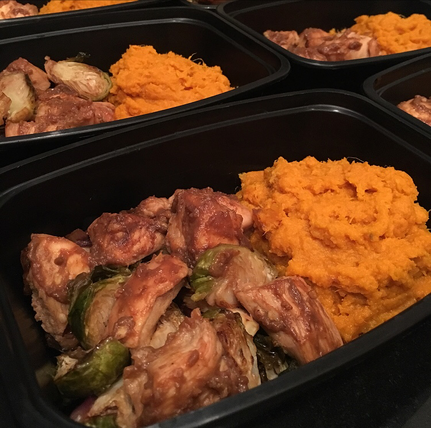
Oh my goodness this meal was delicious!!! I have missed me some Brussels sprouts! Below is my version of the original recipe - I basically just doubled everything, but kept the oil amount the same, so I could get 8 meals. Since I increased the ingredient amounts, I decided to bake the Brussels and red onions separately from the chicken. This added some more time to meal prep, but I had the sweet potatoes in the Instant Pot anyway, so it didn't really make a difference to me. I baked the Brussels and red onions for 20 minutes, mixed them around, then baked for another 10 minutes and set them aside. Once those were done, I baked the chicken for just 20 minutes and they were done. Since I used bite size chicken breast pieces instead of chicken thighs, the chicken did not take too long to cook at all. Of note, you do have to marinate the chicken for 2 hours before cooking. I hate when I forget this piece, then go to meal prep only to realize I didn't marinate the meat yet. It's almost as if that happened to me this weekend or something... Anyways though, this meal is definitely worth making! Super easy, not many ingredients, and it turned out so delicious! I will be making this one again for sure!

Roasted Balsamic Chicken with Brussels Sprouts
Ingredients:
  • 6-8 chicken thighs (I used 3 lb chicken breast instead)
  • 2/3 cup balsamic vinegar
  • 4 Tbsp olive oil (divided)
  • 2 Tbsp maple syrup (I used honey instead)
  • 2 garlic cloves, minced
  • salt and pepper, to taste
  • 24 Brussels sprouts (I used a 2 lb bag)
  • 1 red onion
Directions:
  1. Whisk together the balsamic vinegar, 2 tablespoons of the olive oil, maple syrup, garlic, salt and pepper in a small bowl.
  2. Place the chicken thighs in a glass dish or plastic bag and pour the marinade on top. Place in the refrigerator and marinate for 2 hours.
  3. Preheat the oven to 400 degrees F.
  4. Slice the Brussels sprouts in half and the red onion into wedges. Place the Brussels sprouts and onion on a large baking sheet and drizzle with two tablespoon of olive oil and sprinkle with salt and pepper. Mix together to coat, then create spaces for the chicken.
  5. Remove the chicken from the marinade and place on the sheet pan. Cook for 30 minutes or until the chicken is cooked through.
  6. While the chicken is cooking, pour the remaining marinade into a small saucepan on medium heat. Simmer for 8-10 minutes or until the sauce is reduced and thickened. Open the oven, brush the glaze on the chicken and continue cooking.
  7. Once the chicken is fully cooked, serve immediately.

​Original recipe found here

Super Fast Instant Pot Sweet Potato Mash
Ingredients:
  • 2 pounds of sweet potatoes, peeled and cut into 1″ cubes*
  • 1 cup of water
  • 1-2 tbsp of coconut oil or ghee (to your tasting)
  • salt and seasonings to taste
Directions:
  1. Peel your sweet potatoes and cut them into 1″ cubes.
  2. Add sweet potatoes and water to the instant pot. Close pot and set to sealing.
  3. Cook on manual, high pressure, for 4 minutes.
  4. Immediately quick release the pressure as soon as the 4 minute cooking cycle has completed.
  5. Use oven mitts to carefully remove the inner pot from the Instant pot, carrying it to a colander in your sink to drain the potatoes.
  6. Quickly wash out the inner pot and dry it with a kitchen towel.
  7. Immediately place the clean inner pot back into the instant pot, add the coconut oil/ghee and press the sauté button.
  8. Once the coconut oil starts to sizzle, add your potatoes back to the pot along with any seasonings you desire. Use a wooden spoon to stir and turn your sweet potatoes, cooking until a desired consistency is reached. This step should only take a few minutes before you are ready to serve your sweet potato mash! Enjoy!
Notes
*I always use at least 6 lbs of sweet potatoes, 2 cups of water, and cook it for 10-15 minutes.

Original recipe found here
0 Comments

Egg Muffins with Sausage, and Cauliflower and Sweet Potato Rice​

4/9/2018

0 Comments

 
Picture
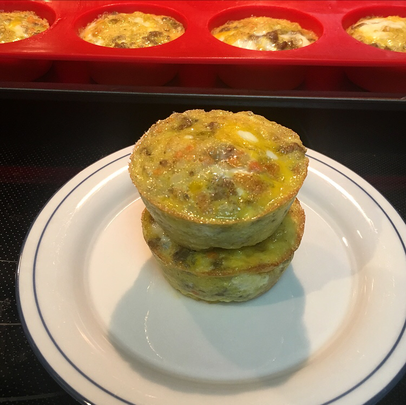
This is the same exact egg muffin recipe I made about a month ago, I just swapped out the ham for some breakfast sausage. The only prep for this one is cooking up the sausage and heating up the riced veggies in the same pan. Easy! While that is on the frying pan and you are waiting for the oven to preheat, you can prepare the egg mixture and oil your muffin pan. I filled my muffin cups pretty much to the top and this recipe ended up making me 14 muffins. The classic egg muffin is such an easy on-the-go breakfast meal prep to prepare and you can simply swap out a couple ingredients for whatever ones you enjoy. I especially like using the frozen riced veggies lately because not only do I get some more veggies into the meal, but they are also already diced up. This is a quick, simple, and delicious recipe that makes meal prep efficient and painless! 

Egg Muffins with Sausage, and Cauliflower and Sweet Potato Rice
Ingredients:
  • 1 lb pork sausage (no added sugar) (I  used Jones Dairy Farm Pork Sausage found in Wegman's frozen meat section)
  • 2 cups Riced Veggies Cauliflower & Sweet Potato
  • ½ tsp salt
  • ½ tsp garlic powder
  • 8 eggs
  • 1-2 tsp coconut oil for sauteing, plus extra for greasing muffin cups
Directions:
  1. Preheat your oven to 400 degrees and grease a 12 cup muffin tin well with coconut oil to prevent sticking.
  2. Heat a medium or large skillet over medium heat and add 1 lb of breakfast sausage. Cook until browned. 
  3. Once sausage is browned, push to side of the skillet and add cauliflower and sweet potato rice. Cook and stir for about 2-4 minutes (cook rice until soft), then mix with sausage and remove from heat.
  4. Fill muffins cups evenly with sausage and rice mixture.
  5. In a large bowl, whisk together the eggs, salt, and garlic powder. 
  6. Pour egg mixture into muffin cups (these were filled to the top for me).
  7. Bake in the preheated oven for about 15 minutes, or until the eggs are set and the muffins just begin to brown.
  8. Remove from oven and let cool a few minutes before serving. If making ahead, you can refrigerated them in a sealed container for up to 5 days. Enjoy!
0 Comments
    Picture

    Erika Copeland

    Sharing the recipes I prepare to help others eat more nutritious food and begin their journey to a healthier life.

    Instagram

    categories

    All
    AIP
    Beef
    Breakfast
    Brussels
    Burgers
    Casserole
    Cauliflower Rice
    Chicken
    Crockpot
    Kombucha
    Low FODMAP
    Meal Prep Tips
    Nutrition Blog
    Pork
    Pressure Cooker
    Quiche
    Sausage
    Shrimp
    Snacks
    Steak
    Sweet Potatoes
    Treats
    Tuna
    Turkey
    Vegan
    Video
    Whole30

    Archives

    December 2021
    November 2021
    September 2021
    August 2021
    July 2021
    June 2021
    May 2021
    April 2021
    March 2021
    February 2021
    January 2021
    December 2020
    November 2020
    September 2020
    August 2020
    July 2020
    June 2020
    May 2020
    April 2020
    March 2020
    February 2020
    January 2020
    December 2019
    November 2019
    October 2019
    September 2019
    August 2019
    July 2019
    June 2019
    May 2019
    April 2019
    March 2019
    February 2019
    January 2019
    December 2018
    November 2018
    October 2018
    September 2018
    August 2018
    July 2018
    June 2018
    May 2018
    April 2018
    March 2018
    February 2018
    January 2018
    December 2017
    November 2017
    October 2017
    September 2017
    August 2017
    July 2017
    June 2017
    May 2017
    April 2017
    March 2017
    February 2017
    January 2017
    December 2016
    November 2016
    October 2016
    September 2016
    August 2016
    July 2016
    June 2016
    May 2016
    April 2016
    March 2016
    February 2016
    January 2016

Powered by Create your own unique website with customizable templates.
  • Home
  • All Recipes
  • Goal
  • About
  • FAQ
  • Contact