LiveSqueezy
  • Home
  • All Recipes
  • Goal
  • About
  • FAQ
  • Contact

Beef Keema Mattar

5/24/2021

2 Comments

 
Picture
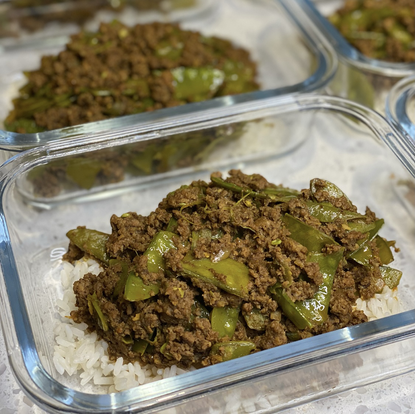
A super flavorful Indian spiced ground meat and pea dish! You can make this one on the stovetop or in the Instant Pot and use your choice of ground meat. I used ground beef and opted for using snow peas instead of regular peas in this one, which definitely gave the meal some texture. If you are not a fan of a more fibrous pea then stick to regular peas or pair with a different vegetable altogether. Full disclosure, by the end of the week I was definitely snow pea'd out. The only spice that might not be in your pantry already is the Garam Masala, but if you invest in the spice you can easily search my blog for other recipes that use that spice - I have posted plenty of other delicious recipes that use the spice. This was a delicious change to the typical ground meat recipes and one I will for sure be making again!​
​
Beef Keema Mattar 
Ingredients:
  • 2 tablespoon Oil
  • 1 Onion, finely chopped
  • 4 Garlic cloves, minced
  • 1-inch piece fresh Ginger root, grated 
  • 1 teaspoon ground Turmeric
  • 1 teaspoon Paprika powder 
  • 1 teaspoon ground Cumin
  • 1 1/2 teaspoon ground Coriander
  • 1 tablespoon Garam Masala
  • 1 lb Ground Meat
  • 2 tablespoon tomato paste
  • 1 cup frozen peas, snow peas, or snap peas
Directions:
Stovetop
  1. Heat the oil in a large pot at medium heat.
  2. Add chopped onion, garlic and ginger and cook until the onions have softened.
  3. Adjust the heat to low and add all the spices. Cook for 1-2 minutes or until aromatic.
  4. Add ground meat. Break it up with your spoon as everything comes together.
  5. Add the tomato paste and then season with salt and pepper. Bring to a boil, reduce the heat and then simmer on low covered for about 15-20 minutes.
  6. Add the peas and cook until the peas are done. Adjust the seasoning if needed.
Instant Pot                              
  1. Turn Instant Pot onto Sauté Mode.
  2. Add oil and let heat.
  3. Add onion, garlic and ginger to the oil and cook until the onions have softened about 2-3 minutes.
  4. Add all the spices. Cook for 1-2 minutes or until aromatic.
  5. Add ground meat and break up meat with your spoon as you mix the onions with the ground meat.
  6. Add tomato paste and then season with salt and pepper.
  7. Turn Instant Pot Off.
  8. Place lid on the Instant Pot and Pressure Valve to Sealing.
  9. Cook on Low Pressure for 6 minutes.
  10. Let Natural Release for 10 minutes.
  11. Open lid and turn on Saute Mode and add the peas and cook 1-2 minutes.
Notes:
Pro Tip: Chop onions into large chunks and place in food processor along with garlic cloves and peeled ginger and pulse gently until just mixed. SAVES TIME AND TEARS!

Original recipe found here
2 Comments

Teriyaki Chicken Stir Fry

5/17/2021

2 Comments

 
Picture
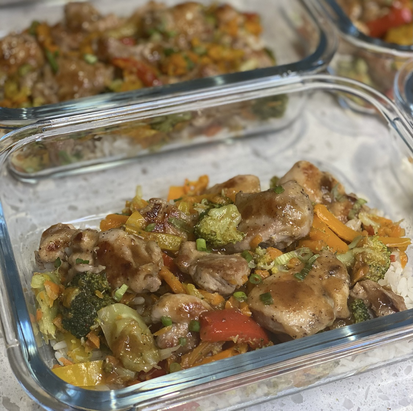
A delicious stir fry recipe from the Paleo Running Momma blog! Having all your ingredients prepped before starting is a must for this one. Purchasing matchstick carrots, pre-cut peppers, and pre-cut broccoli florets can help cut down on kitchen time tremendously. To make the sauce, just throw all your ingredients into a blender and you're done. Last, dice your chicken and coat with salt, pepper, arrowroot or tapioca flour, and coconut aminos. Now you're ready to heat up your skillet or wok and quickly cook a delicious Teriyaki Chicken Stir Fry meal!  I ended up quadrupling the chicken and vegetables, but decided just to triple the sauce, which was a mistake. The sauce amount is a perfect ratio for the meal and will thicken up and reduce once heated up. I worked in 4-5 batches for the chicken and ended up using my Instant Pot on sauté mode to cook all of the vegetables at once. I tend to do that a lot since I typically cook 3-5 times the amount the original recipe calls for. Like all of the Paleo Running Momma recipes I have tried, this one turned out tasty! 

​Teriyaki Chicken Stir Fry
Ingredients:

Sauce:
  • 2 medjool dates pitted or 2 Tbsp raw honey, melted (honey is paleo but not Whole30 compliant*)
  • 1/4 cup very hot water use 2 Tbsp water if not using whole dates
  • 1/4 cup coconut aminos
  • 2 Tbsp rice vinegar or apple cider vinegar
  • 2 tsp sesame oil optional
  • 2 tsp minced garlic
  • 1 tsp fresh grated ginger
  • 1 tsp arrowroot starch or tapioca
Chicken:
  • 1 1/2 lbs boneless skinless chicken thighs sliced into bite size pieces
  • Sea salt and black pepper
  • 2 tsp arrowroot or tapioca flour
  • 1 tbsp coconut aminos
  • 1 Tbsp avocado oil
Veggies:
  • 1 Tbsp avocado oil
  • 1 large bell pepper thinly sliced
  • 1 large or two medium carrots, peeled and cut into matchsticks (juliennned)
  • 3 scallions white and green parts separated, thinly sliced
  • 1 1/2 cups broccoli florets blanched**
Directions:
  1. Have the ingredients prepped before beginning since everything will cook quickly.
  2. Begin by mixing the sauce. If using medjool dates, use a small high speed blender to blend together the dates, water, coconut aminos and rice vinegar. Then stir in the sesame oil, garlic, ginger, and arrowroot. If using date syrup or honey, you can simply whisk the ingredients together in a bowl. Set aside.
  3. Place the chicken pieces on a cutting board or in a large bowl and sprinkle all over with the salt, pepper, and arrowroot, then drizzle with the coconut aminos and toss to coat.
  4. Heat a large non stick skillet or wok over medium high heat and add one tablespoon of the oil. Once sizzling, add the chicken in a single layer and let them cook for a minute or until browned. Stir and cook the chicken for another 2 minutes or until fully cooked and golden brown all over. Remove to a plate and set aside.
  5. Add one tablespoon of oil to cook the veggies and keep the heat on medium high. Add the white scallions, carrots and peppers and cook, stirring often, for 1-2 minutes or until barely fork tender.
  6. Add the blanched broccoli to the skillet followed by the cooked chicken and sauce. Stir to coat the chicken and veggies in the sauce. The sauce should thicken right away, cook another 30 seconds to heat through and combine flavors. Serve hot, over fried cauliflower rice or alone. Enjoy!

Notes:
*You can also sub in 2 Tbsp date paste or date syrup if you prefer. If you’re not using whole dates, use just 2 Tbsp water.
**Blanch the broccoli by steaming, scalding in boiling water, or microwaving. The broccoli should be bright green.

Original recipe found here
2 Comments

Chunky Monkey Banana Baked Oatmeal

5/10/2021

1 Comment

 
Picture
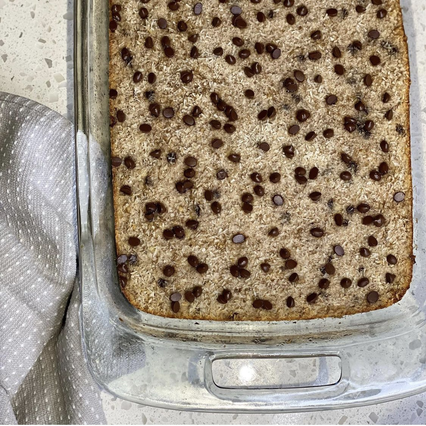
Finally tried a baked oatmeal recipe and this one did not disappoint! It’s really quick and easy to mix the ingredients together and throw in a casserole dish to bake. We enjoyed this more as a snack, but if you throw in some protein powder I'd say this is a great meal prep recipe for breakfast. I made this 12 servings (as opposed to the recipe suggestion of 6 servings) which came out to 25g Carbs, 12g Fat, and 5g Protein, hence the suggestion to add some more protein with this if you're enjoying it as a meal. Anyways, the original recipe calls for using a 9x9 inch casserole dish, but I used a 9x13 inch and baked for 35 minutes and that worked out just fine. Banana sizes can vary so I like that the recipe indicates about 1 1/3 cups mashed. I used about 300g if that measurement is helpful to anyone. I always reduce chocolate amount, so I opted for just spreading the 1/3 cup between the mix-in and topping, and same goes for the shredded coconut. This was certainly a delicious treat in our home for a few days and I will definitely be experimenting with adding some protein powder next time around! Let me know if you give this one a try and if you make any personal adjustments.

Chunky Monkey Banana Baked Oatmeal
Ingredients:

For the wet ingredients:
  • 3 ripe bananas, mashed (about 1 ⅓ cups mashed ripe banana)
  • 2 eggs
  • 1 teaspoon vanilla extract
  • 1 (15 ounce) can light coconut milk (about 1 ⅔ cup coconut milk)
  • 2 tablespoons pure maple syrup
For the dry ingredients:
  • 2 ¼ cups gluten free rolled oats
  • 2 teaspoons baking powder
  • 1 teaspoon cinnamon
  • ¼ teaspoon salt
Mix-ins:
  • ½ cup unsweetened shredded coconut, plus 2 extra tablespoons for topping
  • ½ cup chopped walnuts
  • 1/3 cup chocolate chips (I used Enjoy Life Semi Sweet Chocolate Mini Chips), plus 2 tablespoons for sprinkling on top
Directions:
  1. Preheat the oven to 350 degrees F. Grease a 9x9 inch pan with oil and set aside.
  2. In a large bowl, whisk together the mashed banana, eggs, vanilla, coconut milk and maple syrup until well combined.
  3. Add the dry ingredients to the bowl with the wet ingredients: oats, baking powder, cinnamon and salt. Mix until combined, then fold in shredded coconut, walnuts and chocolate chips.
  4. Pour mixture into prepared pan and smooth top. Sprinkle with reserved shredded coconut and chocolate chips. Bake for 35-45 mins or until the edges are slightly golden brown. Remove from the oven, allow to cool for 10 minutes, then cut into 6 slices and serve. Top with extra banana slices, a drizzle of maple syrup and chopped walnuts. Serves 6.
Notes:
  • To store: be sure the banana baked oatmeal has completely cooled, and then cover your 9×9 inch pan with tinfoil before transferring it to the refrigerator. It will stay good covered in the refrigerator for 3-4 days, and you can reheat individual slices in the microwave for 30-60 seconds. You can also store individual slices in airtight containers for quick, on-the-go breakfasts.
  • To freeze: once the baked oatmeal has completely cooled, cut it into 6 squares and wrap each square in plastic wrap and tinfoil. When you’re ready to eat it, place the unwrapped frozen square of baked oatmeal on a microwave safe dish and microwave it at 30 second intervals for 1-2 minutes. If you’d like to freeze the entire banana baked oatmeal for later, simply reheat it in the oven for 20-25 minutes at 350 degrees F while it’s covered with tinfoil.

Original recipe found here
1 Comment

Smoked Pork Tenderloin

5/3/2021

1 Comment

 
Picture
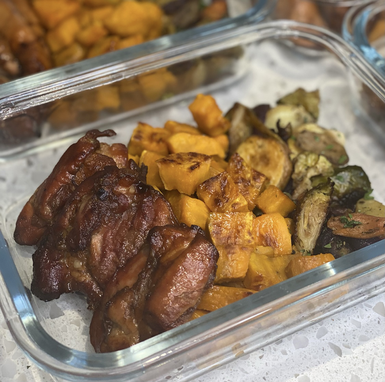
Well I certainly looked forward to eating this one all week long! Props to the grill master Robbie. Super simple smoked pork recipe using pork tenderloin, your favorite meat rub, and some fresh apple juice/cider. We used FreshJax Rosy Cheeks Maple Bourbon BBQ Spice on some of the tenderloins and Pork Barrel BBQ All American Seasoning Mix on the others. Utilizing that grill in these warmer months doubles for a meal prep hack and for making the best meals! Paired this one with some roasted potatoes and brussels and it made for the tastiest meal. We will for sure be making this one again soon! 

Smoked Pork Tenderloin
Ingredients:
  • 2 lb Pork Tenderloin
  • 4 Tbsp Seasoned Meat Rub 
  • 1/2 cup Apple Juice/Cider
Directions:
  1. Brush the apple juice generously over all sides of the tenderloin.
  2. Sprinkle seasoning (add more if desired) all over meat and rub in.
  3. Preheat smoker to 225 degrees.
  4. Place tenderloin on grates and close smoker lid.
  5. Allow meat to cook for 2 1/2- 3 hours, or until internal temperature reaches at least 145 degrees (medium rare).
  6. Remove tenderloin from smoker and allow to rest for 5 minutes before slicing/serving!

​Original recipe found here
1 Comment
    Picture

    Erika Copeland

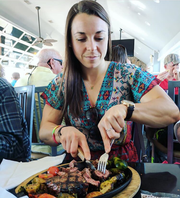
    Sharing the recipes I prepare to help others eat more nutritious food and begin their journey to a healthier life.

    Instagram

    categories

    All
    AIP
    Beef
    Breakfast
    Brussels
    Burgers
    Casserole
    Cauliflower Rice
    Chicken
    Crockpot
    Kombucha
    Low FODMAP
    Meal Prep Tips
    Nutrition Blog
    Pork
    Pressure Cooker
    Quiche
    Sausage
    Shrimp
    Snacks
    Steak
    Sweet Potatoes
    Treats
    Tuna
    Turkey
    Vegan
    Video
    Whole30

    Archives

    December 2021
    November 2021
    September 2021
    August 2021
    July 2021
    June 2021
    May 2021
    April 2021
    March 2021
    February 2021
    January 2021
    December 2020
    November 2020
    September 2020
    August 2020
    July 2020
    June 2020
    May 2020
    April 2020
    March 2020
    February 2020
    January 2020
    December 2019
    November 2019
    October 2019
    September 2019
    August 2019
    July 2019
    June 2019
    May 2019
    April 2019
    March 2019
    February 2019
    January 2019
    December 2018
    November 2018
    October 2018
    September 2018
    August 2018
    July 2018
    June 2018
    May 2018
    April 2018
    March 2018
    February 2018
    January 2018
    December 2017
    November 2017
    October 2017
    September 2017
    August 2017
    July 2017
    June 2017
    May 2017
    April 2017
    March 2017
    February 2017
    January 2017
    December 2016
    November 2016
    October 2016
    September 2016
    August 2016
    July 2016
    June 2016
    May 2016
    April 2016
    March 2016
    February 2016
    January 2016

Powered by Create your own unique website with customizable templates.
  • Home
  • All Recipes
  • Goal
  • About
  • FAQ
  • Contact