LiveSqueezy
  • Home
  • All Recipes
  • Goal
  • About
  • FAQ
  • Contact

Chocolate Strawberry Banana Smoothie​

3/26/2018

0 Comments

 
Picture
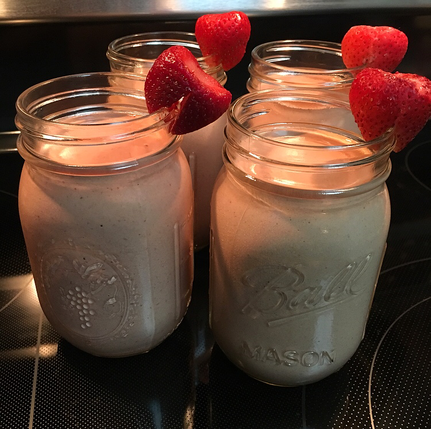
Just another variation of the smoothie recipes I have already posted: ​Strawberry Pineapple Coconut Smoothie and Creamy Apple Cinnamon Smoothie. I usually order the Vanilla Bean Paleo Protein powder, but this time I decided to try out the Double Chocolate, which meant time to experiment with a new smoothie combination. I didn't want to get too crazy though, so I stuck to a strawberry banana combination. After hearing my mom slurp the end of the smoothie for five minutes, I think it's safe to say this was a delicious combo! I'll for sure be making this one again for her breakfast meal prep. If you make these ahead of time, throw them in the freezer, and just take one out the night before and put it in the fridge. By morning it is good to grab-and-go as a smoothie! 

Chocolate Strawberry Banana Smoothie
Ingredients:
  • ½ cup coconut milk (I use SO Delicious Original Culinary Coconut Milk)
  • ½ cup water
  • ½ ripe banana, frozen 
  • 2.5 ounces frozen fresh chopped strawberries
  • 1 scoop Protein Powder (I used this Paleo Protein)
Directions:
  1. Add all the ingredients to your blender. Place the lid on and puree (use the “smoothie setting” if your blender has one) until smooth and desired consistency is reached.
  2. Serve immediately, or portion into freezer safe canning jars and store in the freezer for later use.
  3. If desired, garnish with fresh strawberries.
  4. Enjoy!
0 Comments

Buffalo Chicken and Broccoli Sweet Potato Bowls

3/26/2018

0 Comments

 
Picture
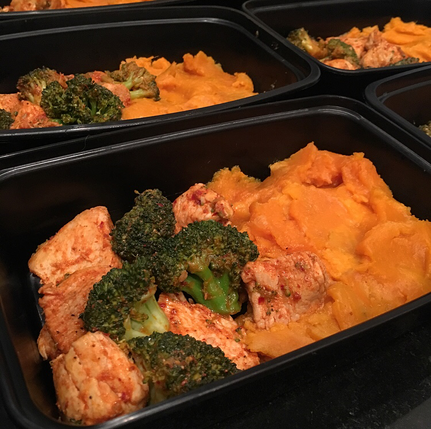
This meal was incredibly easy to make and it turned out tasting delicious! I've been making this similar Buffalo Chicken​ meal every other week lately, so it was slightly refreshing to at least not have a shredded buffalo chicken meal. However, yes, both taste incredibly similar. This one though is all done in one pan on the stove top, so if you don't want to do the slow cooker or pressure cooker buffalo chicken then give this one a try! The recipe also calls for cauliflower rice, which I clearly did not make. Instead, I paired this with the basic sweet potato! I got really lazy with the sweet potato this time around though and simply threw 8 lbs of peeled sweet potato in the Instant Pot, added 1 cup of water, and set to manual for 25 minutes. Once it was done, I let the sweet potatoes sit in the strainer to drain the excess water while I made the chicken, and that was literally all I did to the sweet potatoes. No added spices or fat whatsoever, so basically just a boiled sweet potato. This is another easy way to bulk make a lot of plain sweet potato, and have it ready to dress up as you want throughout the week. Anyways though, this was an easy meal to throw together for the week and one that I really enjoyed eating!​

Buffalo Chicken and Broccoli Bowls
Ingredients:
For Cauliflower Rice
  • 1 head cauliflower
  • 1 tablespoon olive oil
  • salt
  • pepper
For Buffalo Chicken and Broccoli
  • 3 pound boneless skinless chicken thigh, cut into bite sized pieces
  • 1-2 pound of broccoli, cut into small to medium florets* (I used two large crowns)
  • 2 tablespoon oil (for the pan, optional)**
  • 1 cup hot sauce (I used PaleoChef Wing Sauce)***
  • 2 Tablespoons ghee or coconut oil
  • salt
  • pepper
Directions:
To make the Cauliflower Rice
  1. Cut cauliflower into medium to small sized florets, removing the green leaves and any tough stem.
  2. Working in batches, place florets into the food processor and don't fill the bowl more than halfway. Pulse until the cauliflower resembles grains of rice, about 20 pulses. Try not to over process or you will have cauliflower mash!
  3. Heat a skillet or saute pan over medium heat with olive oil. Add cauliflower and season with salt and
  4. pepper. Saute until tender 5-8 minutes.
To make the Buffalo Chicken and Broccoli
  1. Heat a skillet or saute pan that has a lid over medium high heat. Add oil if using, and when hot add chicken. Season with just a little salt. Allow to cook on one side until browned, then turn and brown the other side. Cook until no longer pink, 4-5 minutes per side.
  2. When chicken is cooked, add broccoli to the pan and cover. Allow to steam until tender 5-10 minutes. You can give the pan a stir a few times if you want to keep the chicken from browning too much. Broccoli is done when easily pierced with a knife and still bright green.
  3. Meanwhile, prepare the buffalo sauce. Melt 2 tablespoons of ghee or coconut oil with the hot sauce and whisk to combine.
  4. Pour the sauce over the chicken and broccoli, toss to coat everything in the sauce.
  5. Serve over cauliflower rice or regular rice.
​
Notes:
*Make sure the broccoli florets are not too large and are of even size. This will allow them to cook faster and also make sure that they are all done at the same time.
**If using a pan that is not non-stick, I would suggest using a little oil when cooking the chicken. Otherwise it may stick to the pan.
***If you prefer more sauce, just increase the amount of hot sauce you use. This amount makes enough to fully coat everything but doesn't leave much extra sauce.

Original recipe found here
0 Comments

Instant Pot Spicy Pineapple Pork over Cauliflower Rice

3/26/2018

0 Comments

 
Picture
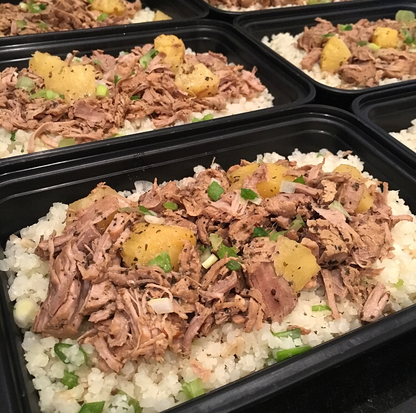
A Nom Nom Paleo recipe, so you know it's a good one! My friend made this one last week and loved it, so I had to give it a try. I ended up using Pork Tenderloin instead of shoulder roast, and my friend used a beef roast, but both ways turned out tasting DELICIOUS! The only other ingredient I changed was I omitted the serrano peppers and just threw in some red pepper flakes instead. If you really like spicy though, go for the serrano peppers and let me know how it turned out! I have gotten better with eating spicy foods, but I decided to just play it safe. For the cauliflower rice I went super easy (as always) and just bought a few bags of Green Giant Riced Cauliflower and heated that up on the stove top. I threw in some extra chopped scallions, salt, and a little bit of juice from a lime and that was it. There was plenty of leftover sauce in the Instant Pot to throw back over everything, so really no need to make any fancy cauliflower rice with this meal. Also, there are slow cooker directions in the notes below if you do not have a pressure cooker. There is no excuse not to give this one a try! It was so easy to make and seriously turned out amazing! 

​Instant Pot (Pressure Cooker) Spicy Pineapple Pork 
Ingredients:
  • 3 pounds boneless pork shoulder roast (or beef chuck roast if you don't eat pork)
  • 2 teaspoons Diamond Crystal brand kosher salt or Magic Mushroom Powder
  • 1 tablespoon coconut oil, ghee, or your preferred high temperature cooking fat
  • 1 (14-ounce) can pineapple chunks in 100% juice (make sure no added sugar or syrup)
  • 2 serrano peppers, diced (if you don’t like spicy, removed ribs, pith, and seeds and/or use less peppers)
  • 1 tablespoon dried basil  
  • 1 tablespoon ground cumin
  • ½ teaspoon freshly ground black pepper
  • 2 tablespoons lime juice
  • 2 scallions, thinly sliced (optional)
Directions:
  1. Trim and discard the extra fat from the pork roast and cut it into 2-inch cubes. (If all the available roasts are extra fatty at the butcher counter, buy a slightly larger one so you’ll end up with 3 pounds of meat.)
  2. Measure out the Diamond Crystal kosher salt or Magic Mushroom Powder and toss well to coat all the pork pieces. (Yes, Magic Mushroom Powder can be used as a 1:1 substitute for Diamond Crystal kosher salt in most of my savory recipes!)
  3. Turn on the Sauté function on your Instant Pot and add the coconut oil once the insert is hot. Toss in the seasoned pork cubes and cook, stirring, until the meat gets a bit of sear on the sides. If you’re pressed for time, don’t worry about searing the meat carefully. I’ve tested this recipe both ways (diligently searing in batches and not), and the final result tastes great either way.
  4. Drain the pineapple juice and set the pineapple chunks aside (or keep them in the fridge until you’re ready to serve and eat the pork stew). You’ll be adding ½ cup pineapple juice to the recipe.
  5. Turn off the Sauté function on the Instant Pot. Add the diced serrano peppers, basil, cumin, and black pepper to the pork. Give everything a good stir to distribute the seasoning.
  6. Pour in ½ cup pineapple juice and the lime juice. Give everything a good stir. (Make sure the liquid reaches the bottom of the insert. Otherwise, you might get a “BURN” or “OVHT” error message on your Instant Pot display as the stew reaches high pressure.)
  7. Lock the lid on top and make sure the top valve is pointed to the sealed position. (If you’re using the Instant Pot Ultra, you won’t need to adjust the valve.)
  8. Program the Instant Pot to cook under high pressure for 35 minutes, and let the pressure drop naturally. If you’re feeling impatient and hangry, you can manually release the pressure after 20 minutes.
  9. Open the lid and check that the pork is fork tender. If the pork is still tough, cook for 5-10 more minutes under high pressure.
  10. Stir in the pineapple chunks until warmed through. Taste and adjust for seasoning with additional salt, Magic Mushroom Powder, or lime juice. 
  11. Ladle up the pork and pineapples and garnish with scallions. Spicy Pineapple Pork tastes great served over cauliflower rice!

Notes
  • If you’re doing a Whole30, make sure your canned pineapple doesn’t contain syrup or added sugar! This brand is the one I use.
  • If you don’t love spicy food, make sure you remove the ribs, pith, and seeds from the serrano peppers—or just leave ’em out entirely. Conversely, you can crank up the heat even more by adding cayenne pepper to the dried spices or increasing the amount of serrano peppers.
  • The leftovers taste great simply reheated (I plop ’em in my Instant Pot and cook for 2 minutes under high pressure) or fried crispy in a skillet.
  • No Instant Pot? Don’t freak out: You can make it in a slow cooker—just cook the pork on low for 8-10 hours before adding the pineapple chunks at the end.

Original recipe found here
0 Comments

Paleo Orange Chicken over Cauliflower Rice

3/5/2018

0 Comments

 
Picture
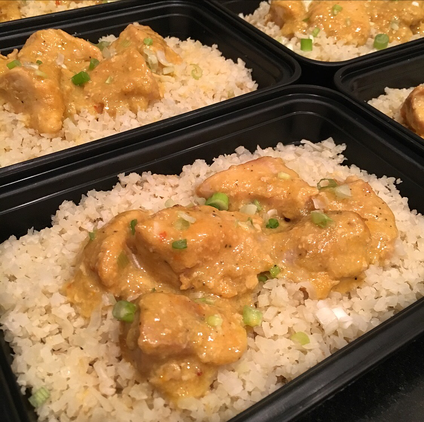
Yay for friends continuing to send me recipes they enjoyed! This meal turned out delicious! My only fail was not making more sauce. The original recipe link is below and there is an option on the site to adjust serving size, which then adjusts ingredient amounts. Below is the sauce amount for 4 servings, although I increased the chicken to 8 servings. I am typically fine without a lot of sauce, but after boiling it down the sauce drastically reduced. Besides the lack of sauce though, I loved everything about this meal! It was extremely simple and easy to throw together, and I had the cauliflower rice, sauce, and chicken all on the stove top cooking at the same time. Definitely an easy and yummy meal prep recipe to mix up your weekly meals!

​Paleo Orange Chicken over Cauliflower Rice
Ingredients:

For the sauce:
  • 1.5 Cup 100% Orange juice
  • Zest Of half a medium orange
  • 2 Tbsp Coconut aminos
  • 2 tsp Rice vinegar (or coconut vinegar)
  • Pinch Red pepper flakes
  • Salt and pepper
  • 1 Tbsp Avocado oil (or sesame oil or coconut oil)
  • 1 Tbsp Fresh ginger, minced
  • 2 tsp Garlic, minced
  • 2 tsp Arrowroot starch
For the chicken:
  • 2-4 Tbsp Avocado oil (or sesame oil or coconut oil)
  • 3 Tbsp Arrowroot starch
  • Salt and Pepper
  • 3-4 lb Chicken breast, cut into 1 inch cubes
For Serving:
  • 1 medium orange, segmented
  • Green onion, sliced
  • Sesame seeds
  • Hot cooked white rice or cauliflower rice
Directions:
  1. In a small bowl, whisk together the orange juice, orange zest, coconut aminos, rice vinegar, red pepper flakes and a pinch of salt and pepper. Set aside.
  2. In a medium, high-sided frying pan heat the avocado oil (for the sauce) up on medium heat. Add in the ginger and garlic and cook until fragrant, about 1 minute.
  3. Add in the orange juice mixture, stirring so the garlic/ginger mix into it. Additionally, place the 1 tsp of Arrowroot starch into a medium bowl.
  4. Turn the temperature up to high and bring to a boil. Once boiling, add 2 tsp of the hot sauce into the Arrowroot starch and whisk until smooth. While whisking, pour the Arrowroot mixture into the sauce and stir in well.
  5. After you add the Arrowroot, boil the sauce for 2 minutes. Then, turn the heat down to medium/low and cook an additional 3-4 minutes until the sauce is thick and glossy. Transfer to a large bowl, cover, and let stand to thicken up more while you make the chicken.
  6. In a large frying pan over medium/high heat, heat the avocado oil. NOTE: you do not want to crowd the chicken, so I fry mine in 2 batches, using 1-2 Tbsp of oil each time. Adjust according to the size of your pan.
  7. While the oil heats, place the Arrowroot starch and a pinch of salt and pepper into a large Zip-loc bag. Add in the chicken cubes, seal the bag and toss until the chicken is coated in the starch.
  8. Place the chicken into the hot oil (again, don't crowd them) and cook until golden brown and crispy about 2-3 minutes per side, flipping once. If your chicken cooks too quickly, reduce the heat a little bit. Repeat with the 2nd batch of chicken if necessary.
  9. Once cooked, transfer to a paper-towel lined plate and gently press out any excess oil. Place the chicken into the bowl with the sauce. Add in the orange segments and toss until the sauce coats everything.
  10. Serve over top of cauliflower rice, or white rice, garnish with green onion and sesame seeds, and DEVOUR.

Original recipe found here
0 Comments

Instant Pot Honey Garlic Chicken with Garlic Cauliflower Mash

3/5/2018

0 Comments

 
Picture
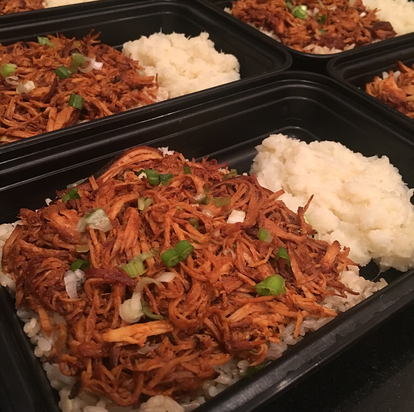
Another recipe recommendation from a friend! This one turned out delicious and if you can tell I actually added normal rice to this meal too. It's that time of year where my carb intake is extremely high, so I've started to add rice to some of my meals to help meet my daily goal. I've actually found that mixing normal rice with cauliflower rice is my favorite, so I apologize for all the cauliflower rice meals I've been making recently. Anyways, about this recipe... I altered some of the original recipe ingredients and used coconut aminos instead of soy sauce, tomato paste instead of ketchup, and chicken breasts instead of thighs. Those swaps are shown in the recipe below, but if you want to see the original recipe or alter the serving size/ingredient amounts, click the link below. If you have a pressure cooker, then this chicken meal takes very little time to prepare! (If you don't have a pressure cooker though, you can simply throw this meal into the slow cooker on low for 8 hours too.) While that was cooking I made the Garlic Cauliflower Mash. Instead of using the food processor, I drained the cauliflower, then threw it back on the stove top on medium heat and used a wire masher to make the mash. The food processor definitely makes the mash more smooth, but the masher is another simple and easy way to make a mash. Overall, I really enjoyed this meal and it was not like one I have made before, so I enjoyed something different! I have a feeling this one will be thrown into the weekly meal prep rotation alongside my Homemade BBQ Pulled Chicken and Buffalo Chicken. 

​Instant Pot Honey Garlic Chicken 
Ingredients:
  • 2/3 cup honey
  • 8 cloves garlic, minced
  • 1 cup Coconut Aminos
  • 6 oz Tomato Paste
  • 1 teaspoon dried oregano
  • 4 tablespoons chopped fresh parsley
  • 2 tablespoon sesame seed oil
  • 8 to 12 bone-in, skinless chicken thighs (or 3-4 lbs boneless chicken breasts)
  • salt and fresh ground pepper, to taste
  • 1 tablespoon toasted sesame seeds, for garnish
  • sliced green onions, for garnish
Directions:
  1. In a small mixing bowl combine honey, minced garlic, coconut aminos, tomato paste, oregano and parsley; mix until well combined and set aside.
  2. Heat the Instant Pot in sauté mode.
  3. Add sesame oil to the pot.
  4. Season chicken thighs with salt and pepper; arrange in the instant pot and cook for about 2 to 3 minutes per side.
  5. Add the prepared honey garlic sauce to the pot; cover and lock the lid. 
  6. Cook in poultry mode for 25 minutes.
  7. Turn off the pot and allow it to release the pressure, about 5 minutes.
  8. Transfer chicken to a serving plate and spoon the sauce over the chicken.*
  9. Garnish with toasted sesame seeds and green onions.
  10. Serve.

*I put the Instant Pot on saute mode for about 8 minutes to thicken up the sauce some.

Original recipe found here

Garlic Cauliflower Mash
Ingredients:
  • 1 cauliflower head (I used 2 bags (16 oz) of frozen cauliflower)
  • 4 garlic cloves
  • 2 Tbsp coconut oil (you can also use ghee or olive oil, or omit this altogether)
  • Salt and pepper
Directions:
  1. Chop cauliflower into large florets.
  2. Steam the cauliflower in a large pot with boiling water, garlic cloves, and salt. Steam until fork tender.
  3. Drain and transfer cauliflower and garlic cloves into a blender or food processor.
  4. Add the ghee and black pepper. Blender until smooth. Add salt if needed.
0 Comments

Sausage, Pepper, and Sweet Potato Paleo Breakfast Casserole

3/5/2018

0 Comments

 
Picture
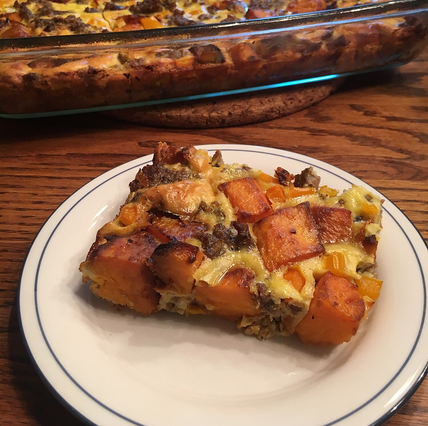
This turned out pretty amazing! I made this with breakfast sausage and used one orange pepper instead of red and green. I make these breakfast meal preps for my mom and she tends to pick out red peppers and anything green, so I thought the orange pepper would camouflage in better. Anyways, this was a delicious casserole to prep ahead of time and have ready for breakfast all week. Just like egg muffins, you can adjust this casserole to your liking and simply throw in any ingredients you enjoy. If you want a leaner protein source just swap the sausage out with some lean ground meat, or if you don't eat meat then add in some butternut squash, spinach, or other veggies! Who has time to make breakfast in the morning? Meal prep a casserole like this and be set, eating good, for the week! 

Paleo Breakfast Casserole
Ingredients:
  • 2 medium sweet potatoes, cubed
  • 1 pound Italian sausage or breakfast sausage
  • ½ green pepper, diced
  • ½ red pepper, diced
  • 8 eggs
  • ½ cup almond milk or coconut milk (I used SO Delicious Original Culinary Coconut Milk)
  • salt and pepper
  • 1 teaspoon garlic powder
  • 1 teaspoon onion powder
Directions:
  1. Preheat oven to 350 degrees.
  2. Cook and crumble sausage. Drain excess grease and set aside.
  3. Cube sweet potatoes into bite sized pieces and cook in some cooking oil in a skillet until soft, about 15 minutes.
  4. Combine together sausage, sweet potatoes, and peppers, and pour evenly into a 9x13 baking dish.
  5. In a bowl, whisk together eggs, milk, salt and pepper (a few shakes of each), garlic powder, and onion powder. Pour evenly over sausage mixture.
  6. Bake for 45 minutes, or until eggs are cooked.

​Original recipe found here
0 Comments
    Picture

    Erika Copeland

    Sharing the recipes I prepare to help others eat more nutritious food and begin their journey to a healthier life.

    Instagram

    categories

    All
    AIP
    Beef
    Breakfast
    Brussels
    Burgers
    Casserole
    Cauliflower Rice
    Chicken
    Crockpot
    Kombucha
    Low FODMAP
    Meal Prep Tips
    Nutrition Blog
    Pork
    Pressure Cooker
    Quiche
    Sausage
    Shrimp
    Snacks
    Steak
    Sweet Potatoes
    Treats
    Tuna
    Turkey
    Vegan
    Video
    Whole30

    Archives

    December 2021
    November 2021
    September 2021
    August 2021
    July 2021
    June 2021
    May 2021
    April 2021
    March 2021
    February 2021
    January 2021
    December 2020
    November 2020
    September 2020
    August 2020
    July 2020
    June 2020
    May 2020
    April 2020
    March 2020
    February 2020
    January 2020
    December 2019
    November 2019
    October 2019
    September 2019
    August 2019
    July 2019
    June 2019
    May 2019
    April 2019
    March 2019
    February 2019
    January 2019
    December 2018
    November 2018
    October 2018
    September 2018
    August 2018
    July 2018
    June 2018
    May 2018
    April 2018
    March 2018
    February 2018
    January 2018
    December 2017
    November 2017
    October 2017
    September 2017
    August 2017
    July 2017
    June 2017
    May 2017
    April 2017
    March 2017
    February 2017
    January 2017
    December 2016
    November 2016
    October 2016
    September 2016
    August 2016
    July 2016
    June 2016
    May 2016
    April 2016
    March 2016
    February 2016
    January 2016

Powered by Create your own unique website with customizable templates.
  • Home
  • All Recipes
  • Goal
  • About
  • FAQ
  • Contact