LiveSqueezy
  • Home
  • All Recipes
  • Goal
  • About
  • FAQ
  • Contact

One-Pan Pesto Chicken and Veggies

5/21/2018

0 Comments

 
Picture
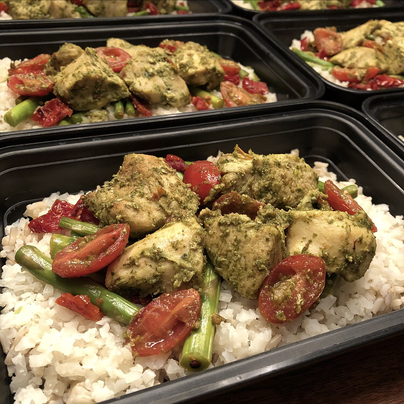
I absolutely love a good pesto meal and this one did not disappoint! I do have to point out though that it's tough finding sun-dried tomatoes that don't have any added ingredients or preservatives to them. Try to find fresh ones in the produce aisle or at your local natural market if you can. Also, I 100% recommend making your own pesto sauce. The recipe below came out delicious and was extremely easy to make while the chicken was cooking. I actually ended up adding the full serving of pesto sauce to the chicken because it didn't really quite make 1 cup worth for me. I also didn't have a lot of fresh basil though, which could be the reasoning for that. Anyways, while the chicken was cooking I heated up a few bags of Green Giant Riced Cauliflower on the stove top as well. All I added to the cauliflower rice was the leftover lemon juice and some salt. I am personally more of a fan of the cherry tomatoes over the sun-dried tomatoes, so next time I might decrease the sun-dried tomatoes and increase the cherry. Other then that note, I thought the meal turned out great! Not a lot of ingredients, didn't take long to make, and it came out tasting delicious!

​One-Pan Pesto Chicken and Veggies 
Ingredients:
  • 2 tablespoons olive oil
  • 2 pound chicken thighs or breasts
  • ⅔ cup sun-dried tomatoes
  • 1 pound asparagus
  • ½ cup basil pesto (see recipe below)
  • 1 cup cherry tomatoes, halved
Directions:
  1. Heat a large skillet on medium heat, add 2 tablespoons olive oil, add sliced chicken, season chicken generously with salt, add half of chopped sun-dried tomatoes - and cook everything on medium heat for 5-10 minutes, flipping a couple of times, until the chicken is completely cooked through. Remove the chicken and sun-dried tomatoes from the skillet, leaving oil in.
  2. Add asparagus (ends trimmed), seasoned generously with salt, remaining half of sun-dried tomatoes, and cook on medium heat for 5-10 minutes until the asparagus cooked through. Remove asparagus to serving plate.
  3. Add chicken back to the skillet, add pesto, stir to coat on low-medium heat until chicken is reheated, 1 or 2 minutes. Remove from heat. Add halved cherry tomatoes, mix with the pesto and the chicken. Add chicken and tomatoes to the serving plate with asparagus.

Original recipe found here


Basil Pesto
Serving: 1 Cup
Ingredients:
  • 1 large bunch of basil, leaves only (about 1-2 cups)
  • ⅓ Cup extra virgin olive oil
  • 1 garlic clove
  • 1 Tablespoon pine nuts (toasted)
  • ½ teaspoon lemon zest (about half a lemon worth of zest)
  • 1 ½ Tablespoons lemon juice (one lemon gets you about 2-3 Tbsp worth)
  • ½ teaspoon sea salt 
Directions:
  1. Preheat a frying pan until hot and cook the pine nuts for 1-2 minutes until browned slightly, stirring frequently to prevent burning.
  2. Place all ingredients in a blender or a food processor and puree until smooth and well combined.

Original recipe found here
0 Comments

One-Pan Garlic Herb Chicken Asparagus with Roasted Sweet Potatoes

5/21/2018

0 Comments

 
Picture
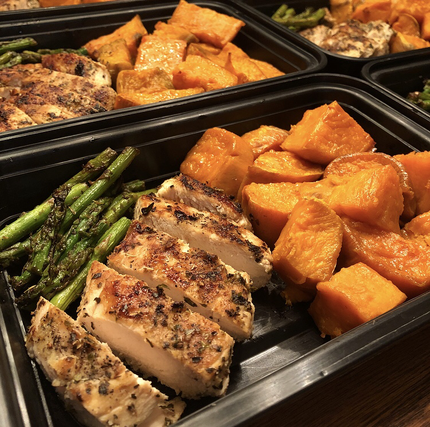
Ever bite into a meal so good that you are immediately happy knowing you get to eat it for lunch everyday that week? If the answer is yes, then you are doing meal prep and eating right! (And probably making some of the recipes I've posted ;-)... like this one!) This is the kind of recipe that your friend who "never uses recipes" makes. Real simple ingredients, real easy, real quick. I busted out the cast iron skillet for this one and doubled the recipe below to get at least 8 servings for the week. While I was making the chicken I had the sweet potatoes roasting in the oven, so time in the kitchen was efficient! Now I do have to point out that when I first started meal prepping I used to avoid recipes that called for ghee, simply because I didn't have the ingredient and I didn't want to pay for it. Fast forward a couple years later and now I'm using it all the time and wondering why I didn't try it earlier. For those who are wondering what ghee is, it's just clarified butter, which means it is butter with all the milk solids removed (so it's free of lactose and casein protein). This creates a higher smoke point and also gives it a nutty, more rich and intense flavor. It's not hard to make by yourself, but you can purchase it at the store as well. I mention all of this because I recommend trying ghee out if you haven't yet and I definitely recommend using it in this recipe if you can! 

One-Pan Garlic Herb Chicken Asparagus
Ingredients:
  • 3-6 chicken thighs or boneless skinless chicken breasts (breasts pounded to even ½ inch thickness)
  • salt and pepper, to taste
  • 1 pound asparagus, ends trimmed
  • 3 tablespoons ghee, divided (or coconut oil)
  • 1 tablespoon minced garlic
  • ½ teaspoon dried basil (see note below)
  • ½ teaspoon dried oregano
  • ½ teaspoon dried thyme
  • ½ teaspoon onion powder
  • salt and pepper, to taste
  • fresh herbs for garnish (optional)
Directions:
  1. Season chicken with salt and pepper on both sides. Melt 2 tablespoons ghee in a large pan/skillet over medium-high heat. Stir in garlic and herbs and cook another minute or so until the garlic is fragrant.
  2. Reduce heat to medium, add chicken to pan, and cook for 5-7 minutes, then flip and cook another 5-7 minutes. (Chicken should be nearly, but not completely cooked through by this point)
  3. Scoot the chicken over the sides and add remaining 1 tablespoon ghee to the empty portion of the pan. Once the ghee is melted, add asparagus. Season asparagus with salt and pepper, to taste. Cook, rotating throughout, for 4-6 minutes until tender and chicken is completely cooked through.
  4. Serve immediately garnished with freshly cracked black pepper and fresh herbs if desired.

Notes:
In place of the dried basil, oregano, and thyme, you can use about 1½ teaspoons dried Italian seasoning.

Original recipe found here

My Roasted Sweet Potatoes
Ingredients:
  • 4-6 Sweet Potatoes (Depending on how much you want to make. 5 medium sized sweet potatoes usually gets me 6 oz of sweet potato fries for 6 meals. I think my idea of medium sized is bigger than most though.)
  • Olive oil spray
  • Sea salt (I love using Garlic Sea Salt!)
  • Optional: Cinnamon, Paprika, any other Spices
Directions:
  1. Preheat oven to 425 degrees
  2. Skin and cut the sweet potatoes into whatever shape you want. I either do fries, wedges or circles.
  3. Spray baking pan with olive oil. Lay down sweet potato fries flat (do not just dump a pile on the pan).
  4. I fill my Misto with olive oil and lightly spray the fries, then add some sea salt (or whatever spices you enjoy).
  5. Bake for 15-20 minutes. Take out of the oven and move them around or flip them over. Bake for another 15-20 minutes.
  6. Keep an eye on them, if they are thin bake for less time, and vice versa. Key is to move them around or flip them over half way through baking them. I usually make mine thicker, so I bake them for at least a total of 40 minutes.
0 Comments

Banana Paleo Pancake Muffins

5/21/2018

0 Comments

 
Picture
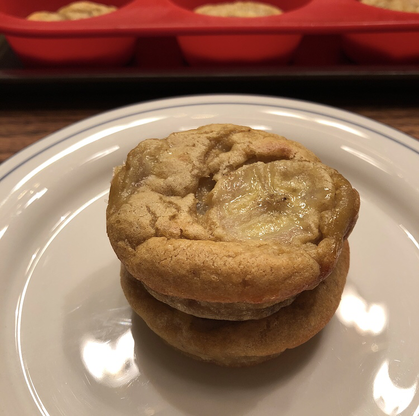
Anyone else notice that Birch Benders came out with a couple new paleo pancake and waffle mixes!? Along with their original Paleo version that I use pretty frequently to make these Paleo Blueberry Pancake Muffins, they now have a Paleo Banana and Pumpkin Spice mix! The Birch Benders website lists that both new products can be found at Whole Foods, and after looking at my local Whole Foods store all month I finally found the Banana Paleo Pancake & Waffle Mix! These mixes only require adding water, but I also always add a scoop of Paleo Protein to get some more protein in the meal, 1 egg (though I have experimented with 2 as well) to make the muffins more fluffy, and some fruit. Since this was a banana mix I figured I'd stick with the banana theme and add a few slices of banana on top of each muffin. This is a super easy meal prep recipe to throw together and they came out smelling and looking amazing! I unfortunately didn't make enough to taste test them myself, but my mom enjoyed them for breakfast and my mother's approval is not easy to get haha! Let me know if you try this new mix out and what you think. 

Paleo Pancake Muffins
Serves: 10-12 muffins
Ingredients:
  • 3/4 Cup Birch Benders Banana Paleo Pancake & Waffle Mix! (found at Whole Foods, but can also purchase online)
  • 2/3 Cup Water
  • 1 egg
  • 1 Scoop Protein Powder (optional) (I used a scoop of this Paleo Protein)
  • 2 Tbsp 100% Maple Syrup or Honey (optional)
  • Optional mix-in ideas:
          o Sliced bananas, or other fruit
          o Enjoy Life Dairy-Free Mini Chocolate Chips
          o Chopped nuts
Instructions:
  1. Preheat oven to 350. Mix together all ingredients, minus the optional mix-in’s
  2. Spray muffin tin pan with nonstick spray or use muffin liners. Fill ⅔ way full. Top each muffin with your choice of mix-ins.
  3. Bake for 15-20 minutes or until a toothpick comes out clean. (It took me 20 minutes for 10-12 muffins.)
0 Comments

Firecracker Pineapple Chicken​ over Cauliflower Rice

5/7/2018

0 Comments

 
Picture
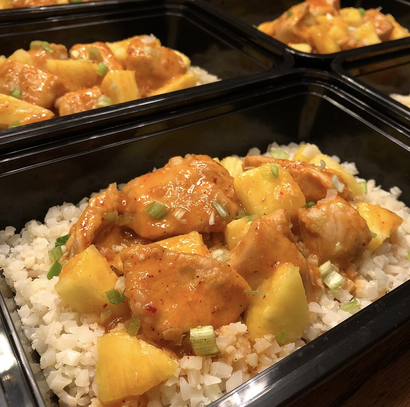
Ever have a meal that just makes you happy to eat? This one did that for me! It was seriously so delicious and paired perfectly with this first week of sunny weather in Maryland. Alright maybe I'm just excited to be eating pineapple and see some sun, but really this meal was the bomb! The original recipe link below has the option to increase serving size, which then adjusts your ingredient amounts. I adjusted it to serve 8 people, so please note that the recipe I posted below is based off the serving size for 8 people, with the exception of the oil and Tapioca/Arrowroot starch, which I significantly reduced back down. I did put ranges for both to leave it up to you and your needs/desires though. I personally used the lower number of all ranges and thought the below amounts worked perfectly for 8 servings. Anyways, the only ingredient that was tough to find was a quality pineapple juice. Unfortunately just about every juice in the local grocery stores have added ingredients and preservatives in them. After reading every label of juice in my local Giant grocery store though, I finally found the pineapple juice I linked below in the Organic/Natural food aisle. I was thrilled about it! I paired this with some frozen riced cauliflower that I heated up on the stove top with some salt and that was it. Pretty simple recipe to throw together without much prep and ingredients to it. I definitely recommend giving this one a try!

Firecracker Pineapple Chicken​ over Cauliflower Rice
Ingredients:
For the sauce:
  • 2-4 Tbsp Avocado oil or Coconut Oil
  • 4 tsp Fresh ginger, minced
  • 3 Cup Pineapple juice (I used Lakewood Organic Pure Pineapple Juice)
  • 4 Tbsp Franks red hot sauce (I used PaleoChef Wing Sauce)
  • 2 Tbsp Coconut aminos
  • 2-4 tsp Tapioca starch (I used Arrowroot starch)
For the chicken:
  • 2-3 Tbsp Tapioca starch (I used Arrowroot starch)
  • Salt and pepper
  • 2 lb Chicken breast
  • 2-4 Tbsp Avocado oil or Coconut Oil
  • 1 Cup Pineapple tidbits (I ended up just weighing 1-2 oz Pineapple per meal)
  • Cooked white rice, or cauliflower rice, or both
  • Sliced green onion
  • Sesame seeds, optional
Directions:
  1. In a medium frying pan heat the avocado oil (for the sauce) on medium heat. Add in the ginger and cook until fragrant, about 30 seconds. Turn up the heat to medium high and add in the pineapple juice, hot sauce and coconut aminos. Bring to a boil.
  2. Once boiling whisk 2 tsp of the sauce with the 1 tsp of tapioca starch in a small bowl until smooth. While whisking, pour in the tapioca starch mixture until well mixed.
  3. Boil, stirring constantly, until the sauce thickens and starts to reduce, about 7-8 minutes. Turn down the heat to medium/low and cook an additional 2-4 minutes, until the sauce begins to become shiny. Transfer to a medium bowl and cover to thicken and keep warm while you make the chicken.
  4. Place the tapioca starch and a pinch of salt and pepper in a large Ziploc bag. Add in the cubed chicken and shake until evenly coated.
  5. Heat 1 Tbsp of the avocado oil on medium high heat in a large frying pan. Add in half of the chicken paces and cook until golden brown, about 2-4 minutes. Flip and cook until the other side is golden brown. Then, transfer to a paper towel lined plate and lightly press out any excess oil. Repeat with the remaining oil and chicken.
  6. Add the cooked chicken into the sauce, along with the pineapple tidbits and toss to evenly coat.
  7. Serve over cauliflower rice (or rice...or both!) and garnish with green onion and sesame seeds.
  8. DEVOUR!

Original recipe found here
0 Comments

Chocolate Protein Pancake Muffins

5/7/2018

0 Comments

 
Picture
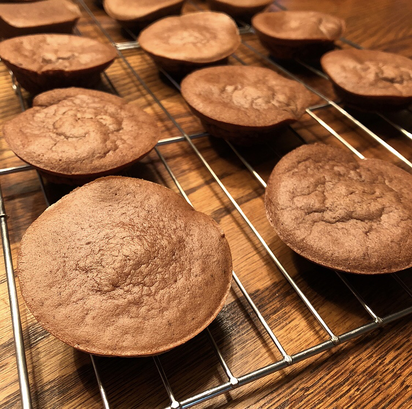
One of my very first blog posts was my Protein Pancake recipe that I used to make every week for breakfast. I seriously loved eating those every morning, but after I started prepping my mom's breakfasts and lunches along with my own, I unfortunately didn't have much time anymore to prep my pancakes too. Anyways, I decided to bring it back for my mom to try and I experimented with this muffin version. The only additional ingredient I used was Flaxseed and that was solely to sneak in some extra nutrients into this meal for her. The recipe below makes 9 muffins and if you are enjoying this as a meal I recommend having at least 3, which puts the meal at 20g Carbs, 8g Fat, and 19g Protein. I personally like using the single serve blade assembly on my Ninja blender because it's easier to clean up, so I ended up just making two batches of the recipe below to get 18 muffins for the week. If you are using a bigger blender though you can easily double the ingredients below. Of note, I ended up filling the muffin tins a little above 2/3 of the way full and although they alarmingly rise in the oven, once they were out of the oven and cooled down they shrunk back down. The bottoms actually shrunk in a lot more then the top, so they turned out looking a little odd, but they still tasted delicious! I'm curious if I need to add more oats of flaxseed to prevent that issue, so I'll most likely be experimenting with this one again. Anyways, this was not only an extremely easy recipe to prep for breakfast, but now my mom is enjoying chocolate muffins all week for breakfast. Happy mom, happy life! Let me know if you try these out please! 

​Protein Pancake Muffins
Servings: 3 muffins =
 20C/8F/19P (Makes 9 muffins)
Ingredients:
  • 1/4 cup Gluten-Free Oats (I used Bob's Red Mill Gluten Free Quick Cooking Rolled Oats)
  • 2 Tbsp Flaxseed (I used Bob's Red Mill Golden Flaxseed Meal)
  • 2/3 cup Egg Whites
  • 1 1/4 Scoop Protein Powder (I used 37g of this Paleo Protein)
  • 1 Banana
  • 2 Tbsp Almond Butter (or other Nut Butter)
Instructions:
  1. Preheat oven to 350. Mix together all ingredients in blender.
  2. Spray muffin tin pan with nonstick spray, oil, or use muffin liners and fill ⅔ way full. 
  3. Bake for 18-20 minutes or until a toothpick comes out clean. 
0 Comments

Make Your Own Kombucha

5/3/2018

0 Comments

 
Picture
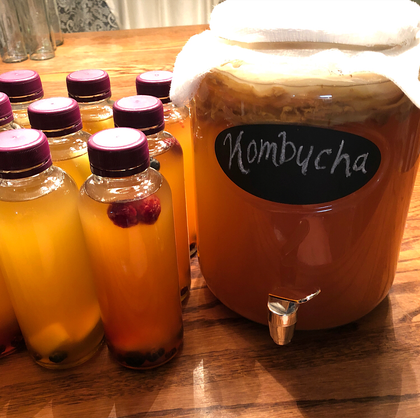
Slightly different blog post on another staple "meal prep" that I have been making for over three years now, Kombucha! I'll get more into what Kombucha is all about below, but ever since my friend helped me get started I've never looked back, and I've also continuously helped others get started as well. As I recently gave away another SCOBY (keep reading below for more on what that is) along with directions for the Kombucha making process, I realized for the amount of times I share these directions I should just make a blog post about it. SO here it is!  Leave a comment if you have any questions or need more help getting started!

What? Kombucha is a beverage produced by fermenting sweet tea with a culture of yeast and bacteria (technically referred to as a symbiotic culture of acetic acid (vinegar) bacteria and yeast, or a SCOBY), also known as probiotics. Our body's are full of good and bad bacteria, and probiotics are helpful bacteria to keeping your gut healthy!

Why? Your digestion system and gut health matter, I mean that's where your food is processed! Here are just some symptoms that suggest your gut health is not working up to par:
  • Gas
  • Bloating
  • Inconsistent bowel movements
  • Thyroid issues
  • Fatigue
  • Mood disorders like anxiety/depression
  • Allergies / Seasonal Allergies
There are many reasons to explore as to why you might be experiencing less than optimal gut health, but one way to help is adding probioitics into your daily consumption. 

How? Making your own Kombucha is easy and extremely cost-effective (buying a bottle from the store everyday = $$$)!  Here's what you need to get started:
  • Gallon-Size Glass Jar
  • Tight-Weave Cheese Cloth or Paper Coffee Filter
  • Something to secure the cover to the jar (rubber band or canning jar rings work well)
  • 1 Cup White cane sugar
  • 8 Green or Black Tea bags (I like doing half Green/half Black)
  • 13-14 Cups Unfluoridated, Unchlorinated Water
  • 2 Cups Starter Tea (tea from a previous batch of Kombucha) or Distilled White Vinegar 
  • Active Kombucha SCOBY (click link if you do not have a SCOBY)
Optional:
  • 7-8 Smaller bottles
  • Fruit, ginger, peppers, spices, herbs, etc. for flavoring
  • Funnel
  • Small strainer
Directions:
  1. Clean and dry the gallon size jar you plan on using. Add the starter tea and SCOBY into the jar.
  2. In a pot, combine 4 cups of hot water and 1 cup of white cane sugar. Put on stove at medium heat. Stir around a few times. Once the sugar dissolves, take the pot off the hot burner and place 8 tea bags in the water to steep (I use organic black and green tea).
  3. Leave the tea bags in for about 20 minutes then remove them. Then add 8-10 more cups of cold water so that the tea mixture cools down enough - needs to be 68-85ºF. 
  4. Add this tea mixture to the gallon size jar with the starter tea and SCOBY.
  5. Cover the jar with cheese cloth and place a rubber band around it.
  6. Allow the mixture to sit undisturbed at 68-85°F, out of direct sunlight, for 7-30 days, or to taste. The longer the Kombucha ferments, the less sweet and more vinegary it will taste. (I usually let the mixture sit for 10 days. You can stick a straw into the mix, hold your thumb at the top of the straw to hold some tea in, then remove and taste. If it's too sweet, then continue letting it ferment.)
  7. Once you are done fermenting your batch, have your 7-8 bottles ready. Add some fruit into each bottle and any other flavors you want to experiment with (ginger, peppers, spices, herbs, etc.). I always add raisins to help with carbonation in addition to some fresh frozen fruit like pineapples, blueberries, and raspberries. 
  8. Once each bottle has it's flavorings in it, distribute the Kombucha from the gallon-size glass jar into each bottle, and seal air tight. **Make sure to leave at least 1-2 cups of tea in with the SCOBY so you have enough starter tea for your next batch**
  9. You can either put the bottles into the fridge right away, or leave them out for a couple extra days (I personally let the bottles sit for another 3 days to carbonate more before putting into the fridge.) Once you put the bottles in the fridge (or the starter tea and SCOBY mixture), the fermentation process stops.
  10. Congrats on finishing your first batch! Go back to the first step and do it all over again to begin your next batch. 

Notes: Your SCOBY grows, so every 3 or so batches I peel mine in half and save it to give to someone who might want to try making their own Kombucha. When I do this, I store the SCOBY in a clean mason jar, add some of my Kombucha tea so they have their Starter Tea, then seal the jar tight and leave it in the fridge. Again, when stored in the fridge, the fermentation process stops, so you can leave it in there until you are ready to start your batch. The optional funnel is to help pour your Kombucha into the bottles, but if you purchase a Gallon-Size Glass Jar with a dispenser then you will have a much cleaner and enjoyable time bottling your Kombucha. The optional strainer is to strain the fruit from the bottles before drinking, or you can just leave the fruit in there and answer everyone's questions as to what the hecht you are drinking, or is it Moonshine, if you want! If you do strain the fruit, you also might need the funnel to help pour the Kombucha back into the bottles. For the 7-8 smaller bottles you can get fancy and purchase your own, or when I first started I simply washed and reused Kombucha bottles that I had bought from the store. Last, but not least, for those who have never tried Kombucha or a probiotic supplement before, I highly encourage you to ease into things slowly. A cup of Kombucha or half of the prescribed probiotic amount is always a good place to start, see how your body responds, and go from there.

​If any of this digestion and gut talk sparked your interest or concerns about your health, click that nutrition coaching tab above and lets chat! 

I used this website for help when I first started making my own Kombucha and for reference in the directions above. Check it out for further information and help!
0 Comments
    Picture

    Erika Copeland

    Sharing the recipes I prepare to help others eat more nutritious food and begin their journey to a healthier life.

    Instagram

    categories

    All
    AIP
    Beef
    Breakfast
    Brussels
    Burgers
    Casserole
    Cauliflower Rice
    Chicken
    Crockpot
    Kombucha
    Low FODMAP
    Meal Prep Tips
    Nutrition Blog
    Pork
    Pressure Cooker
    Quiche
    Sausage
    Shrimp
    Snacks
    Steak
    Sweet Potatoes
    Treats
    Tuna
    Turkey
    Vegan
    Video
    Whole30

    Archives

    December 2021
    November 2021
    September 2021
    August 2021
    July 2021
    June 2021
    May 2021
    April 2021
    March 2021
    February 2021
    January 2021
    December 2020
    November 2020
    September 2020
    August 2020
    July 2020
    June 2020
    May 2020
    April 2020
    March 2020
    February 2020
    January 2020
    December 2019
    November 2019
    October 2019
    September 2019
    August 2019
    July 2019
    June 2019
    May 2019
    April 2019
    March 2019
    February 2019
    January 2019
    December 2018
    November 2018
    October 2018
    September 2018
    August 2018
    July 2018
    June 2018
    May 2018
    April 2018
    March 2018
    February 2018
    January 2018
    December 2017
    November 2017
    October 2017
    September 2017
    August 2017
    July 2017
    June 2017
    May 2017
    April 2017
    March 2017
    February 2017
    January 2017
    December 2016
    November 2016
    October 2016
    September 2016
    August 2016
    July 2016
    June 2016
    May 2016
    April 2016
    March 2016
    February 2016
    January 2016

Powered by Create your own unique website with customizable templates.
  • Home
  • All Recipes
  • Goal
  • About
  • FAQ
  • Contact