LiveSqueezy
  • Home
  • All Recipes
  • Goal
  • About
  • FAQ
  • Contact

Make Your Own Kombucha

5/3/2018

0 Comments

 
Picture
Slightly different blog post on another staple "meal prep" that I have been making for over three years now, Kombucha! I'll get more into what Kombucha is all about below, but ever since my friend helped me get started I've never looked back, and I've also continuously helped others get started as well. As I recently gave away another SCOBY (keep reading below for more on what that is) along with directions for the Kombucha making process, I realized for the amount of times I share these directions I should just make a blog post about it. SO here it is!  Leave a comment if you have any questions or need more help getting started!

What? Kombucha is a beverage produced by fermenting sweet tea with a culture of yeast and bacteria (technically referred to as a symbiotic culture of acetic acid (vinegar) bacteria and yeast, or a SCOBY), also known as probiotics. Our body's are full of good and bad bacteria, and probiotics are helpful bacteria to keeping your gut healthy!

Why? Your digestion system and gut health matter, I mean that's where your food is processed! Here are just some symptoms that suggest your gut health is not working up to par:
  • Gas
  • Bloating
  • Inconsistent bowel movements
  • Thyroid issues
  • Fatigue
  • Mood disorders like anxiety/depression
  • Allergies / Seasonal Allergies
There are many reasons to explore as to why you might be experiencing less than optimal gut health, but one way to help is adding probioitics into your daily consumption. 

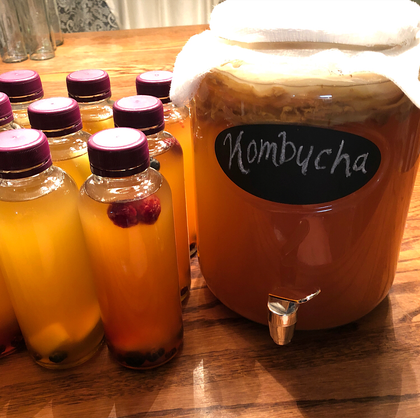
How? Making your own Kombucha is easy and extremely cost-effective (buying a bottle from the store everyday = $$$)!  Here's what you need to get started:
  • Gallon-Size Glass Jar
  • Tight-Weave Cheese Cloth or Paper Coffee Filter
  • Something to secure the cover to the jar (rubber band or canning jar rings work well)
  • 1 Cup White cane sugar
  • 8 Green or Black Tea bags (I like doing half Green/half Black)
  • 13-14 Cups Unfluoridated, Unchlorinated Water
  • 2 Cups Starter Tea (tea from a previous batch of Kombucha) or Distilled White Vinegar 
  • Active Kombucha SCOBY (click link if you do not have a SCOBY)
Optional:
  • 7-8 Smaller bottles
  • Fruit, ginger, peppers, spices, herbs, etc. for flavoring
  • Funnel
  • Small strainer
Directions:
  1. Clean and dry the gallon size jar you plan on using. Add the starter tea and SCOBY into the jar.
  2. In a pot, combine 4 cups of hot water and 1 cup of white cane sugar. Put on stove at medium heat. Stir around a few times. Once the sugar dissolves, take the pot off the hot burner and place 8 tea bags in the water to steep (I use organic black and green tea).
  3. Leave the tea bags in for about 20 minutes then remove them. Then add 8-10 more cups of cold water so that the tea mixture cools down enough - needs to be 68-85ºF. 
  4. Add this tea mixture to the gallon size jar with the starter tea and SCOBY.
  5. Cover the jar with cheese cloth and place a rubber band around it.
  6. Allow the mixture to sit undisturbed at 68-85°F, out of direct sunlight, for 7-30 days, or to taste. The longer the Kombucha ferments, the less sweet and more vinegary it will taste. (I usually let the mixture sit for 10 days. You can stick a straw into the mix, hold your thumb at the top of the straw to hold some tea in, then remove and taste. If it's too sweet, then continue letting it ferment.)
  7. Once you are done fermenting your batch, have your 7-8 bottles ready. Add some fruit into each bottle and any other flavors you want to experiment with (ginger, peppers, spices, herbs, etc.). I always add raisins to help with carbonation in addition to some fresh frozen fruit like pineapples, blueberries, and raspberries. 
  8. Once each bottle has it's flavorings in it, distribute the Kombucha from the gallon-size glass jar into each bottle, and seal air tight. **Make sure to leave at least 1-2 cups of tea in with the SCOBY so you have enough starter tea for your next batch**
  9. You can either put the bottles into the fridge right away, or leave them out for a couple extra days (I personally let the bottles sit for another 3 days to carbonate more before putting into the fridge.) Once you put the bottles in the fridge (or the starter tea and SCOBY mixture), the fermentation process stops.
  10. Congrats on finishing your first batch! Go back to the first step and do it all over again to begin your next batch. 

Notes: Your SCOBY grows, so every 3 or so batches I peel mine in half and save it to give to someone who might want to try making their own Kombucha. When I do this, I store the SCOBY in a clean mason jar, add some of my Kombucha tea so they have their Starter Tea, then seal the jar tight and leave it in the fridge. Again, when stored in the fridge, the fermentation process stops, so you can leave it in there until you are ready to start your batch. The optional funnel is to help pour your Kombucha into the bottles, but if you purchase a Gallon-Size Glass Jar with a dispenser then you will have a much cleaner and enjoyable time bottling your Kombucha. The optional strainer is to strain the fruit from the bottles before drinking, or you can just leave the fruit in there and answer everyone's questions as to what the hecht you are drinking, or is it Moonshine, if you want! If you do strain the fruit, you also might need the funnel to help pour the Kombucha back into the bottles. For the 7-8 smaller bottles you can get fancy and purchase your own, or when I first started I simply washed and reused Kombucha bottles that I had bought from the store. Last, but not least, for those who have never tried Kombucha or a probiotic supplement before, I highly encourage you to ease into things slowly. A cup of Kombucha or half of the prescribed probiotic amount is always a good place to start, see how your body responds, and go from there.

​If any of this digestion and gut talk sparked your interest or concerns about your health, click that nutrition coaching tab above and lets chat! 

I used this website for help when I first started making my own Kombucha and for reference in the directions above. Check it out for further information and help!
0 Comments


Leave a Reply.

    Picture

    Erika Copeland

    Sharing the recipes I prepare to help others eat more nutritious food and begin their journey to a healthier life.

    Instagram

    categories

    All
    AIP
    Beef
    Breakfast
    Brussels
    Burgers
    Casserole
    Cauliflower Rice
    Chicken
    Crockpot
    Kombucha
    Low FODMAP
    Meal Prep Tips
    Nutrition Blog
    Pork
    Pressure Cooker
    Quiche
    Sausage
    Shrimp
    Snacks
    Steak
    Sweet Potatoes
    Treats
    Tuna
    Turkey
    Vegan
    Video
    Whole30

    Archives

    December 2021
    November 2021
    September 2021
    August 2021
    July 2021
    June 2021
    May 2021
    April 2021
    March 2021
    February 2021
    January 2021
    December 2020
    November 2020
    September 2020
    August 2020
    July 2020
    June 2020
    May 2020
    April 2020
    March 2020
    February 2020
    January 2020
    December 2019
    November 2019
    October 2019
    September 2019
    August 2019
    July 2019
    June 2019
    May 2019
    April 2019
    March 2019
    February 2019
    January 2019
    December 2018
    November 2018
    October 2018
    September 2018
    August 2018
    July 2018
    June 2018
    May 2018
    April 2018
    March 2018
    February 2018
    January 2018
    December 2017
    November 2017
    October 2017
    September 2017
    August 2017
    July 2017
    June 2017
    May 2017
    April 2017
    March 2017
    February 2017
    January 2017
    December 2016
    November 2016
    October 2016
    September 2016
    August 2016
    July 2016
    June 2016
    May 2016
    April 2016
    March 2016
    February 2016
    January 2016

Powered by Create your own unique website with customizable templates.
  • Home
  • All Recipes
  • Goal
  • About
  • FAQ
  • Contact