LiveSqueezy
  • Home
  • All Recipes
  • Goal
  • About
  • FAQ
  • Contact

Tomato Basil Bisque with Italian Meatballs

6/29/2020

0 Comments

 
Picture
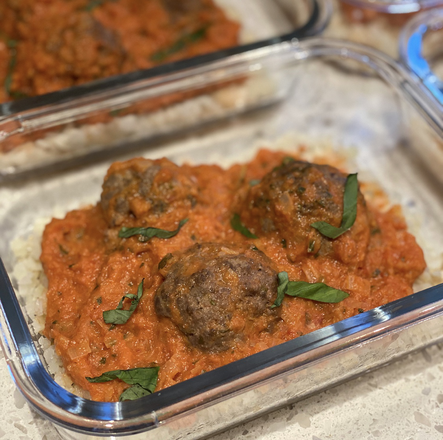
This turned out tasting just as amazing as it sounds! The only slicing and dicing involved is for the leeks and basil. Don't spend too much time making perfect or tiny slices though because those ingredients just go into the blender anyways. The recipe below serves four, so I had to significantly increase the ingredients to get enough meals for our house. Since we aren't big soup fans I ended up using a ratio of half bisque to meatballs, which is why my meal looks less saucy. I absolutely love an Italian dish with basil and tomato flavors and this meal was exactly that. I topped over some plain cauliflower rice and rice and really enjoyed eating this meal for lunch all week long. If you give this one a try let me know what you think! 

Tomato Basil Bisque with Italian Meatballs
​Ingredients:
  • 1 leek stalk, sliced thinly
  • 1 tablespoon olive oil
  • 1 28-ounce can diced tomatoes
  • 1/3 cup fresh chopped basil
  • 1/3 cup full-fat coconut milk
  • *optional: 1 tablespoon honey or agave
  • 1 pound ground beef
  • 2 teaspoons garlic powder
  • 3 teaspoons dried oregano
  • 2 teaspoons onion powder
  • 1 teaspoon mustard powder
  • 1 1/2 teaspoons salt
  • 1/2 teaspoon pepper
Directions:
  1. Preheat oven to 400 degrees
  2. Combine the ground beef, garlic powder, dried oregano, onion powder, mustard powder, salt, and pepper. Using a 1/4 measuring up, scoop the meat mixture then form into a ball
  3. Place the raw meatballs on a baking sheet and place into the oven to cook for 12-15 minutes
  4. While the meatballs are cooking, sauté the sliced leek in olive oil just slightly below medium-high heat for roughly 5 minutes
  5. Pour the the sautéed leeks from the saucepan into a blender, then add the diced tomatoes (with juice), fresh basil, and coconut milk. Blend until you reach the desired consistency (pulsing for a chunkier texture, blending on high for a creamy bisque)
  6. Pour the tomato basil bisque back into the saucepan and turn heat to medium-low, just to warm throughout. Add the honey or agave if desired (this helps cut the acidity a bit – add more sweetener as needed)
  7. Once the meatballs are finished cooking, add to the bisque

Original recipe found here
0 Comments

Beef & Veggie Bowls with Comeback Sauce

6/22/2020

0 Comments

 
Picture
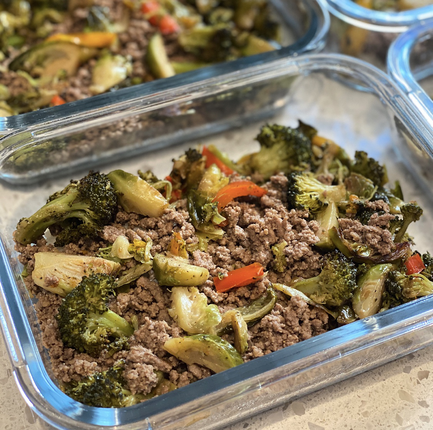
I've never heard of comeback sauce before, but my Mississippi livin' sister let me know real quick that it's a southern thing. Since I had extra Primal Kitchen Chipotle Lime Mayo and Primal Kitchen Organic Unsweetened Ketchup already in the fridge I decided to give this one a try and I am SO glad I did. This meal was a delicious one that I seriously looked forward to eating everyday! I increased all the ingredients significantly and ended up using the Instant Pot saute feature to cook the beef. I also mixed the comeback sauce in with the beef at the end because it made more sense to me then just plopping some on top of each meal. If you are not a big mayo fan, I suggest cutting the comeback sauce recipe down some. I ended up only using a little compared to the increased amount of beef and veggies I made and thought it still turned out plenty flavorful and delicious. This one was super easy to throw together, especially if you buy pre-sliced veggies. If not, dice them up the day before if you want an even faster meal prep time. I will definitely be making this one again anytime I have extra mayo and ketchup in the fridge! 

​Beef & Veggie Bowls with Comeback Sauce 
Ingredients:

Beef
  • 1 lb lean ground beef (Can sub ground turkey)
  • 1/2 tsp salt
  • 1/2 tsp pepper
  • 1/2 tsp chili powder
Veggies
  • 20 – 24 oz fresh broccoli
  • 1 lb fresh brussels sprouts
  • 1 bell pepper, Color of choice
  • 3 tbsp olive oil, extra virgin
  • 1/2 tsp salt
  • 1/2 tsp pepper
  • 1/2 tsp garlic powder
Comeback Sauce
  • 1/2 cup mayo (I used Primal Kitchen Chipotle Lime Mayo)
  • 1 tbsp homemade or high quality store-bought ketchup​ (I used Primal Kitchen Organic Unsweetened Ketchup)
  • 1 tsp lemon juice
  • 1/2 tsp Tabasco
  • 1/2 tsp paprika
  • 1/2 tsp garlic powder
  • 1/2 tsp ground mustard
  • 1/2 tsp salt
Directions:
  1. Preheat oven to 425 degrees.
  2. Cut any large broccoli florets in half or thirds. Add broccoli florets to baking sheet in a single layer.
  3. Trim the bottom of each brussels sprout and peel away the first layer of leaves. That’s where you usually see the dirt and any brown sprouts. Once this is done you’ll have beautiful little bright green sprouts. Add them to your baking sheet in a single layer beside the broccoli.
  4. Slice your pepper into strips. Spread in a single layer on baking sheet beside the other veggies.
  5. Drizzle olive oil over all veggies. Sprinkle with salt, pepper, and garlic powder. Bake for 20 to 25 minutes.
  6. While vegetables are roasting, add your ground beef (or turkey) to a skillet on the stove top. Use your spatula to crumble the beef. Cook on medium high, stirring occasionally, until beef is browned. If your beef isn’t very lean you may want to drain the grease. Stir in salt, pepper, and chili powder.
  7. Add all Comeback Sauce ingredients to a bowl and stir together until well combined.
  8. To assemble, divide all roasted veggies into bowls. Top with cooked ground beef and Comeback Sauce. You’re ready to eat!

​Original recipe found here
0 Comments

Almond Flour Blueberry Banana Muffins

6/15/2020

0 Comments

 
Picture
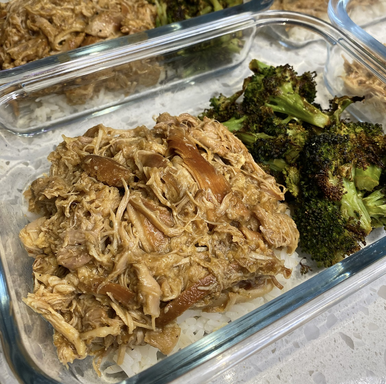
Although these say almond flour I actually used some banana flour with these too. I stumbled upon it while I was at the store getting almond flour​ and figured what better recipe then banana muffins to try using banana flour with? I found it at Harris Teeter and it was actually WAY less expensive then almond flour. After some quick google searches, I decided not to totally substitute the almond flour, but instead used banana flour for 1/4 of the total flour called for. The exact measurements I used are indicated below if you want to see. The only other change I made to this recipe was using ghee instead of olive oil. I had both, but ghee sounded like it would go better with a muffin recipe. I've never had blueberries with my banana bread, but these turned out tasting amazing! They had all the banana taste to them with bites of blueberries that were absolutely delicious. Now these definitely weren't as sweet as your average banana bread, so if you are looking for that I would recommend increasing the maple syrup some. I personally enjoyed them just the way they were and will absolutely be making them again the next time our bananas go brown! 

Almond Flour Blueberry Banana Muffins
Ingredients:
  • 3 bananas, mashed (about 1 cup)
  • 2 large eggs
  • 1/4 cup olive oil (I used ghee instead)
  • 1/4 cup pure maple syrup
  • 1 teaspoon vanilla extract
  • 2 1/2 cups almond flour (I ended up doing 1.875 cups Almond Flour and .625 cups Banana Flour)
  • 1 1/2 teaspoons baking powder
  • 1/4 teaspoon baking soda
  • 1/4 teaspoon kosher salt
  • 1 cup blueberries
Directions:
  1. Preheat the oven to 350 degrees. Line a standard muffin pan with paper liners.
  2. Mash the banana in a large bowl. Add the eggs, oil, maple syrup and vanilla and whisk until well combined.
  3. Add the almond flour, then sprinkle the baking powder, baking soda and salt over the top. Whisk until well incorporated and no lumps remain, then gently fold in the blueberries.
  4. Divide the batter evenly between the muffin cups and bake on the middle rack of the oven for 23-28 minutes, until lightly golden brown and set. Remove from heat and place on a wire rack. Let stand 10 minutes, then remove from the pan and cool completely.
  5. Enjoy!
Notes:
  • Muffins will keep at room temperature in an air tight container for 3 days. Place in the refrigerator to keep for up to one week, and reheat as needed.
  • If blueberries aren't in season, use frozen blueberries, tossed in an additional tablespoon of almond flour.  Omit the blueberries for almond flour banana muffins.
  • Almond flour blueberry muffins are also freezer friendly.

Original recipe found here
0 Comments

Chinese Pepper Steak

6/8/2020

0 Comments

 
Picture
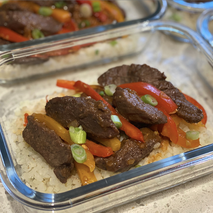
Another I Heart Umami recipe that did not disappoint! If you can purchase sirloin steak I definitely recommend trying this one out! I ended up using a chuck roast and that was not the right cut of meat for this type of recipe whatsoever. The meal still turned out delicious, but I spent a lot of time cutting out fat to try and slice thin cuts of meat. The seasonings and homemade Worcestershire sauce were on point though and seriously made this into a true tasting Chinese Pepper Steak meal. Also, the Worcestershire sauce recipe makes extra sauce that you can save and use for making steaks another time. All around, this was a relatively simple and one skillet recipe that turned out tasting delicious!

Chinese Pepper Steak
Ingredients:
  • 1 lb. sirloin steak, thin sliced against the grain
  • 1 green + 1 red bell peppers, sliced to thin strips*
  • 3-4 garlic cloves, thin sliced
  • 1 large shallot, sliced to thin strips
Beef seasoning:
  • 2 tbsp coconut aminos
  • ¼ tsp garlic powder
  • ¼ tsp onion powder
  • 2 tsp toasted sesame oil
  • 1 tsp arrowroot flour
  • Less than ½ tsp baking soda
  • Coarse salt and pepper to taste*
Paleo Whole30 Worcestershire sauce: (makes about ⅔ cup)
  • 1/2 cup beef stock
  • 3 tbsp tomato paste, no salt and sugar added
  • 1 tbsp aged balsamic vinegar
  • 2 tbsp coconut aminos
  • 1/4 tsp onion powder
  • 1/4 tsp garlic powder
  • 1/4 tsp mustard powder
  • 1/8 tsp sea salt
  • 1/8 tsp cinnamon powder
  • 1/8 tsp black pepper
Directions:
  1. Prep: Thin slice the beef against the grain. Add beef seasonings. Mix well and set aside in the fridge. Thin slice bell peppers*, prep aromatics, and combine (stir-well) ingredients under Worcestershire sauce.
  2. Beef: In a well-heated large stainless steel skillet, add 1.5 tbsp cooking fat of your choice, pan sear the beef until they’re slightly charred. Do this in separate batches. Set aside along with the juice in the skillet.
  3. Combine: Add a bit more oil to the same skillet, add sliced garlic and shallots. Season with a bit salt, saute until fragrant (about 8-10 seconds). Add bell peppers. Season with a bit more salt, saute until the peppers turn slightly softer yet still crunchy. Add ¼ cup Worcestershire sauce, add beef back to the skillet. Give a quick toss to coat the sauce over. Taste and see if more salt or sauce is preferred.
  4. Serve hot and immediately with cauliflower rice, mashed potatoes, or simple salad.
Notes
  • For AIP version, swap bell peppers for carrots and/or celery. Slice them to match stick thin. Omit black pepper.
  • For thicker Worcestershire sauce texture: bring the sauce to simmer over stovetop, let it simmer and stir frequently for about 1 minute. Cool and store in the refrigerator.
  • To make ahead - Season thin sliced beef. Store in fridge (for serving next day) or freezer. Pre-make worcestershire sauce. Store in glass container in the fridge. Finish within 3 weeks for best flavor.

Original recipe found here
0 Comments

Instant Pot Honey Sesame Chicken

6/1/2020

0 Comments

 
Picture
Truly a delicious Instant Pot chicken meal to save! I did not top with sesame seeds, but the sesame oil gave this chicken a true honey sesame chicken taste. I ended up tripling the ingredients below, then only using half the honey due to preference. Also, since I had much more chicken I skipped out on sauteing it and just increased the pressure cooking time. No worries if you don't have arrowroot starch to help thicken the sauce either. Putting the pot on saute mode at the end and continuing to mix everything will reduce the sauce plenty enough without it. I actually hardly use arrowroot starch anymore when using the Instant Pot since saute mode reduces the sauce just as well. While the chicken was cooking I heated up some coconut oil and threw frozen plain cauliflower rice and the extra diced green onion together to pair with this chicken. Super simple and easy meal to put together for dinner or meal prep! 

Instant Pot Honey Sesame Chicken
Ingredients:
  • 2 lbs boneless skinless chicken breasts
  • salt and freshly ground black pepper
  • 1 Tbsp olive oil
  • 1/2 cup chopped onion
  • 2 cloves garlic, minced
  • 1/2 cup honey
  • 2 tsp sesame oil
  • 1/4 cup coconut aminos
  • 1 Tbsp rice vinegar (I used apple cider vinegar)
  • 2 Tbsp homemade ketchup (I used Primal Kitchen Ketchup)
  • 1/2 Tbsp ground ginger
  • 2 Tbsp arrowroot starch (optional)
  • sesame seeds
  • fresh green onions, chopped
Directions:
  1. Season chicken breasts with salt and pepper on both sides. Preheat pressure cooking pot using the ‘Saute’ setting. Add olive oil, chopped onion and seasoned chicken to the preheated pot. Saute, stirring occasionally, until the onion is softened. Add minced garlic and saute for about 30 seconds.
  2. In a small bowl, mix the honey, sesame oil, coconut aminos, rice vinegar, ketchup, and ground ginger. Mix well, and add to the pot. 
  3. Lock the lid, seal the valve, and press the ‘Manual’ (or ‘Pressure Cooking’) button, and adjust the time to 4 minutes. When timer beeps, turn pressure cooker off and do a quick pressure release.
  4. Remove chicken from the pot, and shred it. Transfer 1/4 cup honey sesame sauce from the pot to a small bowl. Add 2 Tbsp arrowroot starch (optional to help thicken) to the bowl and stir until the sauce is smooth. Return the sauce back to the pot, and saute using the ‘Saute’ function for a couple of minutes until the sauce thickens. Turn off the pot. Add shredded chicken back to the pot and mix well.
  5. Serve honey sesame chicken over rice. Sprinkle some sesame seeds and chopped fresh green onion on top.

​Original recipe found here
0 Comments
    Picture

    Erika Copeland

    Sharing the recipes I prepare to help others eat more nutritious food and begin their journey to a healthier life.

    Instagram

    categories

    All
    AIP
    Beef
    Breakfast
    Brussels
    Burgers
    Casserole
    Cauliflower Rice
    Chicken
    Crockpot
    Kombucha
    Low FODMAP
    Meal Prep Tips
    Nutrition Blog
    Pork
    Pressure Cooker
    Quiche
    Sausage
    Shrimp
    Snacks
    Steak
    Sweet Potatoes
    Treats
    Tuna
    Turkey
    Vegan
    Video
    Whole30

    Archives

    December 2021
    November 2021
    September 2021
    August 2021
    July 2021
    June 2021
    May 2021
    April 2021
    March 2021
    February 2021
    January 2021
    December 2020
    November 2020
    September 2020
    August 2020
    July 2020
    June 2020
    May 2020
    April 2020
    March 2020
    February 2020
    January 2020
    December 2019
    November 2019
    October 2019
    September 2019
    August 2019
    July 2019
    June 2019
    May 2019
    April 2019
    March 2019
    February 2019
    January 2019
    December 2018
    November 2018
    October 2018
    September 2018
    August 2018
    July 2018
    June 2018
    May 2018
    April 2018
    March 2018
    February 2018
    January 2018
    December 2017
    November 2017
    October 2017
    September 2017
    August 2017
    July 2017
    June 2017
    May 2017
    April 2017
    March 2017
    February 2017
    January 2017
    December 2016
    November 2016
    October 2016
    September 2016
    August 2016
    July 2016
    June 2016
    May 2016
    April 2016
    March 2016
    February 2016
    January 2016

Powered by Create your own unique website with customizable templates.
  • Home
  • All Recipes
  • Goal
  • About
  • FAQ
  • Contact