LiveSqueezy
  • Home
  • All Recipes
  • Goal
  • About
  • FAQ
  • Contact

Citrus Shredded Beef with Caribbean Roasted Vegetables

3/29/2021

0 Comments

 
Picture
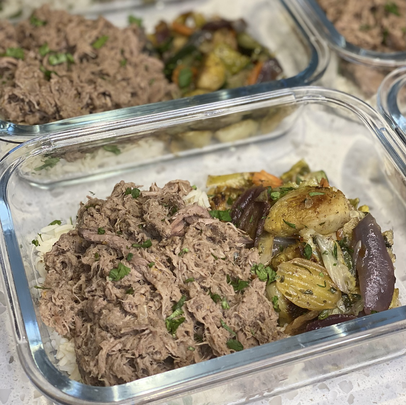
This meal was so amazing! The Citrus Beef was full of delicious citrus flavor and the Caribbean Roasted Vegetables are a tasty must-try. Super simple slow cooker recipe and an easy sheet pan roasted veggie recipe, especially if you purchase pre-cut vegetables. I ended up making the Citrus Beef in the Instant Pot on the slow cooker setting and just boiled down the excess broth and juice on Sauté mode at the end. I think this helped keep a ton of flavor. The Caribbean Roasted Veggies were inspired by the recipe linked below and it was a fun twist on roasting up a variety of vegetables with spices and flavors that complimented the Citrus Beef pretty well. I will definitely be making these vegetables again to pair with other citrus and Caribbean style meals in the future! I also thought this shredded beef could easily be thrown into a tortilla to make for a delicious citrus taco. This meal takes me back to the Florida Keys and gets me excited for warmer weather! I will definitely be making this one again soon. 

Citrus Shredded Beef
Ingredients:
  • 2-3 lbs grass-fed beef roast we used a blade roast
  • 1 ½ tsp kosher salt
  • 1 lime zested & juiced
  • 1 orange zested & juiced
  • 1 small onion diced
  • 4 cloves garlic minced
  • 1 tsp ground cinnamon
  • ½ tsp ground ginger
  • ¼ tsp dried thyme
  • ½ tsp ground cloves
Directions:
  1. Place all ingredients in a crockpot on low heat for 6-8 hours.
  2. Once beef is falling apart tender, remove the beef and drain the broth. Shred the beef with a fork. Be sure to pull out the cloves! Add back enough broth to keep it moist but not wet.
Notes:
  • If the lime and orange aren't juicy you may need up to a ¼ cup of water. Have restraint! You don't want it to be soupy.
  • Depending on the shape of your roast and the crock pot size you may need to cut the beef into large chunks.
  • AIP Compliant

Original recipe found here

​

Caribbean Roasted Vegetables
Ingredients:
  • 1/4 cup Extra Virgin Olive Oil
  • 1 lb Brussels, halved
  • 1 lb Zucchini, chopped 
  • 1 lb carrots, chopped to 1 or ½ inch chunks
  • 1 large red onion, halved and cut into thick 1 inch pieces
  • 4 tablespoon chopped fresh cilantro
  • 2 teaspoon chopped fresh parsley
  • 2 teaspoon ground coriander 
  • ½ teaspoon ground ginger
  • ½ teaspoon ground allspice
  • ½ teaspoon salt
  • ½ teaspoon black pepper
Directions:
  1. Preheat oven to 400 degrees F. Grab a large (11x17-inch) or 2 smaller sheet pans and set aside. Prepare the veggies: peel the carrots and cut into large chunks (if they are thick do 1 inch chunks if they are thinner do 1-1/2 inch chunks), remove the outer leaves of the brussels and halve them, chop the zucchini, and halve the red onion and cut into thick 1-inch pieces.
  2. Place all the prepared vegetables in one even layer (do NOT overlap or you'll steam the veggies instead of roasting them) on the prepared baking sheet(s) and add the herbs and spices. Add the olive oil and toss well, evenly coating all the vegetables with the seasonings and oil. (Add 1-2 more tablespoons of oil if the vegetables seem dry.)
  3. Place on middle rack in oven and bake for 35 to 40 minutes, flipping the veggies 20 minutes into baking time.
  4. Remove from the oven and enjoy immediately. 

Inspired by this recipe
0 Comments

Whole30 Pineapple Teriyaki Chicken

12/14/2020

0 Comments

 
Picture
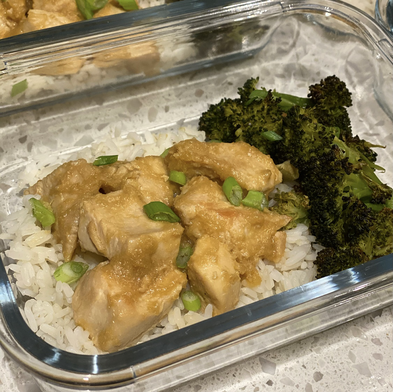
This turned out super delicious and will definitely be a repeat recipe in our house! Cook the diced chicken in a large skillet, throw the four sauce ingredients in the blender, then heat up the sauce and toss with the chicken. Can't get any easier then that! I've also made this by just throwing the chicken in the Instant Pot with the Pineapple Teriyaki Sauce, which turned out great as well and was an even more simple, less hands-on alternative. To keep this low FODMAP I had to leave out the garlic and limit the coconut aminos, so I used a significantly less amount of sauce. For reference, I quadrupled the chicken amount and left the sauce amount the same. If I paired this with a combo of cauliflower rice and rice I probably would have wanted more sauce, but this amount was perfectly fine with just rice - coming from someone who does not prefer a lot of sauce to begin with though. This tasty meal was enjoyed all week long and is definitely worth trying! 

Whole30 Pineapple Teriyaki Chicken
Ingredients:
  • 1½ lb boneless, skinless chicken breasts or thighs cut into bite-sized pieces
  • 1 tsp sea salt or more to taste
  • 1 tbsp ghee or coconut oil
  • 3 garlic cloves minced
  • Sesame seeds and chopped green onions to serve (omit sesame seeds for AIP)
Pineapple Teriyaki Sauce:
  • 1 cup fresh or canned pineapple chunks
  • 1/2 cup coconut aminos
  • 1/2 inch fresh ginger
  • 3 tbsp apple cider vinegar or rice vinegar
  • 2 tsp arrowroot starch (optional, to help thicken sauce)
Directions:
  1. Place all ingredients for the pineapple teriyaki sauce in a blender and blend until smooth. Set aside.
  2. Toss the chicken pieces with salt.
  3. Heat ghee in a large skillet over medium high heat.
  4. Add the chicken to the pan and cook stirring until browned on all sides, about 3 minutes. Remove from the pan.
  5. Add garlic to the pan and stir for 1 minute until fragrant.
  6. Pour in the prepared pineapple teriyaki sauce and use a wooden spoon to scrap the bottom of the pan as it heats.
  7. Simmer the sauce for 1 minute until thickened.
  8. Add the chicken pieces to the sauce, and simmer for 2 minutes until heated through. Taste and add more sale, as needed.
  9. Sprinkle with sesame seeds and chopped green onions, and serve with cauliflower rice.

Original recipe found here
0 Comments

Fail-Proof, AIP Recipe with Ground Turkey

11/30/2020

0 Comments

 
Picture
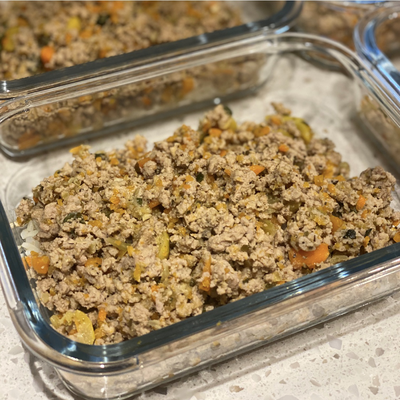
This was a very comforting, chicken-noodle tasting kind of recipe! The original recipe calls for ground beef, but I used ground turkey instead as we navigate an elimination diet in our house. The recipe also calls for making this on the stovetop, however since I significantly increase serving size and ingredients I opted for making this in the Instant Pot on the sauté mode. Six pounds of ground turkey is not getting cooked in one or even two batches on the stovetop. I definitely encourage using the food processor to thinly chop the vegetables as it saves you time chopping them yourself and they will cook faster. Plus, everything tastes better bite-size, in my opinion! This is how you can sneak more vegetables into your kids and family member's lives who don't enjoy eating their veggies. Anyways, I scaled back the broth some but kept the ingredient amounts the same for everything else.  We really enjoyed this meal all week long and like I mentioned before, it reminded us of a chicken noodle soup. If you're experimenting with an elimination diet or just trying to get back to eating whole foods then this is a great recipe for you! 

Fail-Proof, AIP Recipe with Ground Turkey (Paleo, GF, DF)
Ingredients:
  • 2 Tbsp Extra Virgin Olive Oil
  • 1/2 White Onion  
  • 2 Bay Leaves  
  • 3 Large Carrots  
  • 3 Stalks of Celery  
  • 2 Zucchini  
  • 1.5 lbs Grass Fed Ground Beef (I used Ground Turkey instead)
  • 2 cups of Bone Broth  
  • 1 tsp Himalayan Salt  
  • 1 Tbsp Dried Italian Herbs
Directions:
  1. Shred all the vegetables (except for the onion) in a food processor (if you don’t have one, you can use a blender or do it manually with a grater) and set aside.
  2. Heat up the olive oil in a large pan, thinly chop the onion and throw it in the pan to make a soffritto, letting the onion sizzle until soft.
  3. Add in the shredded vegetables, together with one cup of bone broth and the 2 Bay leaves and let cook for 20 minutes with the lid on.
  4. Add in the ground beef, mix well and add more broth as needed, together with salt and dried herbs.
  5. Cook with the lid on, on low heat for 1 hour and 40 minutes. Remove the Bay leaves and enjoy!

Note:
For a quicker version of this AIP recipe with ground beef, add less broth and cook on higher heat for 30 minutes after you add in the beef.

​Original recipe found here
0 Comments

Ground Beef Stir Fry

7/27/2020

0 Comments

 
Picture
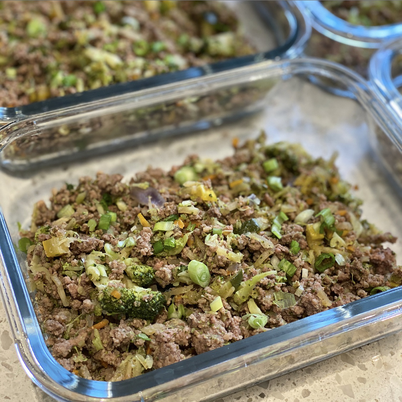
The most simple-ingredient and delicious recipe I have tried in a while! Very similar to the Egg Roll in a Bowl recipe, but with more of a variety of vegetables. Carrots, zucchini, broccoli, cabbage, fresh grated ginger and garlic, plus salt and pepper (omit for AIP), coconut aminos (soy sauce substitute), and apple cider vinegar. All made in a stir-fry pan, unless you are like me and enjoy using the big Instant Pot on saute function to cook massive amounts of food. To make this even easier you can purchase matchstick carrots, fresh coleslaw or cabbage mix in the salad section, and pre-cut broccoli florets and zucchini. I actually found some fun coleslaw and cabbage mixes that had carrots, broccoli, cabbage, and cauliflower, so I used a couple bags of those. If you are not a huge cabbage fan, I still recommend giving this a try - just make sure you cook down the cabbage plenty and you won't even recognize it's in there. Shredded and cooked down cabbage with some ground meat is seriously underrated. Give it a try! We devoured this all week and I know I will be making it again plenty. 

Ground Beef Stir Fry
Ingredients:
  • 1 lb ground beef
  • 1 tsp salt
  • 1/4 tsp black pepper (omit for AIP)
  • 1 thumb ginger, grated
  • 2 cloves garlic, minced
  • 1/2 cup carrots, shredded
  • 1 small zucchini, chopped into half moons
  • 1 cup broccoli florets
  • 1 1/2 cup green cabbage, shredded
  • 3 tbsp coconut aminos
  • 2 tsp apple cider vinegar
  • 1 tbsp green onion, sliced
Directions:
  1. Using a large deep skillet, brown the ground beef over medium heat. Season with salt and pepper and use a wooden spoon to thoroughly crumble. Set the ground beef aside and drain the excess fat, leaving about 2 tbsp in the pan.
  2. Using the same pan, saute the garlic and ginger until fragrant.
  3. Add the carrots, zucchini, and broccoli and cook for 5-6 minutes or until lightly crisp and softened, adding more fat to the pan if needed.
  4. Incorporate the cabbage and cook for 2-3 minutes or until the cabbage has wilted and softened.
  5. Add the ground beef back to the stir fry along with the coconut aminos apple cider vinegar. Stir to cook for another 2 minutes to reheat and allow the flavors to combine.
  6. Serve topped with sliced green onion.

​Original recipe found here
0 Comments

Chinese Pepper Steak

6/8/2020

0 Comments

 
Picture
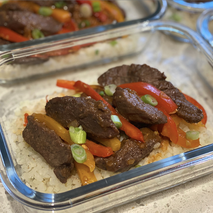
Another I Heart Umami recipe that did not disappoint! If you can purchase sirloin steak I definitely recommend trying this one out! I ended up using a chuck roast and that was not the right cut of meat for this type of recipe whatsoever. The meal still turned out delicious, but I spent a lot of time cutting out fat to try and slice thin cuts of meat. The seasonings and homemade Worcestershire sauce were on point though and seriously made this into a true tasting Chinese Pepper Steak meal. Also, the Worcestershire sauce recipe makes extra sauce that you can save and use for making steaks another time. All around, this was a relatively simple and one skillet recipe that turned out tasting delicious!

Chinese Pepper Steak
Ingredients:
  • 1 lb. sirloin steak, thin sliced against the grain
  • 1 green + 1 red bell peppers, sliced to thin strips*
  • 3-4 garlic cloves, thin sliced
  • 1 large shallot, sliced to thin strips
Beef seasoning:
  • 2 tbsp coconut aminos
  • ¼ tsp garlic powder
  • ¼ tsp onion powder
  • 2 tsp toasted sesame oil
  • 1 tsp arrowroot flour
  • Less than ½ tsp baking soda
  • Coarse salt and pepper to taste*
Paleo Whole30 Worcestershire sauce: (makes about ⅔ cup)
  • 1/2 cup beef stock
  • 3 tbsp tomato paste, no salt and sugar added
  • 1 tbsp aged balsamic vinegar
  • 2 tbsp coconut aminos
  • 1/4 tsp onion powder
  • 1/4 tsp garlic powder
  • 1/4 tsp mustard powder
  • 1/8 tsp sea salt
  • 1/8 tsp cinnamon powder
  • 1/8 tsp black pepper
Directions:
  1. Prep: Thin slice the beef against the grain. Add beef seasonings. Mix well and set aside in the fridge. Thin slice bell peppers*, prep aromatics, and combine (stir-well) ingredients under Worcestershire sauce.
  2. Beef: In a well-heated large stainless steel skillet, add 1.5 tbsp cooking fat of your choice, pan sear the beef until they’re slightly charred. Do this in separate batches. Set aside along with the juice in the skillet.
  3. Combine: Add a bit more oil to the same skillet, add sliced garlic and shallots. Season with a bit salt, saute until fragrant (about 8-10 seconds). Add bell peppers. Season with a bit more salt, saute until the peppers turn slightly softer yet still crunchy. Add ¼ cup Worcestershire sauce, add beef back to the skillet. Give a quick toss to coat the sauce over. Taste and see if more salt or sauce is preferred.
  4. Serve hot and immediately with cauliflower rice, mashed potatoes, or simple salad.
Notes
  • For AIP version, swap bell peppers for carrots and/or celery. Slice them to match stick thin. Omit black pepper.
  • For thicker Worcestershire sauce texture: bring the sauce to simmer over stovetop, let it simmer and stir frequently for about 1 minute. Cool and store in the refrigerator.
  • To make ahead - Season thin sliced beef. Store in fridge (for serving next day) or freezer. Pre-make worcestershire sauce. Store in glass container in the fridge. Finish within 3 weeks for best flavor.

Original recipe found here
0 Comments

Instant Pot Pina Colada Chicken

12/9/2019

0 Comments

 
Picture
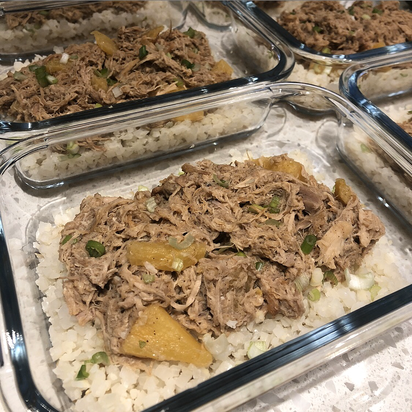
This chicken turned out super flavorful and unlike any pineapple chicken recipe that I've tried before! I ended up tripling most of the ingredients below, with the exception of using 2 tsp cinnamon and just one can of full-fat coconut milk. Check out the note on the coconut cream below, but basically you can just use the thick part from a can of full-fat coconut milk, or dump the whole can in if you want. No need to let that ingredient stop you from giving this one a try. This recipe was extremely hands-off after cutting the pineapple and throwing everything into the Instant Pot. When it was done cooking, there was plenty of extra sauce. I followed the recipe below and added a Tbsp of arrowroot starch mixed with a Tbsp of water, and set the Instant pot to saute mode to help thicken up the sauce some. You can also just put the pot on Saute mode without adding the arrowroot starch, and continuously stir until the sauce reduces. The arrowroot starch just speeds the process up slightly. I also really enjoyed the green onions topped on this meal, so don't skip out on that if you can! With plenty of flavor and sauce, this paired perfectly with plain frozen cauliflower rice, which made for the easiest meal prep. Definitely a recipe that I will be throwing into the meal prep rotation going forward! 
​
Instant Pot Pina Colada Chicken
Ingredients:
  • 2 pounds chicken thighs
  • 1 cup fresh or frozen pineapple chunks
  • 1/2 cup full fat coconut cream (see note to make your own)
  • 1 teaspoon cinnamon
  • 1/8 teaspoon salt
  • 2 tablespoons coconut aminos
  • 1/2 cup chopped green onion (garnish)
Directions:
  1. Place all ingredients, except green onions, into Instant Pot. Close lid. Press Poultry button.
  2. Pot will automatically set itself for 15 minutes, high pressure.
  3. Once cooking has stopped, turn off Instant Pot. Let pressure release naturally for 10 minutes.
  4. Carefully open lid and remove from pot and stir.
  5. If you’d like to thicken the sauce a bit, simply stir in a tablespoon of arrowroot starch mixed with a tablespoon of water. Then, press the Saute button. Cook until sauce thickens to your liking.
  6. Turn off Instant Pot and serve with green onion garnish
Notes:
To make your own coconut cream, simply place a can of full fat coconut milk in the fridge overnight. When ready to use, open can from bottom and drain out coconut water ( you can drink it or discard it). You will be left with pure coconut cream in the can.

Original recipe found here
0 Comments

​AIP Orange Teriyaki Meatballs

8/12/2019

0 Comments

 
Picture
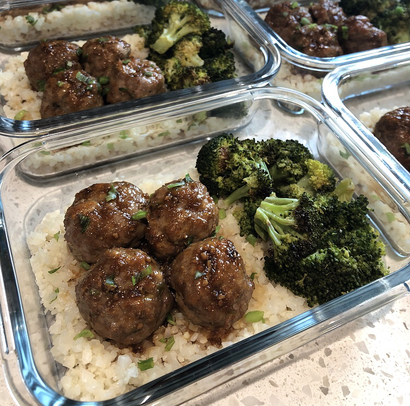
​These turned out amazing and did not have an overwhelming orange taste to them whatsoever! My biggest note on this is the same note I have on all meatball recipes: bulk prepping meatballs is never a quick task. However, I tripled the meat and sauce on this one, so if you are not doing that then this could obviously be prepped much faster. Don't let that tip dissuade you from trying this delicious recipe though! This meal really did turn out SO tasty. I ended up using ground turkey instead of chicken, and then heated up some coconut oil and garlic to toss the cauliflower rice in before serving. If you are newer to the blog, I am a big fan of grabbing the frozen cauliflower rice and quickly heating that up to pair with most meals. Just make sure to check the ingredients label to make sure it only has vegetables listed! Those packaged foods can sneak in plenty of extra preservatives, sugars, and ingredients you don't need to be consuming. You can even find cauliflower rice mixes with other riced veggies as well if you aren't a big cauliflower fan. I really like this Riced Veggies Cauliflower & Sweet Potato one. Throw in some rice if you need more substantial carbs and you've got yourself a nutritious and delicious meal you can enjoy all week long! 

AIP Orange Teriyaki Meatballs
Ingredients:

Meatballs
  • 2 lbs ground chicken
  • 1/2  cup finely chopped green onions
  • 2 teaspoons orange zest 2 oranges worth
  • pinch salt
Sauce
  • 2/3 cup fresh orange juice juice of 2 navel oranges
  • 2 teaspoons grated ginger
  • 1/4 cup coconut aminos
  • 1 Tablespoon apple cider vinegar
  • 1 clove crushed garlic
  • 1 Tablespoon honey
Directions:
  1. In a bowl, mix ground chicken (you can use any kind; breast or a blend) orange zest, pinch salt and green onions. On a parchment lined cookie sheet, form 2 1/2 inch sized meatballs. Bake at 350 until internal temperature reaches 170 degrees. Mine took about 30 minutes.
  2. In a saucepan, add coconut amino's grated ginger, garlic, honey, vinegar and fresh orange juice. Bring to a simmer and reduce until sauce coats the back of a spoon. It will simmer for about 10 minutes and then start to watch it closely. It will start to foam and bubble as it is reducing and almost ready. You want the sauce to be the consistency of maple syrup.
  3. When meatballs are cooked, place in a bowl and drizzle with the sauce. Gently toss to coat all the meatballs.

Original recipe found here
0 Comments

Slow Cooker Squash & Ground Beef Curry

7/15/2019

0 Comments

 
Picture
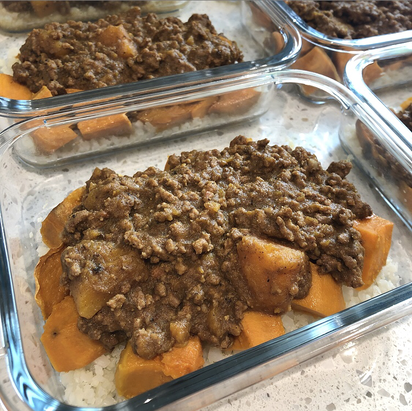
​Sometimes I really wish my pictures did the meal more justice... Anyways, I probably say this for every curry meal I post, but if you enjoy a curry meal then you will enjoy this one! I didn't actually make this recipe as-is though, so I am not sure I can give an accurate review for it. Instead of the acorn squash, I used butternut squash, and instead of all of the spices listed after the lemon, I used the spices listed in the notes section. Both of those swaps were out of convenience though since it's much easier to find already cubed butternut squash at the grocery store, and I didn't already have all the spices listed on the original recipe. Whichever way you decide to make this recipe though, I definitely suggest browning the meat first, and also adding some salt. Other then that, I thought this meal was especially good over some roasted sweet potatoes! I also threw in some cauliflower rice just to add some more vegetables to this recipe, but I can see a mixture of cauliflower rice and regular rice being good too. Let me know if you try this recipe out and how you choose to make it! ​

Slow Cooker Squash & Ground Beef Curry
Ingredients:
  • 2 lb Ground Beef
  • 1 whole Acorn Squash, cut into 1/2 inch cubes (I used Butternut Squash instead)
  • 13 1/2 oz Coconut Milk, (one can)
  • 15 oz Pumpkin Puree, (one can)
  • 1 1/2 cup Water
  • 1 1/2 Tbsp Ginger Root, peeled and diced
  • 5 cloves Garlic
  • 1 whole Lemon, quartered
  • 1/2 Tbsp Garlic Powder
  • 1/2 Tbsp Onion Powder
  • 1/2 Tbsp Turmeric Powder
  • 1 tsp dried Cilantro
  • 1 tsp dried Basil
  • 1 tsp dried Dill
  • 1 tsp ground Cinnamon
  • 1/2 tsp ground Ginger
  • 1/4 tsp ground Cloves
  • 1/2 cup Cilantro, (optional) for topping
Directions:
  1. Break up the ground beef into small pieces, as small as you can make them.
  2. Add the ground beef and all other ingredients (except the fresh cilantro) to your slow cooker. Squeeze the lemons into the slow cooker before adding them.
  3. Cover and cook on low for 4-6 hours or on high for 2-3 hours. If you're nearby, break up the chunks of ground beef halfway through the cooking time. If you're not, do so at the end.
  4. Serve with cauliflower rice (you'll need about 1 1/2 - 2 cauliflower heads' worth of rice) and topped with fresh cilantro (optional).
Notes
1. If you're not on the autoimmune protocol, replace the AIP curry blend (dried garlic, onion, turmeric, basil, dill, cilantro, cinnamon, ginger, and cloves) with 2 tablespoons of your favorite curry powder.
2. Another spice option is to make your own AIP Curry Powder, like this one, which combines much fewer spices, and spices that you are more likely to already have in your kitchen:
  • 1 T. granulated garlic
  • 1 T. granulated onion
  • 1 T. turmeric
  • 2 t. cinnamon
  • 1 t. powdered ginger
  • ½ t. ground clove

Original recipe found here
0 Comments

Turkey Apple Breakfast Hash

6/10/2019

0 Comments

 
Picture
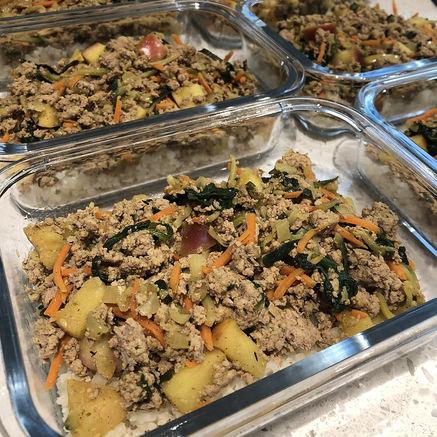
I love these kinds of recipes because I can add in a ton of different vegetables and get more of a variety of nutrients in my life then I typically consume. Plus, this one was absolutely delicious and refreshing! If you ever suspect that your body is rejecting certain foods, experiencing inflammation or any other unwanted symptoms, then AIP (autoimmune protocol) recipes like this one are great meals to start incorporating into your life. They are certainly not a cure, but a good starting point with eliminating a lot of known foods to cause inflammation and gut issues. Worth trying out to see if it helps your body! Anyways, I adjusted some of the ingredients below to make more food for my meal prep this week, so check out the original recipe link below for comparison if you need to. I left out the butternut squash/sweet potato because I threw this meal over a mixture of rice and cauliflower rice instead. However, I think adding the butternut squash/sweet potato would only enhance this meal, so next time I won't skip out on it. This one is definitely worth a try and one that I will most certainly be making again! ​

Turkey Apple Breakfast Hash
Ingredients:
For the meat:
  • 3 lb ground turkey
  • 1-2 tablespoon coconut oil
  • 2 teaspoon dried thyme
  • 2 teaspoon cinnamon
  • sea salt, to taste
For the hash:
  • 1-2 tablespoon coconut oil
  • 1 large onion
  • 1 large or 2 small zucchini
  • 1 cup shredded carrots
  • 2 cups cubed frozen butternut squash (or sweet potato)
  • 2 large apples, peeled, cored, and chopped
  • 4 cups spinach or greens of choice
  • 2 teaspoon cinnamon
  • 1 ½ teaspoon powdered ginger
  • 1 teaspoon garlic powder
  • 1 teaspoon turmeric
  • 1 teaspoon dried thyme
  • sea salt, to taste
Directions:
  1. Heat 1-2 tablespoons of coconut oil in a skillet over medium/high heat. Add ground turkey and cook until browned. Season with cinnamon, thyme, and a pinch of sea salt. Move to plate.
  2. Drop remaining coconut oil to the same skillet and sauté onion for 2-3 minutes, until softened.
  3. Add in zucchini, carrots, apple, and frozen squash. Cook for 4-5 minutes, or until veggies have softened.
  4. Add in spinach and stir until wilted.
  5. Stir in cooked turkey, seasonings, and salt and turn off heat.
  6. Enjoy this hash fresh from the skillet or let cool and refrigerate to eat throughout the week. The hash will keep for about 5-6 days in a sealed container in the refrigerator.

Original recipe found here
0 Comments

Turmeric Chicken Curry over Cauli Rice

3/18/2019

0 Comments

 
Picture
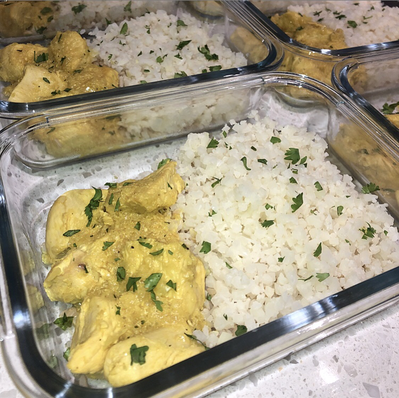
A non-Instant Pot recipe that is still really simple and done completely in one-pot! The only prep I did was dice the onions and cube the chicken breasts. Other then that I bought some frozen cauliflower rice and swapped in ground ginger for the fresh grated ginger since I still don't have a small grater for that. Not only was this meal super easy to whip together, but it was also a big hit in my house! In fact, I will probably throw it into the rotation of repeated meal prep recipes going forward, it was that delicious! I did slightly change the original recipe by combining the ½ cup coconut milk and ½ cup coconut cream, and just used 1 can of full fat coconut milk. Also, since this meal had plenty of extra sauce, I just heated up the cauliflower rice plain, as-is and skipped over sauteing it. If you need those added fats though, definitely still saute the rice - it will also only provide more flavor, which this meal does not lack whatsoever! This truly was a comforting and delicious meal that I recommend everyone giving a try!

Turmeric Chicken Curry 
Ingredients:

For the cauliflower rice
  • 2 Tbsp Coconut Oil
  • 16 oz. (about 3 ¾ cups) Riced Cauliflower
  • ½ tsp sea salt
For the chicken curry
  • 2 Tbsp Coconut Oil
  • 1 white onion, diced
  • 1-inch ginger, grated (I used ½ tsp ground ginger instead)
  • 2 cloves garlic, chopped
  • 2 lb. chicken breast, cubed
  • 1 can full fat coconut milk
  • 2 tbsp coconut aminos
  • Juice of half a lime (reserve the other half to serve)
  • 1 tsp sea salt
  • ½ tsp turmeric powder
  • ¼ tsp black pepper (omit for AIP)
  • 2 tbsp fresh cilantro, chopped (for garnishing)
Directions:
For the cauliflower rice
  1. Using a large deep pan, melt the coconut oil on medium heat. Add the cauliflower rice and lightly salt. Sauté for about 6-8 minutes or until tender. Set aside to serve with chicken curry.
For the chicken curry
  1. Using a large pan, melt the coconut oil on medium heat. Add the diced onion, ginger, and garlic and sauté for 3-4 minutes or until the onion is translucent. Remove from the pan and set aside, reserving the coconut oil in the pan.
  2. Add the chicken to the pan and lightly salt. Sauté until the internal temperature reads 165 F.
  3. Add the onion back to the pan along with the coconut milk, coconut cream, coconut aminos, lime juice, and seasonings to the pan (reserving the fresh cilantro) and stir. Simmer and stir for about 5 minutes to allow the flavors to combine and the sauce the thicken.
  4. Season further to taste and top with fresh cilantro and lime wedges. Serve with cauliflower rice and enjoy!

Original recipe found here
0 Comments
<<Previous
    Picture

    Erika Copeland

    Sharing the recipes I prepare to help others eat more nutritious food and begin their journey to a healthier life.

    Instagram

    categories

    All
    AIP
    Beef
    Breakfast
    Brussels
    Burgers
    Casserole
    Cauliflower Rice
    Chicken
    Crockpot
    Kombucha
    Low FODMAP
    Meal Prep Tips
    Nutrition Blog
    Pork
    Pressure Cooker
    Quiche
    Sausage
    Shrimp
    Snacks
    Steak
    Sweet Potatoes
    Treats
    Tuna
    Turkey
    Vegan
    Video
    Whole30

    Archives

    December 2021
    November 2021
    September 2021
    August 2021
    July 2021
    June 2021
    May 2021
    April 2021
    March 2021
    February 2021
    January 2021
    December 2020
    November 2020
    September 2020
    August 2020
    July 2020
    June 2020
    May 2020
    April 2020
    March 2020
    February 2020
    January 2020
    December 2019
    November 2019
    October 2019
    September 2019
    August 2019
    July 2019
    June 2019
    May 2019
    April 2019
    March 2019
    February 2019
    January 2019
    December 2018
    November 2018
    October 2018
    September 2018
    August 2018
    July 2018
    June 2018
    May 2018
    April 2018
    March 2018
    February 2018
    January 2018
    December 2017
    November 2017
    October 2017
    September 2017
    August 2017
    July 2017
    June 2017
    May 2017
    April 2017
    March 2017
    February 2017
    January 2017
    December 2016
    November 2016
    October 2016
    September 2016
    August 2016
    July 2016
    June 2016
    May 2016
    April 2016
    March 2016
    February 2016
    January 2016

Powered by Create your own unique website with customizable templates.
  • Home
  • All Recipes
  • Goal
  • About
  • FAQ
  • Contact