LiveSqueezy
  • Home
  • All Recipes
  • Goal
  • About
  • FAQ
  • Contact

Orange Glazed Beef Kabobs over Cauliflower "Fried" Rice

3/28/2016

0 Comments

 
Picture
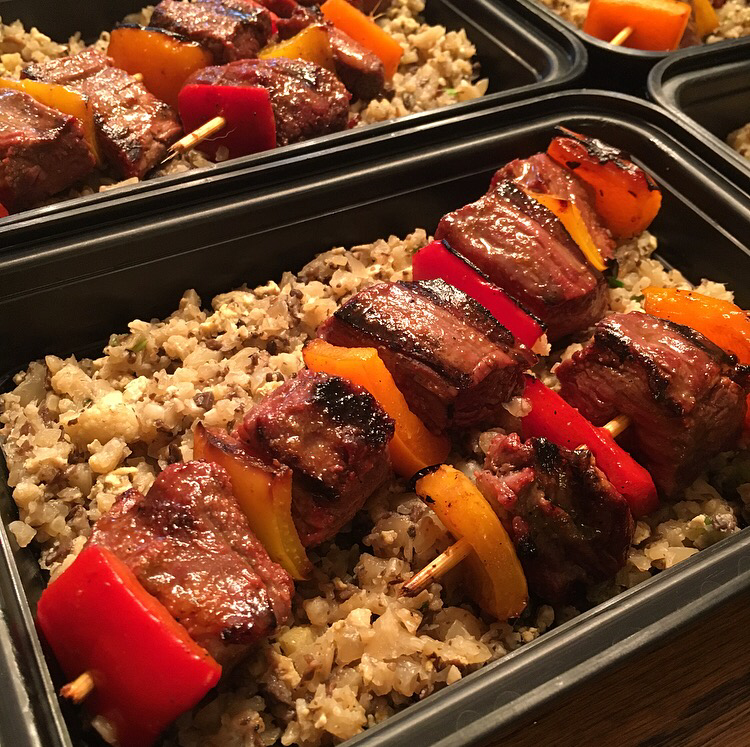
I stumbled across another good PaleOMG recipe! Well they are all good, but this one didn't have a lot of ingredients and I was familiar with all of the ingredients. I altered the original recipe and used beef instead of chicken, so check out the original recipe below for comparison. Since it was Easter this past Sunday I figured getting out of the kitchen to grill for a little bit would eliminate my meal prep Sunday from getting in the way of Easter cooking. I used to think traveling over the weekend was the biggest challenge of meal prep, but I think holiday weekends are just as challenging. Anyways, this turned out amazing and I would highly recommend anyone to try this one out at least once this summer!

Orange Glazed Beef Kabobs
Ingredients:

For the orange glaze:
  • 2 cups orange juice
  • ½ cup coconut aminos (I use Bragg Liquid Aminos)
  • 1 heaping tablespoon honey
  • ¼ teaspoon fish sauce (Red Boat fish sauce is paleo friendly, I recently found it at Whole Foods)
  • zest of ½ an orange (about ½ tablespoon of zest)
For the kabobs:
  • 1.5 pound beef (I used flank steak), cut into 1 inch cubes
  • 1 red bell pepper, cut into 1 inch squares
  • 1 yellow bell pepper, cut into 1 inch squares
  • 1 orange bell pepper, cut into 1 inch squares
  • 1 teaspoon fine sea salt
  • 1 teaspoon garlic powder
  • 1 teaspoon onion powder
  • sliced green onions, to garnish
  • ¼ cup sliced almonds (I omitted)
  • 2 tablespoons sesame seeds (I omitted)

Directions:
  1. Place a large saute pan over medium heat and add all ingredients for orange glaze. Whisk to combine. Let reduce for about 20-25 minutes. It will reduce by ⅓ and should coat the back of a spoon, that's how you know the sauce is ready. If it's still runny like water, let it cook longer. When the sauce is done cooking, remove from heat and set aside.
  2. While the sauce is cooking, this is a great time to toast the almonds and sesame seeds. Place both in a small sauté pan over medium heat and toss for about 10 minutes, until almonds are brown.
  3. Using metal skewers, make the kabobs: place a slice of red bell pepper, then a slice or yellow bell pepper, then 4-5 cubes of chicken and repeat with peppers and chicken until the skewers are filled. I was able to make 5 kabobs. Then sprinkle each kabob with salt, garlic powder and onion powder on all sides.
  4. Turn grill to a medium high heat and grease with a bit of ghee. Once grill is hot, place kabobs on grill and cook for 4-5 minutes on all 4 sides. Cook until no pink in the middle of the chicken remains OR until the chicken reaches an internal temperature of 165 degrees.
  5. As soon as you pull the kabobs off the grill, use a brush to brush glaze on all size of kabobs until completely coated. Leave extra sauce on the side for dipping.
  6. Garnish with toasted almonds and sesame seeds and sliced green onions.

Original recipe found here

Best Cauliflower Rice Dish Ever
Ingredients:
  • 1 head cauliflower, grated
  • 1 package, shittake mushrooms
  • 6 green onions
  • 2 shallots, minced
  • 1 tsp fresh ginger, minced
  • 1tbs garlic
  • 3 Tbsp coconut aminos (I use Bragg Liquid Aminos)
  • 3 eggs
  • Sesame oil
  • Meat of choice (I used the beef kabobs)

Directions:
  1. Grate the cauliflower using a food processor (or if you have time and the patience of a saint, a box grater).
  2. Prep the veggies (slice the green onions and mushrooms thinly and mince the shallot/ginger).
  3. Heat a large skillet/wok to high heat. Add a spoonful or two of sesame oil. Saute the mushrooms, shallot, ginger and garlic for ~3 min or until they begin to soften, stirring often.
  4. Add meat to the wok, and cook, stirring frequently for 3–4 minutes, or until the meat is mostly cooked. (Since I paired this with beef kebabs, I did not add meat to the wok and just skipped to the next step).
  5. Add the cauliflower, green onions and coconut aminos. Saute for ~5 min.
  6. Push the veggies to the side of the skillet and create a well. Crack the eggs into the well and scramble (yes, kind of like you’d do with fried rice). Stir everything to combine.
  7. Top with a meat of your choice.
0 Comments

Pulled Tandoori Chicken with Baked Sweet Potato

3/28/2016

0 Comments

 
Picture
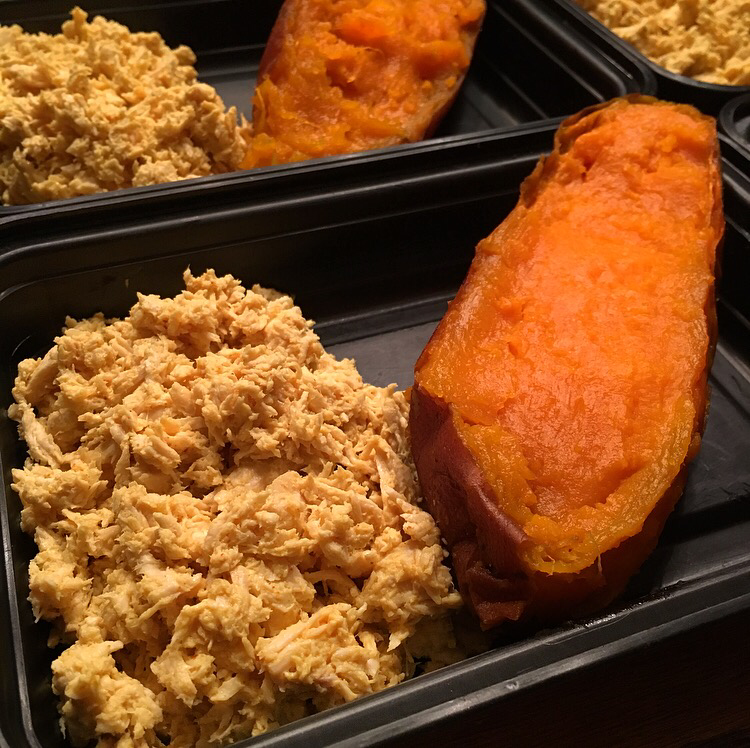
So this meal ended up looking pretty plain and boring. I meant to pair this Tandoori Chicken with the Cauliflower "Fried" Rice I actually ended up pairing with my beef kabobs this week. Total fail on my part, but both meals still turned out really good! Anyways, I picked this chicken recipe because it was super easy and quick and I could eliminate some kitchen time on Easter Sunday. If you like coconut milk based recipes, you will enjoy this! The original recipe also provides the option of using yogurt if you are not paleo or dairy free. Also, I only ended up using about half of the sauce because my dog decided to eat a pound of the chicken behind my back. Luckily I am leaving town this week, so I didn't really need that many meals to begin with, but I was (am?) still fuming. No matter how careful I am, he finds a way to eat some of my meal prep food every Sunday. Anyways, the chicken was yummy and even tasted great with the sweet potato, but next time I would pair it with some kind of vegetable or rice. Since I failed on that, let me know what you pair it with if you end up making this recipe!

Pulled Tandoori Chicken
Ingredients:

Pulled Chicken:
  • 2 lbs chicken breasts, fat trimmed and cut into palm sized portions
  • 4 cups chicken stock
  • 1/2 onion, chopped finely
  • 2 cloves garlic, minced
  • Pinch sea salt
Tandoori Sauce:
  • 1/2 cup full fat coconut milk
  • 1 tsp sea salt
  • 1 tsp smoked paprika
  • 1 tsp cayenne pepper
  • 1 tsp cumin
  • 1 tsp turmeric
  • 1 tsp black pepper

Directions:
Pulled Chicken:
  1. Fill a large pot with chicken stock and add the garlic and onion and bring to the boil.
  2. Once boiling, add the chicken breasts and after 2 minutes, reduce to low and allow to simmer for 12-15 minutes, until chicken is just cooked and no longer pink. Remove from heat and drain immediately and allow chicken to cool.
  3. Once cooled, place chicken back into the pot and using two forks, shred the chicken finely. Add the tandoori sauce and serve.
Tandoori Sauce:
  1. Combine all the spices into a small bowl and add the coconut milk (or Greek yogurt) and mix until fully incorporated. Adjust spices to suit taste.

Original recipe found here
0 Comments

Pork Carnitas over Mexican Cauliflower Rice

3/21/2016

0 Comments

 
Picture
This pork carnita recipe is AMAZING. You must try! I used pork loin, so next time I need to try this with pork butt as the recipe calls for, but it still turned out so good. The original recipe prepares this in a dutch oven, but I tried it out using my crockpot and had success. If you make this, do not forget or overlook boiling the remaining cooking liquid! Pouring that thickened sauce back onto the pork really completed the carnitas. Also, I do have to point out that I finally made a cauliflower rice that wasn't plain Jane. The Mexican Cauliflower Rice recipe was equally as delicious and a good pairing with the carnitas. Let me know what you think if you make either of these recipes!

Pork Carnitas

Ingredients:
  • 4 pound boneless pork butt, fat trimmed and cut into 2 inch cubes
  • 1 1/2 tsp salt
  • 3/4 tsp pepper
  • 1 tsp ground cumin
  • 1 onion, peeled and halved
  • 2 bay leaves
  • 1 tsp dried oregano
  • 2 Tb fresh lime juice
  • 2 C water
  • 1 medium orange, juiced and keep the spent halves

Directions:
  1. Adjust oven rack to lower middle position and heat to 300 degrees. Combine all the ingredients in a large Dutch oven, including the spent orange halves and juice. Bring the mixture to a simmer over medium-high heat, uncovered. Once it simmers, cover pot and transfer it to the oven. Cook until the meat falls apart when prodded with a fork, about 2 hours.
  2. Remove the pot from the oven and turn on the broiler. Use a slotted spoon to remove the meat from the pan and place it on a large foil-lined jelly roll pan. Remove and discard everything from the pot except for the cooking liquid. Place pot over high heat on the stove and boil until it thickens and syrupy, about 20 - 30 minutes. You should have about 1 C of liquid remaining when it is finished.
  3. While the liquid is reducing, use two forks to pull each cube of pork into three equal sized pieces. Once the liquid has reduced, gently fold in the pieces of pork into the pot. Try not to break up the pork any further. Taste and add additional salt and pepper.
  4. Spread the pork back onto the foil lined pan and evenly spread the meat around so there is a single layer of meat. Place the jelly roll pan on the lower middle rack of the oven and broil until the top of the meat is well browned and edges are slightly crisp, about 5 to 8 minutes. Using a wide metal spatula, flip the pieces of meat and broil the other side until well browned and edges are slightly crisp, 5 to 8 minutes. 
  5. Crockpot version: Follow the same directions as above, but use 1 and 1/2 cup water instead of 2. I cooked it on low for 8 hours. When done, scoop out the orange, onion, and bay leaves, then spread the pork onto a foil lined pan and pour the sauce into a pot on the stove...Follow directions above.

Original recipe found here

Mexican Cauliflower Rice
Ingredients:
  • 3 cups raw cauliflower rice
  • ½ yellow onion, diced
  • ½ cup chopped cilantro
  • 1 cup finely diced zucchini (optional)
  • 1 red bell pepper, diced (optional)
  • 1 Tbsp fajita seasoning (Homemade paleo fajita seasoning I made)
  • 1 Tbsp tomato paste
  • 2 Tbsp olive oil

Directions:
  1. Heat the oil in a large skillet on high heat. Add cauliflower, onion, zucchini, bell pepper and fajita seasoning and mix well.
  2. Mix in the tomato paste until evenly distributed and then spread the rice evenly over the skillet and let cook until it starts to brown, 3-5 minutes.
  3. Once the bottom starts to brown, stir the rice, even it out again and let bottom brown again. Repeat 3-4 times. The longer it cooks, the more quickly the bottom will brown.
  4. Once it is cooked through, and browned to your liking, stir in the chopped cilantro and serve hot.
  5. Enjoy!

 Original recipe found here
0 Comments

​Sweet Potato Broccoli Chicken Bake

3/21/2016

0 Comments

 
Picture
If you don't have a lot of time to meal prep or prepare dinner during the week, this is a quick and simple recipe that will help you out! The original recipe makes this meal in one-dish, so check out that link below for an even quicker version of the recipe. Because I aim for 6-7 oz of sweet potato in each meal, I decided to roast the sweet potatoes separately to make sure they were all cooked and soft enough. Anyways, I really enjoyed this combination of sweet potato, broccoli. chicken, red onion and raisin! It was like trying a new salad, without the salad part. So it was perfect. 

Sweet Potato Broccoli Chicken Bake
Ingredients:
  • 2 lb. boneless, skinless chicken breast or thighs, cubed
  • 5 cups broccoli, chopped
  • 5-6 large sweet potato, ¼ inch small cubes
  • ½ red onion, chopped
  • 2 cloves garlic, minced
  • 3 Tbsp. raisins (I just used two of those sun-made raisin boxes)
  • 2 Tbsp. chopped walnuts or nuts of choice
  • ⅓ cup olive oil
  • 1 ½ tsp. Italian seasoning, dried
  • ¼ tsp. sea salt
  • ¼ tsp. pepper

Directions:
  1. Preheat oven to 375 °F.
  2. Spray baking pan with olive oil and lay down cubed sweet potatoes flat. I fill my Misto with olive oil and lightly spray the sweet potatoes, then add some sea salt. Bake for 12-15 minutes. Take out of the oven and move them around or flip them over. Bake for another 12-15 minutes.
  3. While the sweet potatoes are baking, grease a large casserole dish with olive oil. Place cubed chicken on the bottom of casserole dish. Lightly season with salt and pepper.
  4. In a bowl combine broccoli, red onion, garlic, raisins, chopped walnuts, olive oil and herbs. Toss to coat.
  5. Top chicken with herb and vegetable mixture.
  6. Cover with foil and bake for 35 minutes. (Your roasted sweet potatoes should be done and set aside at this point). Remove foil and bake for an additional 10-15 minutes or until chicken is no longer pink.
  7. Add your roasted sweet potatoes to the casserole dish and serve!

Original recipe found here
0 Comments

Buffalo Chicken with Sweet Potato and Carrot Fries

3/14/2016

0 Comments

 
Picture
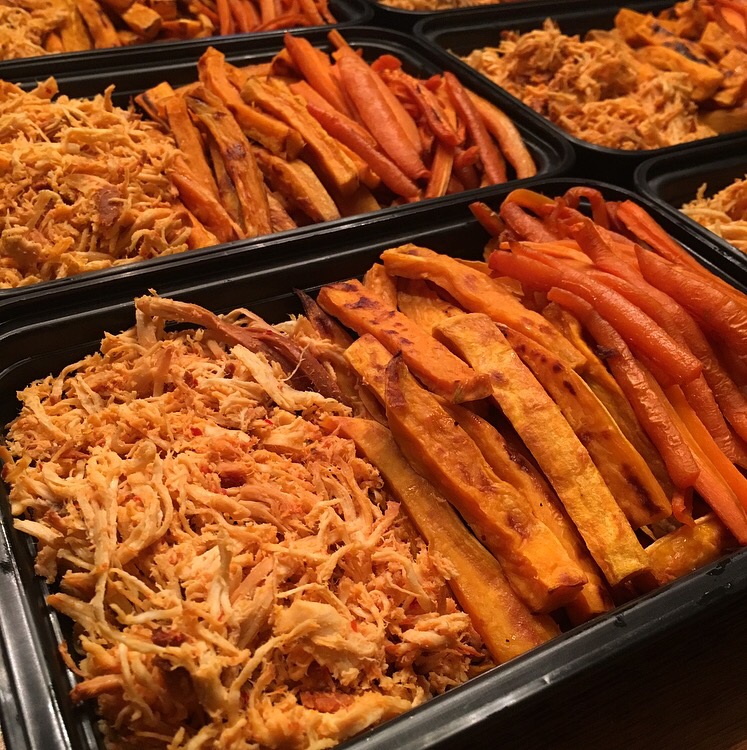
In case you didn't read my last post, I finally decided to buy PaleoChef Sriracha Sauce at Whole Foods and try some hot sauce recipes out. And just in case I never use the PaleoChef Sriracha Sauce again, I decided to make two hot sauce recipes this week to make sure I get some good use out of the sauce. I chose this Buffalo Chicken recipe because it called for throwing three ingredients in the crockpot and I don't see how it can get any easier then that. I think it turned out pretty good, but if I make this again I'll try using PaleoChef Wing Sauce (also sold at Whole Foods) just to compare the two. I paired this with my sweet potato fries and carrot fries, both recipes included below. Yes this meal is so orange and not visually appealing, but it was the bomb!

Buffalo Chicken
Ingredients:
  • 2lb chicken breasts
  • 8 tablespoons hot sauce/chicken wing sauce (I used PaleoChef Sriracha Sauce)
  • 4 tablespoons olive or avocado oil

Directions:
  1. Turn crockpot to high and toss all ingredients in for 3-4 hours (longer if on low)
  2. Shred chicken with forks
  3. I served with my roasted sweet potato fries and carrot fries (recipe link below). The orginal recipe suggested serving on a bed of organic spinach with homemade ranch dressing, baby carrots, and cucumber slices.

Original recipe found here

My Homemade Sweet Potato Fries
(Basically just roasted sweet potatoes)
Ingredients:
  • 4-6 Sweet Potatoes (Depending on how much you want to make. 5 medium sized sweet potatoes usually gets me 6 oz of sweet potato fries for 6 meals. I think my idea of medium sized is bigger than most though.)
  • Olive oil spray
  • Sea salt (I actually use Garlic Sea Salt on everything I cook)
  • Optional: Cinnamon
Directions:
  1. Preheat oven to 425 degrees
  2. Skin and cut the sweet potatoes into whatever shape you want. I either do fries, wedges or circles.
  3. Spray baking pan with olive oil. Lay down sweet potato fries flat (please do not just dump a pile on the pan).
  4. I fill my Misto with olive oil and lightly spray the fries, then add some sea salt (sometimes cinnamon too).
  5. Bake for 15-20 minutes. Take out of the oven and move them around or flip them over. Bake for another 15-20 minutes.
  6. Keep an eye on them, if they are thin bake for less time, and vice versa. Key is to move them around or flip them over half way through baking them. I usually make mine thicker, so I bake them for at least a total of 40 minutes.

Carrot Fries recipe found here 
0 Comments

Kung Pao Chicken with Green Beans

3/14/2016

0 Comments

 
Picture
After seeing a lot of recipes lately calling for hot sauce, I finally decided to just buy PaleoChef Sriracha Sauce at Whole Foods and try some of them out. Also, for this particular recipe I bought this chili sauce from Whole Foods as well since I could not find a paleo friendly chili paste. I apologize to those who don't like recipes that include ingredients you don't already have in your kitchen! I try not to make too many of those. Anyways, if you like a spicy stir-fry, you will like this one. I am still trying to make myself like spicy foods and I found this one to be pretty spicy, but I still really enjoyed it! Next time I make this I'll use less chili sauce and more Sirracha sauce. Who knows though, maybe this was normal since Kung Pao Chicken is supposed to be spicy. If you try this recipe out, please let me know! 

Kung Pao Chicken with Green Beans
Ingredients:
  • 1.75 - 2lbs chicken, thinly sliced
  • 2 tablespoons of garlic, minced
  • 3 tablespoons sesame oil
  • 2 pounds of green beans
  • 3 tablespoons liquid aminos (I use Bragg Liquid Aminos) 
  • 2 tablespoon sriracha (I used PaleoChef Sriracha Sauce)
  • 1 tablespoon chili paste (or more, to taste) (I used this chili sauce)
  • 3 tablespoon honey (or more, to taste)
  • salt and pepper, to taste
  • optional: crushed cashews

Directions:
  1. First, prep chicken by seasoning with salt and pepper and slicing it into thin, bite-sized pieces. Set aside. Then, prep the green beans but cutting off both ends. Set aside. Prep stir fry sauce by mixing together aminos, sriracha, chili past, and honey in a small bowl. Set aside.
  2. Next, place 1 1/2 tablespoon of sesame oil and 1 tablespoon of minced garlic in a large sauce pan or wok. Turn to high medium/high heat.
  3. Add in chicken and sauté for about 5 minutes, or until partially cooked. Remove chicken and set aside.
  4. Place another 1 1/2 tablespoon of sesame oil and minced garlic in the pan and turn to high heat. Add in green beans and sauté for about 5-7 minutes or until they begin to soften. Add in the chicken and continue to cook for 5ish more minutes or until the chicken is cooked all the way through.
  5. Once chicken is cooked, add in stir fry sauce and reduce heat to low/medium and let cook down for a few more minutes.
  6. Let sit for at least 5 minutes so that the sauce can thicken a bit more.
  7. Serve with crushed cashews. 

Original recipe found here
0 Comments

​Twice Baked Sweet Potatoes with BBQ Chicken and Blueberries

3/7/2016

0 Comments

 
Picture
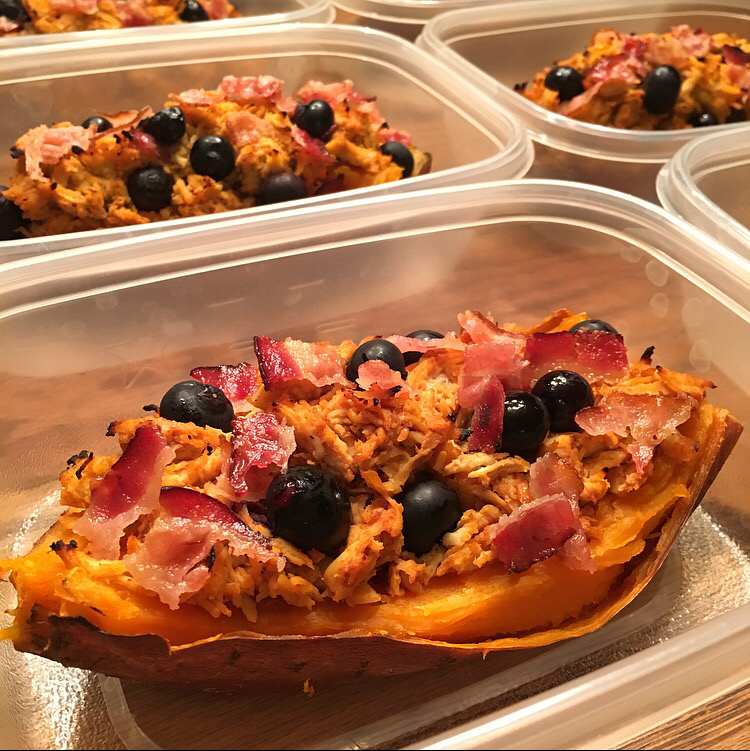
This is a recipe I came up with after stumbling across a couple different stuffed sweet potato recipes that were topped with blueberries. I know, I wasn't sure how I felt about that combination when I first saw it either, but I decided to finally give it a try and it was pretty dang good. I was actually bummed that I didn't add more blueberries to each meal, so definitely don't knock this combo, it was surprisingly awesome! I included the homemade paleo BBQ sauce I made for this recipe below, but if anyone has a homemade paleo BBQ sauce they really like, please share! I have only ever tried this one before. Also, I honestly don't make a lot of sauces, so if you don't want to make your own, here are a couple other options I have used in the past:
  • PaleoChef Peach BBQ Sauce (Whole Foods by me used to sell this, which made life way easier)
  • Organicville BBQ Sauces (Not Paleo, but gluten free, vegan, and made with agave nectar, I can usually find this at any natural foods market)

Twice Baked Sweet Potatoes with BBQ Chicken and Blueberries
Ingredients:
  • 3-4 larger sized sweet potatoes
  • 1.75-2lbs Chicken, shredded
  • 1 cup homemade paleo BBQ sauce (link to the sauce I made)
  • 1/2-1 cup Blueberries
  • 6 slices Bacon, cooked and crumbled

Directions:
  1. Preheat the oven to 425 F.
  2. Place chicken breast on baking sheet and bake for about 12-15 minutes. Take out of the oven and let cool for about 30 minutes.
  3. Wash your sweet potatoes and stab with a fork a couple times.
  4. Place sweet potatoes in the oven on a baking sheet for about 40-70 minutes or until soft. (This time is based on how big your sweet potatoes are. I bought very large sweet potatoes so that when halved they would be a big enough serving. I ended up baking my sweet potatoes closer to 70 minutes total, flipping them over at 35 minutes.)
  5. While the potatoes are baking, cook 6 slices of bacon and set aside.
  6. If the chicken is cooled, throw in a stand food mixer on a low speed until you have pulled chicken. Add 1 cup of homemade BBQ sauce and blend.
  7. After sweet potatoes are removed from the oven, cut them in half. Scoop out some of the potato and set aside into a bowl. Repeat this for each potato.
  8. Fill each halved sweet potato with pulled BBQ chicken. I weighed and served 3.5-4oz of chicken into each potato.
  9. Top each sweet potato with desired amount of blueberries. I shoved them in so they wouldn't fall out. Place back in the oven for 7-10 minutes.
  10. While the potatoes are baking again, crumble the bacon into pieces.
  11. Once the sweet potatoes look crispy and done, take out of the oven and top with bacon. Enjoy!
0 Comments

Slow-Cooked Spicy Shredded Beef Tacos

3/7/2016

0 Comments

 
Picture
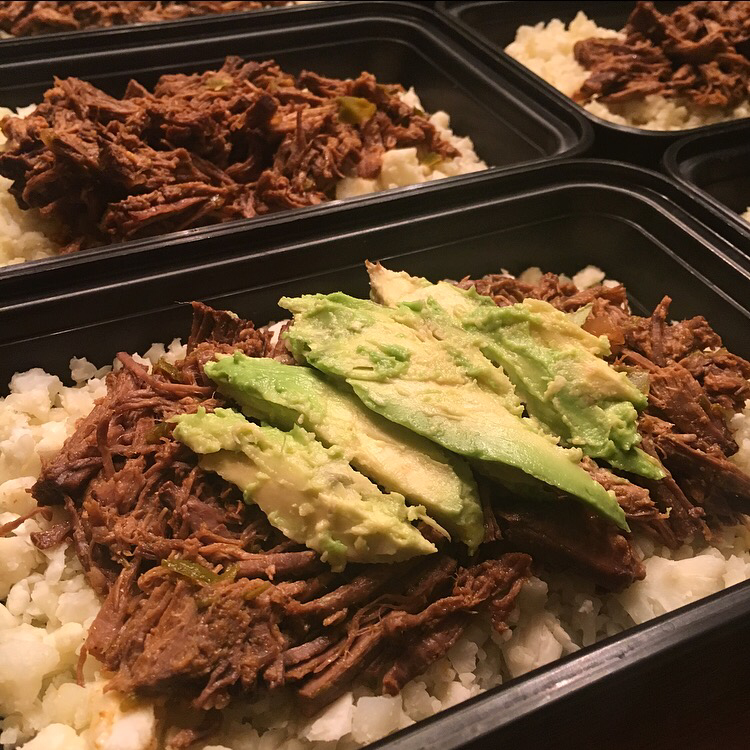
I was hesitant to make this recipe because I am not a fan of spicy food, but it turned out great and not too spicy at all. Although I did use a green pepper instead of the serrano pepper, so that might of had something to do with it not being too spicy. Anyways, I didn't have much time Sunday to meal prep, which means I had to choose at least one crockpot recipe. I paired this with cauliflower rice and avocado, but if you have more time to experiment with making Paleo tortillas and avocado cilantro lime sauce, check out the original recipe below!

Slow-Cooked Spicy Shredded Beef Tacos
Ingredients:
  • 2 lbs chuck roast
  • 2 Heads of Cauliflower Rice
  • 1/4 cup lime juice
  • 3 tbs tomato paste
  • 1/4 cup beef broth (I used 1/3 cup)
  • 1 medium onion, diced
  • 1 serrano pepper, diced small (couldn't find this at the store, so I bought a green pepper)
  • 1 jalepeno pepper. diced small
  • 3 garlic cloves, minced or pressed
  • 1 tbs chili powder
  • 1 tsp paprika
  • 1/2 tsp cumin
  • 1/2 tsp salt
  • 1/2 tsp pepper

Directions:
  1. Season roast with salt and pepper and set aside
  2. Mix dry spices together (chili powder, cumin, paprika) and rub over both sides of roast
  3. Place roast in your slow cooker along with the garlic, onion and peppers
  4. Combine remaining ingredients (tomato paste, beef stock, lime juice) and pour over beef
  5. Cook on Low (8-10 hours) or High (4-6 hours) – meat should be tender and pull apart easily
  6. Shred meat with a fork and return to slow cooker. Mix shredded meat with the juices remaining in the slow cooker
  7. Original recipe (link below) suggests making paleo tortillas or using the shredded beef for a taco salad. I quickly made some cauliflower rice to pair with the beef.
  8. Top as desired with the avocado cilantro lime sauce (link below). I simply topped with avocado.

Original recipe found here
0 Comments
    Picture

    Erika Copeland

    Sharing the recipes I prepare to help others eat more nutritious food and begin their journey to a healthier life.

    Instagram

    categories

    All
    AIP
    Beef
    Breakfast
    Brussels
    Burgers
    Casserole
    Cauliflower Rice
    Chicken
    Crockpot
    Kombucha
    Low FODMAP
    Meal Prep Tips
    Nutrition Blog
    Pork
    Pressure Cooker
    Quiche
    Sausage
    Shrimp
    Snacks
    Steak
    Sweet Potatoes
    Treats
    Tuna
    Turkey
    Vegan
    Video
    Whole30

    Archives

    December 2021
    November 2021
    September 2021
    August 2021
    July 2021
    June 2021
    May 2021
    April 2021
    March 2021
    February 2021
    January 2021
    December 2020
    November 2020
    September 2020
    August 2020
    July 2020
    June 2020
    May 2020
    April 2020
    March 2020
    February 2020
    January 2020
    December 2019
    November 2019
    October 2019
    September 2019
    August 2019
    July 2019
    June 2019
    May 2019
    April 2019
    March 2019
    February 2019
    January 2019
    December 2018
    November 2018
    October 2018
    September 2018
    August 2018
    July 2018
    June 2018
    May 2018
    April 2018
    March 2018
    February 2018
    January 2018
    December 2017
    November 2017
    October 2017
    September 2017
    August 2017
    July 2017
    June 2017
    May 2017
    April 2017
    March 2017
    February 2017
    January 2017
    December 2016
    November 2016
    October 2016
    September 2016
    August 2016
    July 2016
    June 2016
    May 2016
    April 2016
    March 2016
    February 2016
    January 2016

Powered by Create your own unique website with customizable templates.
  • Home
  • All Recipes
  • Goal
  • About
  • FAQ
  • Contact