LiveSqueezy
  • Home
  • All Recipes
  • Goal
  • About
  • FAQ
  • Contact

Buffalo Chicken Stuffed Spaghetti Squash

3/27/2017

0 Comments

 
Picture
Oh my goodness guys... I have found my new go-to chicken recipe to make when I need something quick or in bulk for travel. This buffalo chicken was the bomb and so easy to make!!! I found Tessemae’s Mild Buffalo Sauce at my local Whole Foods and other then that, the ingredient list on this recipe is short and simple. I bought 2 smaller spaghetti squashes and when they were done roasting I shredded them and distributed them evenly over 6 meals. Since I only had 4 half squash bowls, I stuffed those 4 and put them back in the oven as the recipe calls for (leaving 2 meals that didn't go back in the oven). Although, as I type this I realize I did not mix the squash with the chicken before putting it back in the oven, I just put the chicken on top of the squash. Oh well. If you dont want to have a stuffed squash you can totally just pull the spaghetti squash and distribute into your meal containers, then top with however much chicken you want. The chicken is plenty flavorful and delicious without the ranch sauce too, but I'm sure adding that would taste great if you absolutely need a garnish. Also, like I said before this buffalo chicken recipe will be my new go-to, so don't feel like you need to pair it with the spaghetti squash if you don't want to. However, everyone should give this recipe a try! I seriously cannot wait to eat my meals this week.

Buffalo Chicken Stuffed Spaghetti Squash
Ingredients:
  • 1 ¼ lbs chicken breast, cooked and shredded (I used a little over 2 lbs)
  • 1 medium spaghetti squash, halved (about 3 lbs.)
  • 1 rib celery, thinly sliced
  • 1-2 green onions, white and green parts thinly sliced
  • ¼ cup diced red bell pepper
  • ½ cup Tessemae’s Mild Buffalo Sauce
Directions:
To roast the squash:
  1. Preheat oven to 350°F.
  2. Line a baking sheet with parchment paper and set aside.
  3. Slice both ends from squash and discard.
  4. Stand squash up on one of it's cut ends and use a large knife to cut the squash in half lengthwise.
  5. Scoop seeds and stringy insides out using a large spoon.
  6. Place squash cut-side down on the baking sheet.
  7. Bake for 30-40 minutes or until squash is tender. Baking time will depend on the size of your squash, larger squash requiring a longer cook time. When squash is tender, allow to cool slightly before using a fork to gently scrape the squash into a large bowl. Reserve the squash shells.
  8. While squash is roasting, cook the chicken.
To cook the chicken:
  1. Directions for Instant Pot: Insert rack into inner pot. Add 1 cup water or broth. Lay chicken on rack. Secure lid and select ‘Poultry’ setting and increase time to 17 minutes (19 if the breasts are really thick). At the end of the cooking time, allow pressure to naturally release for 5 minutes then flip the vent valve and release the remaining pressure. Move chicken to a cutting board to cool slightly before shredding with two forks.
  2. Directions for Stovetop: Place a medium skillet over medium-high heat. Add 1 tsp. avocado or coconut oil and swirl pan to coat with the oil. Add chicken and ½ cup water. Once the water begins to simmer, reduce heat and cover. Cook chicken for 15-18 minutes or until cooked through. Move chicken to a cutting board to cool slightly before shredding with two forks.
To assemble the stuffed squash:
  1. Place squash shreds, chicken, celery, onions, peppers and Buffalo sauce in a large bowl. Toss well to coat. Spoon squash mixture into the squash shells. Return the stuffed shells back to the baking sheet and place in 350°F oven for 10-15 minutes or until heated through.
  2. Serve with Tessemae’s Creamy Ranch Dressing (for Whole30).

Original recipe found here
0 Comments

Paleo Taco Skillet over Roasted Sweet Potatoes

3/27/2017

0 Comments

 
Picture
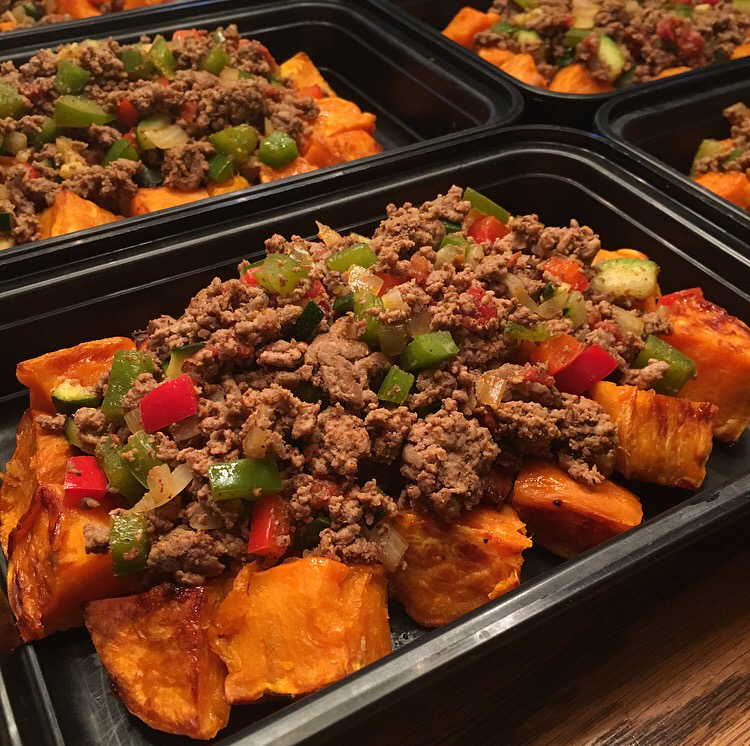
I really believe the key to eating better is making meals that are so delicious you look forward to eating them over anything else. This meal reminded me of that because instead of going to pick something up to eat after meal prepping, all I wanted to do was eat this meal. It turned out so amazing! The taco skillet was super easy and fast to throw together. If you double the meat like I did, make sure to use a bigger pan. My pan was overflowing once I added all the veggies, which is probably why I forgot to add the spinach at the end. Also, I listed the ingredients below to make your own paleo taco seasoning, which I definitely recommend doing. That recipe yields about 4 tbsp of seasoning too, so I stored half of it away to use another day. I also really enjoyed the taco skillet with the roasted sweet potatoes. It might sound strange, but it turned out tasting delicious paired together! Since I cubed the sweet potatoes a little bit larger then normal I baked them in the oven for a total of 45 minutes, flipping over half way through. I would recommend anyone to try this recipe! It truly turned out so delicious and was prepped and done in no time.

Paleo Taco Skillet
Ingredients:
  • 1 lb lean ground beef (I doubled this)
  • 1 large onion, diced
  • 2 large bell peppers, diced
  • 2 zucchinis, diced
  • 1 can diced tomatoes and green chilies
  • 2 tbsp Primal Palate's taco seasoning (Below is the homemade seasoning I used:)
    • 2 Tbsp Chili Powder
    • 2 tsp Cumin
    • 1/2 tsp Paprika
    • 2 tsp dried Oregano
    • 1 tsp Onion Powder
    • 1 tsp Garlic Powder
    • 2 tsp Salt
    • 1 tsp Black Pepper
    • 1/2 tsp Cayenne Pepper
    • 1/2 tsp ground Coriander
  • 3 cups baby kale and greens mix or other salad (I used spinach)
Directions:
  1. In a large pan, add ground meat, crumble, and brown.
  2. Drain off excess fat.
  3. Add diced onion, zucchinis, and peppers and cook until soft and browned.
  4. Add tomatoes and stir.
  5. Mix in taco seasoning- add a tbsp water if needed to mix.
  6. Keep on stove until taco mix has fully incorporated tacos.
  7. Add salad or greens to a bowl, and spoon taco mixture over the top.
  8. Serve and enjoy!

Original recipe found here

My Roasted Sweet Potatoes
Ingredients:
  • 4-6 Sweet Potatoes (Depending on how much you want to make. 5 medium sized sweet potatoes usually gets me 6 oz of sweet potato fries for 6 meals. I think my idea of medium sized is bigger than most though.)
  • Olive oil spray
  • Sea salt (I actually use Garlic Sea Salt on everything I cook)
  • Optional: Cinnamon
Directions:
  1. Preheat oven to 425 degrees
  2. Skin and cut the sweet potatoes into whatever shape you want. I either do fries, wedges or circles.
  3. Spray baking pan with olive oil. Lay down sweet potato fries flat (please do not just dump a pile on the pan).
  4. I fill my Misto with olive oil and lightly spray the fries, then add some sea salt (sometimes cinnamon too).
  5. Bake for 15-20 minutes. Take out of the oven and move them around or flip them over. Bake for another 15-20 minutes.
  6. Keep an eye on them, if they are thin bake for less time, and vice versa. Key is to move them around or flip them over half way through baking them. I usually make mine thicker, so I bake them for at least a total of 40 minutes.
0 Comments

Easy Baked Honey Mustard Chicken with Sweet Potato Fries

3/20/2017

0 Comments

 
Picture
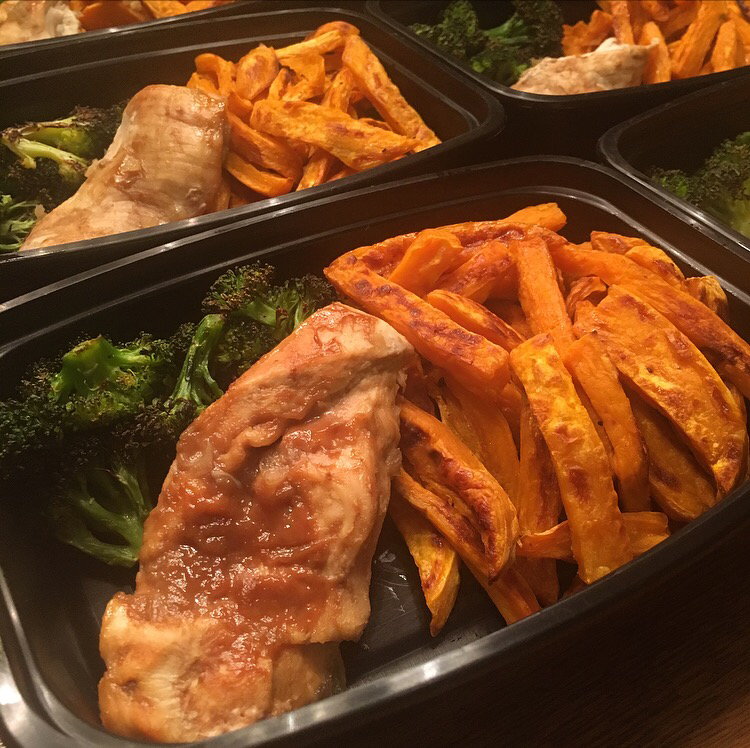
I have an oven again! And not only one, but two now! So naturally the first thing I wanted to do was make all the sweet potato fries in record time. Roasted sweet potatoes are my absolute favorite way to eat sweet potatoes. I also came across this Baked Honey Mustard Chicken recipe, which was a perfect pair for sweet potato fries. The recipe was super easy to make and I have a cast iron skillet, so I didn't even need to transfer pans from the stove top to the oven. I opted for using all of one kind of mustard (Woodstock Organic Dijon Mustard) because that was all I had in the pantry and I thought that worked perfectly fine. If you like honey mustard you will really enjoy this meal! For my entire life (well, before my paleo ways) I would order chicken fingers with honey mustard no matter what restaurant I was at. This meal really reminded me of that, but is obviously a much healthier version. It might not look crazy delicious, but I really look forward to eating this meal all week!

Easy Baked Honey Mustard Chicken
Ingredients:
  • 1/4 cup of grainy, course mustard
  • 1/4 cup smooth dijion mustard (I use Woodstock Organic Dijon Mustard, found at local grocery store)
  • 1/2 cup honey
  • 3 teaspoons extra virgin olive oil
  • 1/2 of a small yellow onion, diced
  • 2 cloves garlic, minced
  • 2 1/2 pounds boneless skinless chicken tenderloins
  • salt and pepper
  • 3 - 4 small sprigs of fresh rosemary
Directions:
  1. In a small bowl, combine the mustards, honey, and 2 teaspoons of the olive oil.
  2. In a sauté pan or cast iron skillet, add 1 teaspoon of olive oil.
  3. Add the onion and sauté over medium heat until golden and tender, about 5 minutes. Add the garlic and sauté for an additional 1 - 2 minutes, until fragrant.
  4. Place the chicken tenderloins on top of the onion and garlic mixture, or if the pan you cooked the onion and garlic in is not oven safe, transfer the onion and garlic to an oven safe dish and add the chicken to it. Salt and pepper the tops of the chicken according to your personal preference.
  5. Pour the honey mustard mixture on top of the chicken. Arrange the rosemary sprigs around the chicken in the pan.
  6. Bake the chicken covered at 400 degrees F for 20 minutes. Then remove the cover, baste the chicken with the sauce, and continue to cook for an additional 20 - 30 minutes uncovered, or until the chicken is browned on top and cooked through.
Original recipe found here

My Roasted Sweet Potatoes
Ingredients:
  • 4-6 Sweet Potatoes (Depending on how much you want to make. 5 medium sized sweet potatoes usually gets me 6 oz of sweet potato fries for 6 meals. I think my idea of medium sized is bigger than most though.)
  • Olive oil spray
  • Sea salt (I actually use Garlic Sea Salt on everything I cook)
  • Optional: Cinnamon
Directions:
  1. Preheat oven to 425 degrees
  2. Skin and cut the sweet potatoes into whatever shape you want. I either do fries, wedges or circles.
  3. Spray baking pan with olive oil. Lay down sweet potato fries flat (please do not just dump a pile on the pan).
  4. I fill my Misto with olive oil and lightly spray the fries, then add some sea salt (sometimes cinnamon too).
  5. Bake for 15-20 minutes. Take out of the oven and move them around or flip them over. Bake for another 15-20 minutes.
  6. Keep an eye on them, if they are thin bake for less time, and vice versa. Key is to move them around or flip them over half way through baking them. I usually make mine thicker, so I bake them for at least a total of 40 minutes.
0 Comments

Slow Cooker Beef Stroganoff over "Fried" Cauliflower Rice

3/20/2017

0 Comments

 
Picture
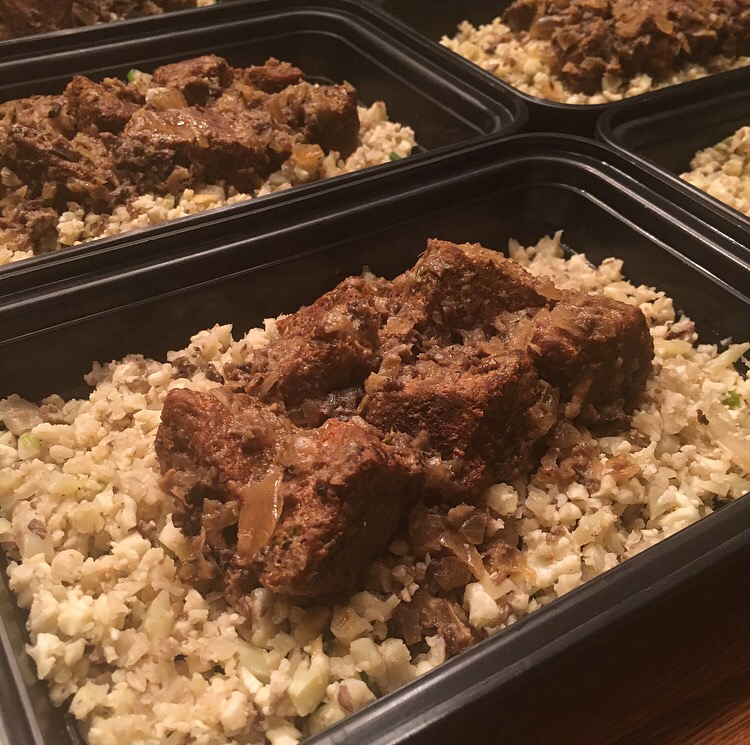
Although I now have an oven, my Sunday was super busy so I knew it was best to choose one slow cooker meal. I made everything as the recipe calls for except for leaving the slow cooker on low for that last hour once I added the coconut milk and vinegar. I thought the beef turned out super flavorful, but also a little dry, if that makes any sense. I know my slow cooker works faster then others, so maybe I should have only left it in there for a total of 4 hours instead of the 4 1/2 + 1 more hour. I also used a different cut of beef, so that probably played a role as well. Anyways, I paired this with my favorite cauliflower rice dish that everyone should definitely try at some point! Pairing this with the beef stroganoff was delicious and absolutely made the meal complete. Don't let my comment about the dry beef sway your decision on this one because everything was still full of flavor and I honestly really enjoyed this meal. If anyone makes this one please let me know what you think! 

Slow Cooker Beef Stroganoff
​Ingredients:
  • 2 lbs. beef stew meat
  • 2 tsp. salt
  • 1/2 tsp. pepper
  • 1 tsp. garlic powder
  • 2 tsp. paprika
  • 1 tsp. thyme
  • 1 tsp. onion powder
  • 8 oz. sliced mushrooms
  • 1/2 onion, sliced
  • 1/3 c. coconut cream (scooped from the top of a refrigerated can of coconut milk)
  • 2 tsp. red wine vinegar
Directions:
  1. In a small bowl, mix together all of your spices. Place meat in a large bowl and sprinkle with the spices. Mix everything together, using your hands, and coat the meat well with the seasoning.
  2. Place the sliced mushrooms and onion in the bowl of the slow cooker. Lay the seasoned beef on top. Put the lid on the slow cooker and cook on low for 4 1/2 hours.
  3. When the meat is tender and nearly done, add the coconut cream, vinegar, and any additional salt or pepper. Stir around and cook on high (with the lid ajar, if possible) for about an hour.
  4. That’s it! Enjoy!

Original recipe found here

Best Cauliflower Rice Dish Ever
Ingredients:
  • 1 head cauliflower, grated
  • 1 package, shittake mushrooms
  • 6 green onions
  • 2 shallots, minced
  • 1 tsp fresh ginger, minced
  • 1tbs garlic
  • 3 Tbsp coconut aminos 
  • 3 eggs
  • Sesame oil
  • Meat of choice (I used the Beef Stroganoff)
Directions:
  1. Grate the cauliflower using a food processor (or if you have time and the patience of a saint, a box grater).
  2. Prep the veggies (slice the green onions and mushrooms thinly and mince the shallot/ginger).
  3. Heat a large skillet/wok to high heat. Add a spoonful or two of sesame oil. Saute the mushrooms, shallot, ginger and garlic for ~3 min or until they begin to soften, stirring often.
  4. Add meat to the wok, and cook, stirring frequently for 3–4 minutes, or until the meat is mostly cooked. (Since I paired this with the paleo jerk chicken, I did not add meat to the wok and just skipped to the next step).
  5. Add the cauliflower, green onions and coconut aminos. Saute for ~5 min.
  6. Push the veggies to the side of the skillet and create a well. Crack the eggs into the well and scramble (yes, kind of like you’d do with fried rice). Stir everything to combine.
  7. Top with a meat of your choice.
0 Comments

Easy Shredded Pork over Sweet Potato Applesauce Mash

3/13/2017

0 Comments

 
Picture
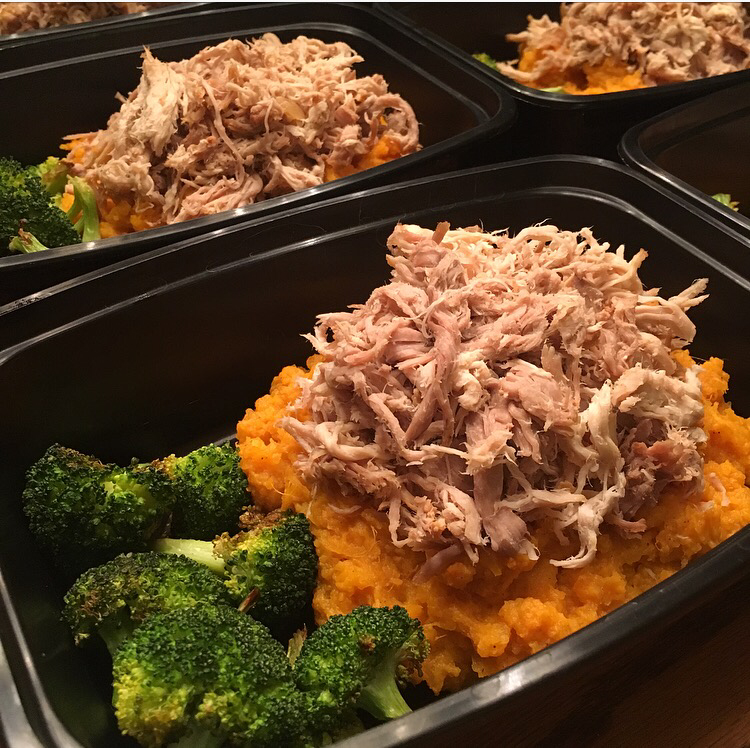
This is the last meal prep I'll have to do without an oven! Woo! Anyways, I decided to make a crockpot pork recipe from PaleOMG that I've made before. It's actually supposed to be paired with caramelized mashed plantains, which is pretty delicious, check out that post here. This pork recipe is pretty plain and definitely needs to be paired with something delicious and flavorful. Since I was lazy and didn't want to prepare the plantains, I made my go-to sweet potato applesauce mash. Just like last weeks mash I boiled about 5lbs of sweet potato for 30-35 minutes, drained it, and used a potato masher to mash it all. I added a cup of homemade applesauce, some cinnamon, and salt, and mashed everything together some more for the final product. I did note that I should have used another cup of applesauce since I had so many sweet potatoes, so if you are making this with a normal amount of sweet potatoes a cup is usually all you need. This meal was definitely a lazy one for me, but super easy to throw together and one I know I'd enjoy eating all week. If you're feeling up for it, I recommend trying the carmelized mashed plaintains with this pork. You will not be disappointed!

Easy Shredded Pork
Ingredients:
  • 1-2lb pork loin
  • 1 yellow onion, sliced
  • 2 cups beef broth (no sugar added) - add 3 cups if you go with a 2lb pork loin
  • 1 tablespoon garlic powder
  • 1 teaspoon onion powder
  • salt and pepper, to taste
Directions:
  1. Add all your pork ingredients to a crockpot and cook on low for 8-10 hours.
  2. Once your pork is done cooking, use two forks and shed it to pieces.

Original recipe found here
0 Comments

Creamy Bacon Mushroom Thyme Chicken over Cauliflower Rice

3/13/2017

1 Comment

 
Picture
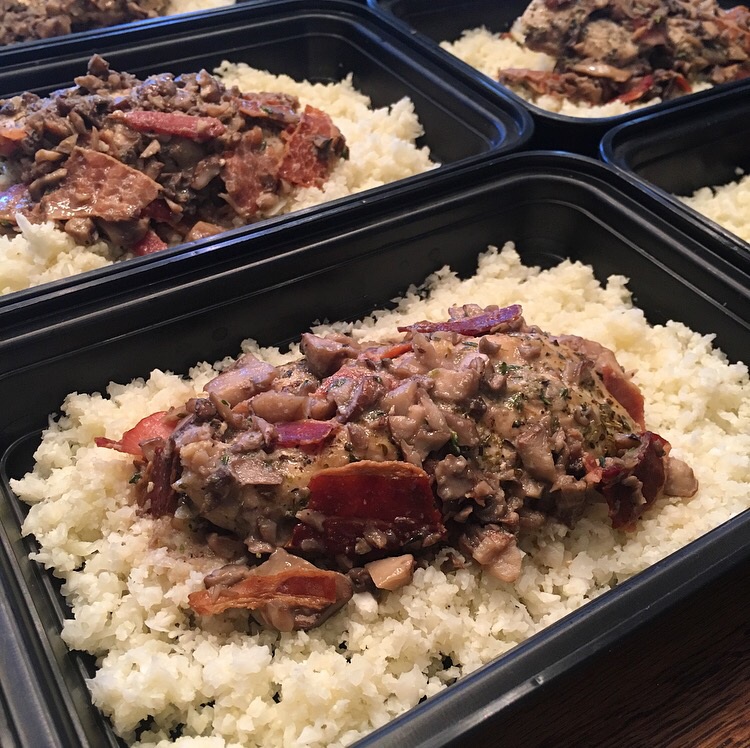
This meal was super easy and quick to throw together! While the chicken was baking, I fried three pieces of bacon in two different frying pans. Once the bacon was finished cooking I removed the bacon and set aside. I left the remaining bacon fat in both pans and made the creamy bacon mushroom thyme sauce in one and threw a head of cauliflower, riced, in the other pan. Note, since I used the leftover bacon fat I didn't use olive oil to make the sauce. The only other ingredient I added to the cauliflower rice was some salt since I knew the sauce would be flavorful enough. With that being said though, I should have made sure I used a cup of coconut milk or maybe a little more. I could have used just a tiny bit more sauce to cover the cauli rice. Either way though, I really enjoyed this meal! I'm always a fan of a creamy mushroom sauce, but the bacon and thyme in this particular sauce really made it stand out from others that I've had and was so delicious. Let me know if you like this one!

Creamy Bacon Mushroom Thyme Chicken
Ingredients:
  • 4 bone in chicken thighs, can also use boneless chicken thighs or breasts
  • 1 tablespoon olive oil
  • 2 teaspoons italian seasoning
  • salt and pepper
Creamy Bacon Mushroom Thyme Sauce:
  • 1 tablespoon olive oil
  • 8 ounces white mushrooms, sliced
  • 6 slices bacon, cooked and crumbled
  • 1 cup coconut milk (mostly the thick part at the top of the can)
  • ½ teaspoon salt
  • ¼ teaspoon pepper
  • 1 teaspoon garlic powder
  • 1 tablespoon fresh thyme, stems removed
Directions:
  1. Preheat oven to 350 degree. Heat a large skillet to medium high heat. Add the chicken thighs and season with italian seasoning and salt and pepper. Pan Sear each side of the chicken for 1-2 minutes until brown and place skillet in oven. Bake for 20 minutes or until chicken is cooked throughout. Set chicken aside on a plate.
  2. Add olive oil to the skillet and saute the mushrooms until soft. Add the bacon, heavy cream, salt, pepper, garlic powder and thyme. Bring to a simmer until the sauce starts to thicken. Add the chicken back to the skillet and heat for another minute. Serve immediately.

Original recipe found here
1 Comment

Slow Cooker Mango Chicken Sweet Potato Bowl

3/6/2017

1 Comment

 
Picture
No one can tell me this does not look absolutely delicious! This meal was AMAZING. I made it slightly different then the directions only because I was short on time. I doubled the chicken amount and slow cooked only the chicken on high for 4 hours. While that was going I boiled close to 5lbs of sweet potato (unnecessary amount for the majority of people. I'd just stick to the recipe as is if you don't need that much carbs in your meals) for about 30 minutes, drained it, and used a potato masher to make the sweet potato mash. Once the chicken was done in the crockpot I combined the excess liquid with the separate additional liquid mixture on the stovetop and boiled for about 20 minutes, whisking frequently, until the sauce thickened. Usually I toss out extra liquid or sauce, but this part of the recipe is a must! The sauce was delicious and really completed this meal. Of note, I tried squeezing my own fresh mango juice, but was not very successful. I ended up just using fresh squeezed orange juice and it still turned out absolutely delicious. This meal was the bomb and you should go make it right now! Or you can save it for the next day you are trying to make an amazing healthy meal that tastes like a treat!

Slow Cooker Mango Chicken Sweet Potato Bowl
Ingredients:
  • 1/2 Cup + 1 Tbsp Orange mango juice divided, not from concentrate
  • 1/4 Cup Light coconut milk
  • 1 Tbsp Fresh ginger minced
  • 1-1 1/2 tsp Habanero pepper minced
  • 1/2 Tbsp Garlic minced
  • 1/2 Tbsp Coconut aminos
  • 1/4 tsp Sea salt
  • 2 Medium sweet potatoes peeled and chopped into large wedges
  • 1 lb Chicken breasts
  • 2 tsp Curry powder
  • Pepper
  • 2 tsp Arrowroot powder
  • 1 1/2 Tbsp unsweetened coconut flakes
  • 1 Large mango cubed
  • Cilantro for garnish
  • Green onion for garnish
Directions:
  1. Whisk together 1/2 cup of the orange mango juice (reserving the rest for later), coconut milk, ginger, garlic, habanero pepper, coconut aminos and salt in the bottom of a 7 quart slow cooker. Lay the sweet potato wedges in an even layer in the sauce mixture.
  2. Sprinkle both sides of the chicken breast with the curry powder, and a pinch of salt and pepper, and rub evenly. Lay the chicken breast on top of the sweet potatoes, cover, and cook on low heat until the potatoes are soft and the chicken is tender, about 6-7 hours.
  3. Using a slotted spoon, gently remove the chicken and sweet potatoes to a large plate.
  4. In a separate small bowl, whisk together the remaining 3 tsp of juice and the 2 tsp of arrowroot powder until smooth and creamy. Whisk into the sauce mixture in the slow cooker.
  5. Gently place the sweet potatoes and chicken back into the slow cooker, cover, and turn the heat up to high. Cook for an additional 1 hour - 1 hour 15 minutes, until the sauce is nice and thick.
  6. While the sauce thickens, heat your oven to 350 degrees and spread the coconut flakes onto a small baking sheet. Bake until golden brown, about 2-4 minutes. Watch them closely, as they burn quickly!
  7. Once the sauce has thickened, divide the chicken and sweet potatoes between 4 bowls. Then, divide the cubed mango and toasted coconut flakes onto each bowl.
  8. Garnish with cilantro, green onion and the remaining sauce from inside the slow cooker.
  9. DEVOUR.

Original recipe found here
1 Comment

Spicy Ground Beef, Butternut Squash, and Cauliflower Rice

3/6/2017

1 Comment

 
Picture
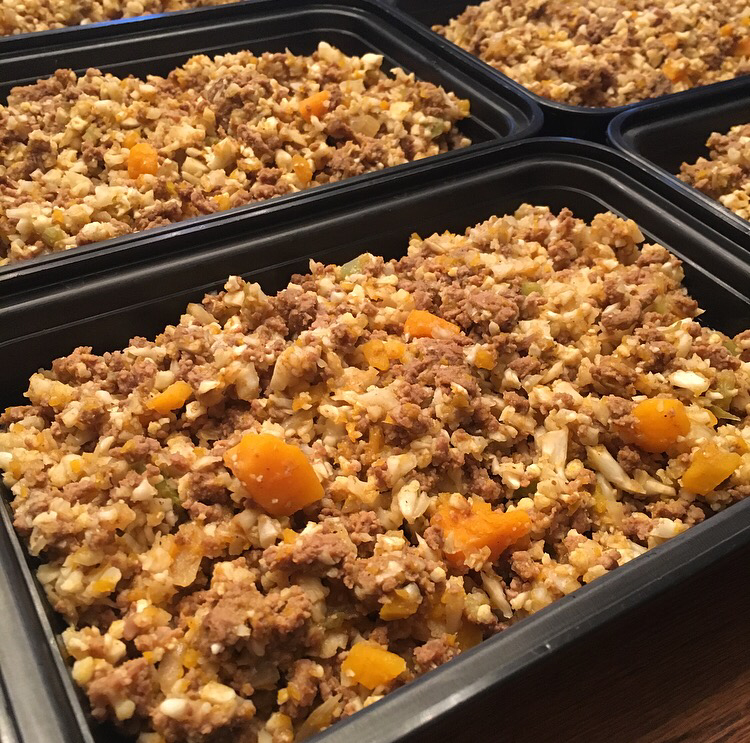
I still don't have a working oven, so I decided it was time to try a stovetop recipe. I completely altered this recipe and added two cauliflower heads, riced, and also doubled the ground beef. I kept everything else the same besides using more of a rounded measurement on the spices. I really enjoyed this meal and the way it turned out, but if you are newer to eating paleo or just eating better in general, I'd recommend sticking to the recipe as is. The cauliflower rice definitely took away from the butternut squash and other flavors, which made me realize I probably should have only added one head of cauliflower rice. Again though, I love cauliflower rice and didn't mind, it was just something I noted for next time. I also riced the butternut squash in the food processor because I was nervous it wouldn't cook through all the way on the stovetop. There is nothing worse then uncooked butternut squash! Anyways, just throwing that idea out there in case anyone else feels the same way. This recipe was super easy and fast to make if you're ever in need of a quick meal prep idea.

Spicy Ground Beef and Butternut Squash
Ingredients:
  • 2 tablespoons avocado oil
  • 1 onion, diced
  • 1 Serrano pepper, minced
  • 4 garlic cloves, minced
  • 1 teaspoon salt
  • 1 teaspoon paprika
  • ½ teaspoon cumin
  • ½ teaspoon freshly ground black pepper
  • Big pinch freshly grated nutmeg
  • 1 pound ground beef
  • 1 pound peeled cubes of butternut squash
  • Small handful of fresh sage, minced
Directions:
  1. Heat oil in a saute pan over medium heat.
  2. Add the onion and Serrano pepper and cook for 6-7 minutes, or until the onions begin to brown.
  3. Add garlic, spices and ground beef and mix well.
  4. Once the beef begins to brown, add the butternut squash and mix well.
  5. Reduce the heat to medium-low, cover with a lid for 10 minutes, or until the butternut squash is cooked through.
  6. Remove the lid, add fresh sage and mix well.
  7. Serve.

​Original recipe found here
1 Comment
    Picture

    Erika Copeland

    Sharing the recipes I prepare to help others eat more nutritious food and begin their journey to a healthier life.

    Instagram

    categories

    All
    AIP
    Beef
    Breakfast
    Brussels
    Burgers
    Casserole
    Cauliflower Rice
    Chicken
    Crockpot
    Kombucha
    Low FODMAP
    Meal Prep Tips
    Nutrition Blog
    Pork
    Pressure Cooker
    Quiche
    Sausage
    Shrimp
    Snacks
    Steak
    Sweet Potatoes
    Treats
    Tuna
    Turkey
    Vegan
    Video
    Whole30

    Archives

    December 2021
    November 2021
    September 2021
    August 2021
    July 2021
    June 2021
    May 2021
    April 2021
    March 2021
    February 2021
    January 2021
    December 2020
    November 2020
    September 2020
    August 2020
    July 2020
    June 2020
    May 2020
    April 2020
    March 2020
    February 2020
    January 2020
    December 2019
    November 2019
    October 2019
    September 2019
    August 2019
    July 2019
    June 2019
    May 2019
    April 2019
    March 2019
    February 2019
    January 2019
    December 2018
    November 2018
    October 2018
    September 2018
    August 2018
    July 2018
    June 2018
    May 2018
    April 2018
    March 2018
    February 2018
    January 2018
    December 2017
    November 2017
    October 2017
    September 2017
    August 2017
    July 2017
    June 2017
    May 2017
    April 2017
    March 2017
    February 2017
    January 2017
    December 2016
    November 2016
    October 2016
    September 2016
    August 2016
    July 2016
    June 2016
    May 2016
    April 2016
    March 2016
    February 2016
    January 2016

Powered by Create your own unique website with customizable templates.
  • Home
  • All Recipes
  • Goal
  • About
  • FAQ
  • Contact