LiveSqueezy
  • Home
  • All Recipes
  • Goal
  • About
  • FAQ
  • Contact

Apple Cider Pulled Chicken

12/13/2021

1 Comment

 
Picture
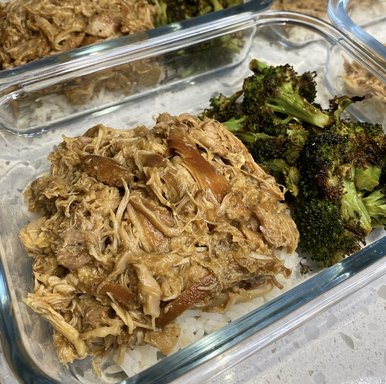
This was so amazing!!! Since there is still fresh Apple Cider in stores I gave this one a go and am SO glad I did. You can make this with chicken thighs or breasts and in the Instant Pot or the slow cooker. I used my Instant Pot and ended up quadrupling the chicken thighs, doubling the onions and apple cider, and used 3 apples, which got me 18 servings. Most people probably don't need that many meals but we eat a lot and also have it twice a day sometimes. Anyways, I share that because I had about 8 cups of leftover sauce once I removed the chicken thighs! I ended up throwing in some arrowroot powder as I simmered and thickened up the sauce until it was down to 4 cups. This chicken turned out delicious and flavorful, so I don't think I'd change a thing. Just expect to simmer down the sauce at the end or have a lot of sauce. This paired really well with simple rice and roasted broccoli. Simple and few ingredients with very little prep and a delicious Whole30 meal. I'll definitely be making this every fall once Apple Cider hits the stores! 

Apple Cider Pulled Chicken
Ingredients:
  • 1.5 lbs boneless skinless chicken thighs, trimmed of extra fat (can use chicken breasts as well)
  • 1 medium yellow onion, sliced
  • 1 crisp apple, peeled and sliced
  • 2 teaspoons minced garlic
  • 1 teaspoon kosher salt
  • 1 cup apple cider, no sugar added
Instant Pot Directions:
  1. Place onion, apple slices, and garlic in the bottom of the Instant Pot.
  2. Place chicken thighs on top of onions and apples.  Sprinkle with salt and pour apple cider over chicken.
  3. Seal lid and cook on Manual setting for 15 minutes.  Allow natural release when cycle is complete.
  4. Shred the chicken right in the pot using forks.  If desired, turn on the Saute function and let the mixture simmer for several minutes to reduce the liquid.
Slow Cooker Directions:
  1. Place onions, apple slices, and garlic in the slow cooker and top with the chicken, salt, and apple cider.  Cook on Low for 6-8 hours or High for 3-4 hours.  Shred chicken.

​Original recipe found here
1 Comment

Maple Chili Pork Tenderloin

11/1/2021

1 Comment

 
Picture
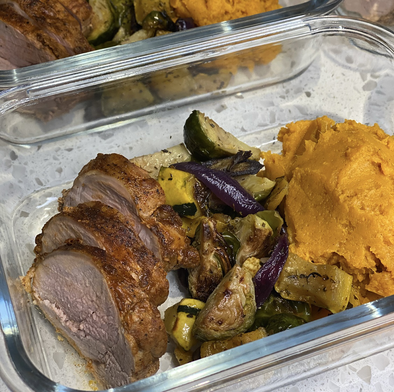
This meal gets me excited for all the holiday food! This one was delish and unique to most of the recipes I post. Simple marinade for the pork tenderloin, then just brown in a skillet on all sides and throw into the oven to finish cooking. Easy, simple, and delicious! Since I tripled this recipe for meal prep I did not use an oven-proof skilled to brown, and instead just threw all the browned pork tenderloins into a casserole dish to finish cooking. Also, it took my pork 30-35 minutes in the oven - way more then what the recipe called for. I paired this Maple Chili Pork Tenderloin with a mix of roasted brussels, tri-colored carrots, delicata squash, and red onion and a simple Sweet Potato Mash with ghee, salt, and cinnamon. We really loved eating this meal all week long! 

Maple Chili Pork Tenderloin
Ingredients:
  • 2 lb. pork tenderloin
  • 1/4 cup pure maple syrup
  • 1 tbsp. apple cider vinegar
  • 2 tsp. chili powder
  • 1 tsp. smoked paprika
  • 2 tbsp. olive oil
  • 1 cup chicken or beef stock
  • Cooking fat
  • Sea salt and freshly ground black pepper
Directions:
  1. In a bowl, combine the maple syrup, apple cider vinegar, chili powder, paprika, and olive oil. Season to taste.
  2. Marinate the pork with the chili maple sauce in the refrigerator for 2 to 12 hours.
  3. Preheat oven to 400 F.
  4. Remove the pork from the marinade.
  5. Melt the cooking fat in an oven-proof skillet over medium-high heat.
  6. Brown the pork on all sides for 1 to 2 minutes, then pour the chicken stock in the skillet.
  7. Place the skillet with the pork in the oven and bake for 12 to 15 minutes.
  8. Let the pork rest for 3 to 5 minutes before slicing.

Original recipe found here

Super Fast Instant Pot Sweet Potato Mash
Ingredients:
  • 2 pounds of sweet potatoes, peeled and cut into 1″ cubes*
  • 1 cup of water
  • 1-2 tbsp of coconut oil or ghee (to your tasting)
  • salt and seasonings to taste
Directions:
  1. Peel your sweet potatoes and cut them into 1″ cubes.
  2. Add sweet potatoes and water to the instant pot. Close pot and set to sealing.
  3. Cook on manual, high pressure, for 4 minutes.
  4. Immediately quick release the pressure as soon as the 4 minute cooking cycle has completed.
  5. Use oven mitts to carefully remove the inner pot from the Instant pot, carrying it to a colander in your sink to drain the potatoes.
  6. Quickly wash out the inner pot and dry it with a kitchen towel.
  7. Immediately place the clean inner pot back into the instant pot, add the coconut oil/ghee and press the sauté button.
  8. Once the coconut oil starts to sizzle, add your potatoes back to the pot along with any seasonings you desire. Use a wooden spoon to stir and turn your sweet potatoes, cooking until a desired consistency is reached. This step should only take a few minutes before you are ready to serve your sweet potato mash! Enjoy!
Notes
*I always use at least 6 lbs of sweet potatoes, 2 cups of water, and cook it for 10-15 minutes.

Original recipe found here
1 Comment

​Instant Pot Peanut Butter Chicken

8/23/2021

0 Comments

 
Picture
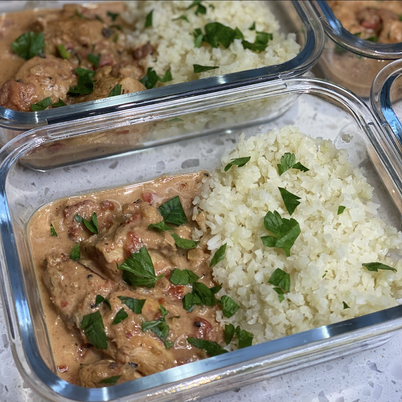
Don't have to twist my arm to try anything with peanut butter! This was delicious and super simple to make in either the Instant Pot or slow cooker. Also, to make this vegan-friendly you can use chickpeas instead. My only note for this recipe is if you coat the chicken in arrowroot flour then I'd opt to brown the chicken on the stovetop instead of the Instant Pot on sauté function. I did a few batches of browning the chicken since I increased the serving size, but my Instant Pot was coated in burnt arrowroot flour by the end and very difficult to clean before I was able to finish cooking. Not sure if I needed a lot more oil or what, but that was something I do not want to mess with again! I used boneless chicken breasts this time and am already planning to try it with chicken thighs next time around. This one was a winner!

​​Instant Pot Peanut Butter Chicken
Ingredients:

Chicken Marinade
  • 1.5 lbs chicken breast or thighs
  • 3 tbsp coconut aminos
  • 2 tbsp arrowroot starch (optional *)
  • Salt to taste
Sauce
  • 1 cup full-fat coconut milk (cream and liquid divided) - 13.5 oz
  • 1 can diced tomatoes (14.5 oz)
  • 1/2 cup unsweetened peanut butter
  • 1 pinch of red pepper flakes
  • 2 - 3 tbsp coconut aminos
  • Additional Salt to taste *
  • 1 clove of garlic (minced)
  • 2 tbsp avocado oil
  • 1/4 cup onion (chopped)​
Directions:
  1. Cut the chicken into cubes. In a big Ziploc bag or medium bowl, marinate the chicken with coconut amino, salt * and arrowroot flour (if using any) for at least 20 minutes. Make sure the chicken is completely coated.
  2. Using "saute" mode, heat up 1 - 2 tbsp oil in an instant pot. Add onion and garlic, saute until fragrant.
  3. Add Chicken cubes (add more oil if needed). Flip a couple of times until the chicken is slightly browned on the outside. Stir in the rest of the ingredients. Use all of the top cream part of the coconut milk (roughly 1/2 cup) along with 1/2 cup of the liquid on the bottom.
  4. Make sure the chicken is evenly coated.
  5. Cover set the valve to “sealing” and cook on high pressure for 10 minutes.
  6. Once done, release. Serve with rice, your favorite vegetables and a sprinkle of fresh cilantro.
Notes
  • *Coconut amino itself is salty, so take that into consideration when you salt the chicken.
  • **If you don't have arrowroot flour, you can omit it. I love using arrowroot flour to help lock the juice in and make the chicken extra moist.
  • For Crockpot and Stovetop Instruction, check out the "What if I don't have an Instant Pot" section in the link below. 
  • You can use 1 to 1 1/2 can of chickpea instead of chicken to make this recipe vegan-friendly.

Original recipe found here
0 Comments

Instant Pot Spicy Pineapple Pork

7/12/2021

1 Comment

 
Picture
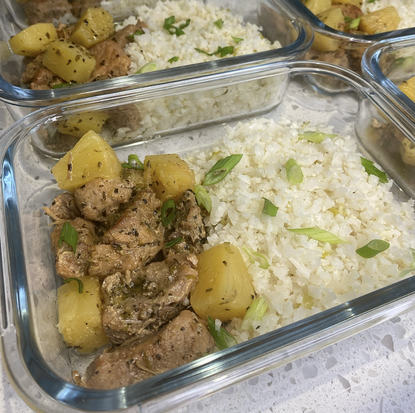
It's been a while since I tried a Nom Nom Paleo recipe and they never disappoint! This one turned out delicious and was super easy to make. I am not a fan of spicy meals, so I simply removed the ribs, pith and seeds from the serrano peppers and it was not spicy at all. However, you can totally leave all that in there and have a much spicier meal. I used salt instead of the Magic Mushroom Powder and found canned pineapple chunks in 100% juice at my local grocery store - make sure to check the ingredients and avoid any extra sugars and unwanted ingredients. I seared the pork this time and really liked the way that turned out, but the directions note that you don't need to diligently sear if you are low on time. While the pork was in the Instant Pot I heated up some plain cauliflower rice on the stovetop with some onions, coconut oil, and salt. There ended up being plenty of extra sauce in the Instant Pot that a simple cauliflower rice was a great pair for this meal. My favorite part about this recipe is how simple the ingredients and instructions are! This one will definitely be thrown into the meal prep rotation. 

Instant Pot Spicy Pineapple Pork
Ingredients:
  • 3 pounds boneless pork shoulder roast or beef chuck roast 
  • 2 teaspoons Magic Mushroom Powder or Diamond Crystal Kosher Salt
  • 1 tablespoon coconut oil ghee, or your preferred high temperature cooking fat
  • 14 ounces canned pineapple chunks in 100% juice
  • 2 serrano pepper diced (if you don’t like spicy, removed ribs, pith, and seeds and/or use less peppers)
  • 1 tablespoon dried basil  
  • 1 tablespoon ground cumin
  • ½ teaspoon freshly ground black pepper
  • 2 tablespoons lime juice
  • 2 scallions thinly sliced (optional)
Directions:
  1. Trim and discard the extra fat from the pork roast and cut it into 2-inch cubes. (If all the available roasts are extra fatty at the butcher counter, buy a slightly larger one so you’ll end up with 3 pounds of meat.)
  2. Measure out the Diamond Crystal kosher salt or Magic Mushroom Powder and toss well to coat all the pork pieces. (Yes, Magic Mushroom Powder can be used as a 1:1 substitute for Diamond Crystal kosher salt in most of my savory recipes!)
  3. Turn on the Sauté function on your Instant Pot and add the coconut oil once the insert is hot. Toss in the seasoned pork cubes and cook, stirring, until the meat gets a bit of sear on the sides. If you’re pressed for time, don’t worry about searing the meat carefully. I’ve tested this recipe both ways (diligently searing in batches and not), and the final result tastes great either way.
  4. Drain the pineapple juice and set the pineapple chunks aside (or keep them in the fridge until you’re ready to serve and eat the pork stew). You’ll be adding ½ cup pineapple juice to the recipe.
  5. Turn off the Sauté function on the Instant Pot. Add the diced serrano peppers, basil, cumin, and black pepper to the pork. Give everything a good stir to distribute the seasoning.
  6. Pour in ½ cup pineapple juice and the lime juice. Give everything a good stir. (Make sure the liquid reaches the bottom of the insert. Otherwise, you might get a “BURN” or “OVHT” error message on your Instant Pot display as the stew reaches high pressure.)
  7. Lock the lid on top and make sure the top valve is pointed to the sealed position.
  8. Program the Instant Pot to cook under high pressure for 35 minutes, and let the pressure drop naturally. If you’re feeling impatient and hangry, you can manually release the pressure after 20 minutes.
  9. Open the lid and check that the pork is fork tender. If the pork is still tough, cook for 5-10 more minutes under high pressure.
  10. Stir in the pineapple chunks until warmed through. Taste and adjust for seasoning with additional salt, Magic Mushroom Powder, or lime juice. 
  11. Ladle up the pork and pineapples and garnish with scallions. Spicy Pineapple Pork tastes great served over cauliflower rice!

​Original recipe found here
1 Comment

Beef Keema Mattar

5/24/2021

2 Comments

 
Picture
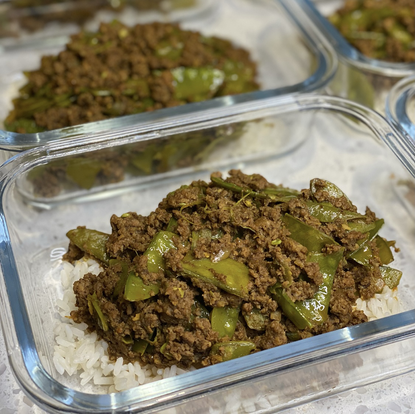
A super flavorful Indian spiced ground meat and pea dish! You can make this one on the stovetop or in the Instant Pot and use your choice of ground meat. I used ground beef and opted for using snow peas instead of regular peas in this one, which definitely gave the meal some texture. If you are not a fan of a more fibrous pea then stick to regular peas or pair with a different vegetable altogether. Full disclosure, by the end of the week I was definitely snow pea'd out. The only spice that might not be in your pantry already is the Garam Masala, but if you invest in the spice you can easily search my blog for other recipes that use that spice - I have posted plenty of other delicious recipes that use the spice. This was a delicious change to the typical ground meat recipes and one I will for sure be making again!​
​
Beef Keema Mattar 
Ingredients:
  • 2 tablespoon Oil
  • 1 Onion, finely chopped
  • 4 Garlic cloves, minced
  • 1-inch piece fresh Ginger root, grated 
  • 1 teaspoon ground Turmeric
  • 1 teaspoon Paprika powder 
  • 1 teaspoon ground Cumin
  • 1 1/2 teaspoon ground Coriander
  • 1 tablespoon Garam Masala
  • 1 lb Ground Meat
  • 2 tablespoon tomato paste
  • 1 cup frozen peas, snow peas, or snap peas
Directions:
Stovetop
  1. Heat the oil in a large pot at medium heat.
  2. Add chopped onion, garlic and ginger and cook until the onions have softened.
  3. Adjust the heat to low and add all the spices. Cook for 1-2 minutes or until aromatic.
  4. Add ground meat. Break it up with your spoon as everything comes together.
  5. Add the tomato paste and then season with salt and pepper. Bring to a boil, reduce the heat and then simmer on low covered for about 15-20 minutes.
  6. Add the peas and cook until the peas are done. Adjust the seasoning if needed.
Instant Pot                              
  1. Turn Instant Pot onto Sauté Mode.
  2. Add oil and let heat.
  3. Add onion, garlic and ginger to the oil and cook until the onions have softened about 2-3 minutes.
  4. Add all the spices. Cook for 1-2 minutes or until aromatic.
  5. Add ground meat and break up meat with your spoon as you mix the onions with the ground meat.
  6. Add tomato paste and then season with salt and pepper.
  7. Turn Instant Pot Off.
  8. Place lid on the Instant Pot and Pressure Valve to Sealing.
  9. Cook on Low Pressure for 6 minutes.
  10. Let Natural Release for 10 minutes.
  11. Open lid and turn on Saute Mode and add the peas and cook 1-2 minutes.
Notes:
Pro Tip: Chop onions into large chunks and place in food processor along with garlic cloves and peeled ginger and pulse gently until just mixed. SAVES TIME AND TEARS!

Original recipe found here
2 Comments

Tomato Basil Chicken

4/26/2021

0 Comments

 
Picture
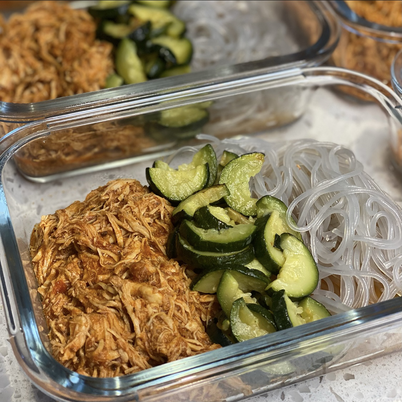
Well this certainly turned out tasting and smelling amazing! Another simple meal prep recipe with little to zero prep, throw all the ingredients into your Instant Pot or slow cooker, and you're pretty much done! I boiled up some sweet potato glass noodles and roasted some zucchini to make this meal complete, and of course to get some more nutrients into the meal. This was definitely a great meal for noodles or zoodles, or better yet a combination of both! We are still keeping things low(er) FODMAP, so I ended up using Extra Virgin Olive Oil Infused with Garlic instead of minced garlic, and swapped the onion powder for Italian seasoning. I don't think either swaps made much of a difference, and like I said this meal was amazing. I will definitely be throwing this one into the meal prep rotation!

Tomato Basil Chicken
Ingredients:
  • 2 pounds boneless, skinless chicken breasts
  • 28 oz can crushed tomatoes with basil
  • 1/2 onion, chopped
  • 2 cloves garlic, minced OR 1 teaspoon garlic powder
  • 1 teaspoon onion powder
  • 1 teaspoon dried basil OR 3 teaspoons fresh, chopped basil (or to taste)
  • 1 teaspoon salt
  • 1 tablespoon balsamic vinegar
  • 1 teaspoon olive oil (optional)
Directions:
Pressure Cooker
  1. Select sauté function on Instant Pot, set to normal
  2. Add a couple teaspoons of extra virgin olive oil or coconut oil to the pot and let it melt
  3. Add chicken breasts, chopped onion, and minced garlic
  4. Brown slightly on both sides
  5. Pour crushed tomatoes over the chicken
  6. Add remaining ingredients and stir a little to combine (doesn't have to be perfect)
  7. Put lid on the IP, make sure vent knob is set to SEALING
  8. Set IP to manual for 20 minutes (add a few more minutes for frozen chicken breasts)
  9. After cooking time has completed, NPR for 10 minutes then QPR to release remaining pressure
  10. Shred the chicken breasts and serve
Slow Cooker
  1. Place chicken breasts in IP or slow cooker
  2. Add remaining ingredients, mixing slightly
  3. Set to slow cook 4 to 6 hours on High
  4. Shred chicken when cooked

​Original recipe found here
0 Comments

Instant Pot Salsa Verde Chicken

4/12/2021

0 Comments

 
Picture
This one got two thumbs up in our house! This was my first time ever making Salsa Verde and it definitely won't be the last. Once the tomatillos are sliced and peppers are de-seeded, throw them in the oven to roast for about 15 minutes, then blend with the remaining ingredients to make the Salsa Verde. All that's left to do from here is fill your Instant Pot or slow cooker with either chicken thighs or breasts and top with your freshly made Salsa Verde sauce. I left the additional chicken broth out of this one and am glad I did because there was plenty of sauce for the chicken. You can easily double the chicken amount with this serving of Salsa Verde. I paired this one with a mix of rice and cilantro lime cauliflower rice and thought this meal was delicious. However, you can easily make this meal to your liking and throw the chicken in a taco or make up a burrito bowl with all your favorite fixings. This recipe was super simple, easy, and tasty, so you know I'll be making it again soon! 

Instant Pot Salsa Verde Chicken
Ingredients:

Tomatillo Salsa Verde
  • 1.5 lbs tomatillos husks removed
  • 1 large poblano pepper de-seeded and sliced in half
  • 2 jalapeno peppers de-seeded and sliced in half
  • 1 tbsp olive oil or avocado oil
  • 2/3 cup diced white onion
  • 1/2 cup fresh cilantro chopped
  • 2 cloves garlic crushed
  • 1 lime juice of
  • 1/2 tsp sea salt + more to taste
For the Chicken
  • 2 lbs chicken thighs or breast
  • 2 tsp cumin
  • 1/2 cup chicken broth
Directions:
  1. Begin by making your tomatillo salsa verde. Preheat your oven to 425 degrees. Slice the tomatillos in half and place cut side down on your baking sheet. Place the peppers cut side down on the same sheet. Lightly brush with oil, and place in the oven. Cook for 12-15 minutes, or until the tops of the veggies are blistered (see photo in post). Remove from the oven.
  2. Place roasted veggies, onion, cilantro, garlic, lime and sea salt in a blender. Pulse and blend for until smooth (don't over pulse). 
  3. Now place the chicken in the bottom of your Instant Pot. Pour the salsa verde on top. Add chicken broth, and cumin. Secure the lid on your Instant Pot, ensuring the valve is turned to the sealed position. Select manual (or pressure for different models), and cook on high pressure for 10 minutes.
  4. Use a quick release and release all steam before opening the lid of your IP. Shred the chicken with a fork and serve, adding additional salt to taste. 
  5. For the slow cooker, place chicken on the bottom of your slow cooker and top with salsa verde. You do not need the chicken broth. Add in some cumin. Cook on low for 4-6 hours, or until the chicken is fork tender.

Original recipe found here
0 Comments

Instant Pot Teriyaki Chicken

4/5/2021

0 Comments

 
Picture
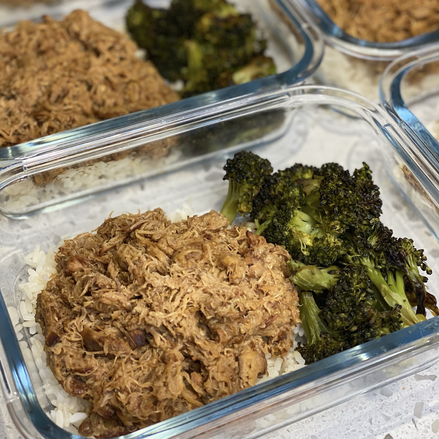
A simple and delicious Instant Pot recipe to save for your collection! This is the kind of recipe that earns its way into the meal prep rotation. I can easily double or triple the ingredients to get enough meals for the week, the ingredients are few and simple with zero prep, and I can dump everything in the Instant Pot and come back later to a pretty much complete meal. For this one I ended up using 100% apple cider since that was the only fresh, no added sugar, apple juice I could find at the store. Maybe in the fall I will be able to find some better apple juice options and compare how it tastes to this apple cider version. I didn't think the Teriyaki Chicken turned out overwhelmingly sweet, which I was a fan of, but also might be due to not using apple juice. Anyways, I almost quadrupled the chicken amount and just doubled the remaining ingredients and thought that ratio provided plenty of sauce. I paired this with some rice and roasted broccoli and really enjoyed this meal all week long! 

​Instant Pot Teriyaki Chicken
Ingredients:
  • 1.5 lbs boneless, skinless chicken thighs
  • 1/2 cup 100% apple juice (no sugar added)
  • 1/3 cup coconut aminos
  • 3 tbsp apple cider vinegar
  • 2 tsp minced ginger (I used 1/4 tsp Ginger Powder)
  • 2 tsp minced garlic
  • 2 tsp sesame oil
  • 1 tbsp honey (substitute 3 pitted and blended medjool dates for Whole30)
  • 2 tsp arrowroot flour dissolved in 1 tbsp water to thicken (optional) 
Directions:
  1. Add all of the ingredients (except for the arrowroot and water) into the instant pot and stir to incorporate the ingredients together, then add in the chicken.
  2. Close the lid, put the valve to sealing and set the instant pot to cook on high pressure for 10 minutes.
  3. Once it’s finished, do a quick release and remove the chicken thighs, transferring to a cutting board.
  4. Add in the arrowroot water mixture and set the instant pot to “sauté”. Stir to mix in the arrowroot and let the sauce come to a simmer to thicken. While it’s thickening, shred the chicken thighs using two forks and add the shredded chicken back into the instant pot.
  5. Press “cancel” once it’s thickened, and serve. Garnish with sesame seeds or chopped green onions.
Notes:
To use dates in place of honey, blend the pitted dates with 3 tbsp very hot water to make a paste, and use that instead.

​Original recipe found here
0 Comments

The Best Paleo Pumpkin Chili

3/8/2021

1 Comment

 
Picture
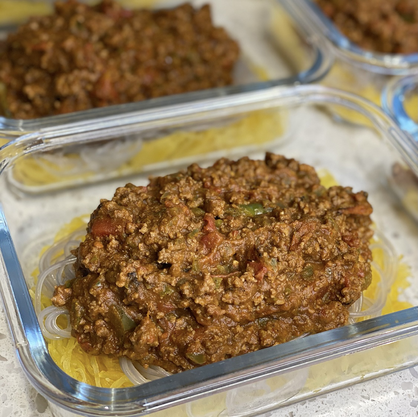
Not only was this recipe called the best paleo pumpkin chili, but it also had some raving reviews, so I had to give it a try. Glad I did because this turned out just as tasty as it smells! I didn't get too much sense of pumpkin while eating this, but it was still very comforting, flavorful, and delicious. Plus, super easy to whip up in the Instant Pot! There are also stovetop directions if you don't have an Instant Pot. Now we aren't big soup people in this house and we've been experimenting with making meals low fod-map, so I left the broth out of this one, along with the onions and garlic. I also tripled the recipe below and it completely filled my 8 quart Instant Pot, so there was no room for anything else anyways. The original recipe said they made this with a combo of ground beef and ground turkey, but I went all ground beef this time. Paired this with spaghetti squash because it's super easy and a great "pasta" substitute. I also love boiling up some Sweet Potato Glass Noodles or Rice Noodles as a quick carb option and another "pasta" substitute. Serving this over roasted sweet potatoes would also be super delicious and comforting too. We enjoyed eating this one all week long and will definitely be making again soon!

​The Best Paleo Pumpkin Chili
Ingredients:
  • 1 1/2 tablespoons avocado oil
  • 2 pounds ground meat 
  • 1 large yellow onion diced
  • 8 garlic cloves minced
  • 2 green bell peppers diced
  • 28 ounces fire roasted tomatoes
  • 1 1/2 tablespoons chili powder
  • 1 1/2 tablespoons cacao powder
  • 1/2 teaspoon nutmeg
  • 1/2 teaspoon paprika
  • 1 1/2 teaspoons cinnamon
  • 1 1/2 teaspoons cumin
  • 1 1/2 teaspoons sea salt
  • 1/2 teaspoon black pepper
  • 2 cups bone broth
  • 15 ounces canned pumpkin
  • sea salt and black pepper to taste
Directions:
Instant Pot Instructions
  1. Set the Instant Pot® to the high sauté setting. Heat oil; add ground meat(s) and cook until they have browned, about 3-5 minutes, making sure to crumble the meat as it cooks. Drain excess fat and set aside.
  2. Add, onion, garlic and bell peppers to the Instant Pot®. Cook, stirring occasionally, until they are all tender, about 4-6 minutes. Stir in tomatoes, cacao powder and spices.
  3. Stir in broth, scraping any browned bits from the bottom of the pot.
  4. Stir in pumpkin and ground meat; season with salt and pepper, to taste. Select manual setting and adjust the pressure to high. Set the time for 10 minutes.
  5. When finished cooking, quick-release pressure according to the manufacturer’s instructions.
  6. Garnish with your favorite toppings and taste for salt and pepper seasoning if needed. Serve immediately and enjoy!
Stovetop Instructions
  1. Heat a large soup/stock pot over medium-high heat and add oil. Once oil is heated through (1-2 minutes), add ground meat(s)). Cook until they have browned, about 3-5 minutes, making sure to crumble the meat as it cooks. Drain excess fat and set aside. 
  2. Add, onion, garlic and bell peppers to the pot. Cook, stirring occasionally, until they are all tender, about 4-6 minutes. Stir in tomatoes, cacao powder and spices.
  3. Stir in broth, scraping any browned bits from the bottom of the pot.
  4. Stir in pumpkin and ground meat; season with salt and pepper, to taste. Cook over medium low heat for 25-30 minutes, stirring occasionally. 
  5. Garnish with your favorite toppings and taste for salt and pepper seasoning if needed. Serve immediately and enjoy!

Original recipe found here
1 Comment

Instant Pot Coconut Curry Chicken

2/22/2021

0 Comments

 
Picture
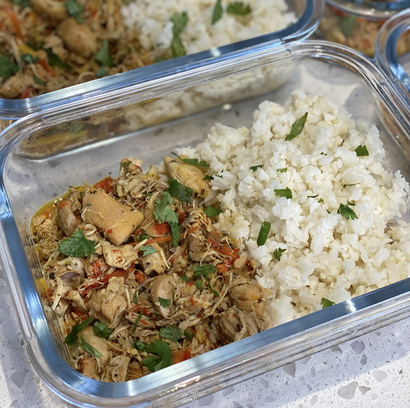
This one might very well be our new favorite curry chicken recipe! It was a little different then other recipes I've posted as it calls for chicken thighs and for browning the chicken before cooking. The recipe serving size is only for 4, so I had to significantly increase ingredients to get enough meals for the week. In doing so, I aired on the side of caution and increased the Instant Pot cooking time to 15 minutes, however that was too much as my peppers were overcooked. A couple other notes I had were that I might drain some excess chicken broth before adding in the spices, and I might use another can of coconut milk next time. Since I increased the ingredients so much I was not about to add 6 cans of coconut milk, but I'd say a good ratio in most recipes I've made is using 1 can of coconut milk per 8 servings. I know that doesn't go in line with what this recipe calls for, but that's just what I've found to work best after years of making recipes that call for canned coconut milk. You can also opt for doing a mix of full fat and low fat canned coconut milk, however that full fat always provides more flavor. A lot of notes on this one, but this meal still seriously turned out amazing and we devoured it all week long with a rice and cauliflower rice mix! I also threw it over roast sweet potatoes later in the week and really enjoyed that combo too. We will definitely be making this one again and again!

​​Instant Pot Coconut Curry Chicken
Ingredients:
  • 1 Tablespoon Olive oil
  • 1 small yellow onion, diced
  • 1 small Red bell pepper, thinly sliced into strips
  • 1 1/2 Pounds boneless, skinless chicken thighs, cut into 1-1/2 inch pieces
  • 4 Cloves garlic, minced
  • 1 Tablespoon Curry powder
  • 1 Tablespoon Dried basil
  • 1 Teaspoon Salt, or to taste
  • 1/2 Teaspoon Chili powder
  • 1/4 Teaspoon White pepper, optional
  • 1/4 Teaspoon Ground ginger, or to taste
  • 1 Can (13.6 ounces) unsweetened full fat coconut milk
  • 1 ½ Tablespoons Arrowroot starch
  • Cooked rice, for serving
  • Chopped fresh cilantro, for garnish
Directions:
  1. Select the “SAUTÉ” function on the Instant Pot and heat up the olive oil.
  2. Add diced onion and prepared peppers to the hot oil; cook for 2 minutes.
  3. Stir in chicken pieces and garlic.
  4. Season with curry, basil, salt, chili powder, white pepper, and ground ginger.
  5. Cook and stir until chicken is just browned, about 2 minutes.
  6. Add coconut milk to the pot and using a wooden spoon, scrape up the brown bits from the bottom of the pot.
  7. Turn OFF the Instant Pot by selecting CANCEL. Secure the lid and make sure the vent is closed.
  8. Select MANUAL (or PRESSURE COOK) and set to cook for 5 minutes.
  9. When time is up, do a quick release.
  10. When the pin drops, remove the lid.
  11. Carefully remove 1/4 cup of the liquid from the pot and into a small bowl; whisk the arrowroot starch into the liquid until thoroughly combined.
  12. Whisk the arrowroot mixture (slurry) back into the Instant Pot; mix and stir around until incorporated and sauce is thickened.
  13. Serve Coconut Curry Chicken over the rice and garnish with cilantro.

Original recipe found here
0 Comments
<<Previous
    Picture

    Erika Copeland

    Sharing the recipes I prepare to help others eat more nutritious food and begin their journey to a healthier life.

    Instagram

    categories

    All
    AIP
    Beef
    Breakfast
    Brussels
    Burgers
    Casserole
    Cauliflower Rice
    Chicken
    Crockpot
    Kombucha
    Low FODMAP
    Meal Prep Tips
    Nutrition Blog
    Pork
    Pressure Cooker
    Quiche
    Sausage
    Shrimp
    Snacks
    Steak
    Sweet Potatoes
    Treats
    Tuna
    Turkey
    Vegan
    Video
    Whole30

    Archives

    December 2021
    November 2021
    September 2021
    August 2021
    July 2021
    June 2021
    May 2021
    April 2021
    March 2021
    February 2021
    January 2021
    December 2020
    November 2020
    September 2020
    August 2020
    July 2020
    June 2020
    May 2020
    April 2020
    March 2020
    February 2020
    January 2020
    December 2019
    November 2019
    October 2019
    September 2019
    August 2019
    July 2019
    June 2019
    May 2019
    April 2019
    March 2019
    February 2019
    January 2019
    December 2018
    November 2018
    October 2018
    September 2018
    August 2018
    July 2018
    June 2018
    May 2018
    April 2018
    March 2018
    February 2018
    January 2018
    December 2017
    November 2017
    October 2017
    September 2017
    August 2017
    July 2017
    June 2017
    May 2017
    April 2017
    March 2017
    February 2017
    January 2017
    December 2016
    November 2016
    October 2016
    September 2016
    August 2016
    July 2016
    June 2016
    May 2016
    April 2016
    March 2016
    February 2016
    January 2016

Powered by Create your own unique website with customizable templates.
  • Home
  • All Recipes
  • Goal
  • About
  • FAQ
  • Contact