LiveSqueezy
  • Home
  • All Recipes
  • Goal
  • About
  • FAQ
  • Contact

Beef Barbacoa over Cilantro Lime Cauliflower Rice

2/25/2019

0 Comments

 
Picture
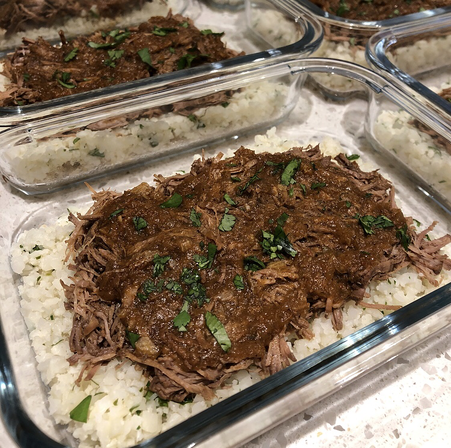
Yummm! This meal turned out tasting SO delicious! You can make the beef barbacoa in the slow cooker or Instant Pot (I used the Instant Pot), and you can broil it in the oven after if you want to make it crispy. There's not too much prep to this one besides dicing the onion and garlic, then preparing the rest of the ingredients into a sauce to poor over the browned beef. While you're waiting on the beef to cook you can quickly make the Cilantro Lime Cauliflower Rice, which is seriously so simple to prepare, especially if you purchase cauliflower that is already riced. If you need to add some more carbs to this just mix in some regular rice with that cauliflower rice and you're all set. This meal had an enjoyable citrus taste to it and was full of so much flavor! I definitely recommend giving this one a try for your next meal prep!

Beef Barbacoa (Slow Cooker or Instant Pot)
Ingredients:
  • 3 lbs beef chuck roast, cut into 2 inch cubes (can also use beef brisket, I used a beef eye round roast)
  • 1 medium onion, diced
  • 6 cloves garlic, peeled and smashed
  • 3/4 cup fresh squeezed orange juice (about 2 oranges)
  • 1/4 cup fresh squeezed lime juice (about 2 limes)
  • 2 tbsp apple cider vinegar
  • 1 tbsp tomato paste
  • 1 tbsp cumin
  • 2 tsp chipotle powder
  • 2 tsp oregano (fresh or dried)
  • 2 tsp salt
  • 1/2 tsp ground cloves
  • 2 tbsp ghee (or other cooking oil)
For topping/serving:
  • romaine lettuce (or sub Siete Tortillas or other sturdy lettuce)
  • cilantro
  • avocado
  • lime wedges
Directions:
  1. Cut beef into cubes and set aside. Prep onion and garlic as noted.
  2. Combine orange juice, lime juice, vinegar, tomato paste, cumin, chipotle powder, oregano, salt and ground cloves in a bowl or jar and mix well.
  3. (If you don't have a pressure cooker then skip to directions below) Press the sauté button on the instant pot and add ghee. Once hot, add in the beef and brown it on all sides. Press cancel on the instant pot once the beef is browned.
  4. Add in the diced onion and garlic cloves and pour the juice/seasoning mixture all over everything.
  5. Secure the lid on the instant pot and close the pressure valve. Press the "manual" button (or "pressure cook" button) and set the time to cook for 30 minutes at high pressure. Once the time is up, let the pressure naturally release on its own for 20 minutes.
  6. Manually release any remaining pressure and remove the lid. Shred the beef with two forks.
  7. Serve beef in bowls over greens, in lettuce wedges or in tortillas with your favorite toppings.
Slow cooker instructions:
  1. Follow steps 1-2 above.
  2. Heat a large skillet over medium heat and add ghee. Once hot, add in beef cubes to brown, just a minute or so on each side until all sides are browned. Transfer beef to the slow cooker.
  3. Add in the diced onion and garlic cloves and pour the juice/seasoning mixture all over everything.
  4. Cook on low for 8-10 hours. Once the beef is finished, shred it in the slow cooker with two forks and mix it with all the juices. Serve as noted above.
Optional step (for crispy beef barbacoa):
  1. Set your oven to broil.
  2. After shredding the beef, use a slotted spoon to remove the beef and onions from the instant pot and place on a large sheet pan. Spoon some of the juices from the instant pot over the top of the beef in the sheet pan.
  3. Place in the oven to broil for 6-8 minutes, until the beef begins to develop some brown and crispy edges. Watch carefully and cook to your preference.
  4. Alternatively, you can simply transfer some of the beef to a skillet over medium heat and cook it until it's crispy, stirring occasionally. This method is easiest if you are re-heating the leftovers from the fridge.

Original recipe found here

Cilantro Lime Cauliflower Rice
Ingredients:
  • 1 head of cauliflower (I used two bags of frozen cauliflower rice)
  • 2 limes
  • 2 cloves of garlic
  • 1 handful chopped cilantro
Directions:
  1. (If making own cauliflower rice) Remove the leaves from the cauliflower, and cut the head in half. Remove the cauliflower from the core so you only have the florets. Place half the cauliflower into the processor and process until only small pieces remain. Remove from the processor and place into a pan. Process the remaining cauliflower repeating the steps.
  2. Mince the garlic and add to the cauliflower in the pan. Cook over medium heat for about 5 minutes, stirring constantly. When cauliflower is slightly toasted, and garlic cooked, remove from heat.
  3. Toss with cilantro and juice from the whole lime.

Original recipe found here
0 Comments

Instant Pot Chicken Vaca Frita over Cauliflower Rice

2/18/2019

0 Comments

 
I am starting to make some videos of the recipes I make more frequently then others in hopes that it will help others realize meal prep really isn't that bad! Plus, I personally think the meals I pick out are truly tasty and meals that people would look forward to eating... I mean why prep meals for the week that you aren't actually going to enjoy? Anyways, I've made this Vaca Frita with chicken multiple times and absolutely love it. It is a relatively simple meal to make without a ton of ingredients whatsoever. I personally love eating this chicken with some Barnana’s Himalayan Pink Sea Salt Plantain Chips (paleo, vegan, gluten free, dairy free, amazing), but this time I just had it over cauliflower rice. For not a ton of ingredients, this chicken sure packs a lot of flavor and is not lemon or cilantro dominant at all. This is a great protein to prep in bulk that you can dress up throughout the week however you want, so that you're not bored of the same meal everyday. One of these days I plan to make this Chicken Vaca Frita with some roasted plantains, which I think would be a bomb meal. If you give this one a try let me know how you enjoy it! 
​
​Instant Pot Chicken or Turkey Vaca Frita
Ingredients:
  • 4lbs boneless skinless chicken breasts or turkey breasts
  • 1 cup bone broth
  • ¼ cup tallow or bacon fat (divided)
  • 3 large sweet onions
  • 4 cloves garlic
  • 3 lemons
  • 3 tsp pink Himalayan salt
  • 1 cup minced cilantro
Directions:
  1. First you need to cook your chicken breasts. Open your pressure cooker, add in my chicken and broth and set to poultry (20 min, high).
  2. While the chicken cooks get prep the rest of the ingredients; peel and slice all the onions and the garlic. Juice the lemons and mince the cilantro. Once the chicken is done, release the pressure manually. Remove the chicken from the pressure cooker and place in a bowl. Shred with two forks and set aside.
  3. Empty the bowl of your pressure cooker. Heat, with the lid open on sauté mode, medium or low heat. When it comes to temperature add in 2 tbsp. cooking fat and all the onions and garlic. Cook, stirring occasionally for 10-15 minutes until the onions are very tender, translucent and sweet.
  4. Remove half of the onion from the pot and add in half of the shredded chicken, one tbsp. fat, sprinkle in some salt and set the saute heat to high. Cook, stirring occasionally for 5-8 minutes until crispy bits begin for form. Add in half of the lemon juice and a handful of cilantro. Stir well and remove from the pressure cooker. Next add in the remaining fat, onions, chicken and repeat. Same with the remaining salt, lemon and cilantro.
  5. Once it’s all done, mix it all together and toss well and let it sit for 5 minutes. Mix again, make sure you scrape and crispy bits from the bottom of the pot. Then you’re ready to serve! Garnish with remaining cilantro. This is great over cauliflower rice, with plantain chips or over greens! Buen Provecho!

Original recipe found here
0 Comments

Crispy Garlic Butter Chicken and Brussels

2/11/2019

0 Comments

 
Picture
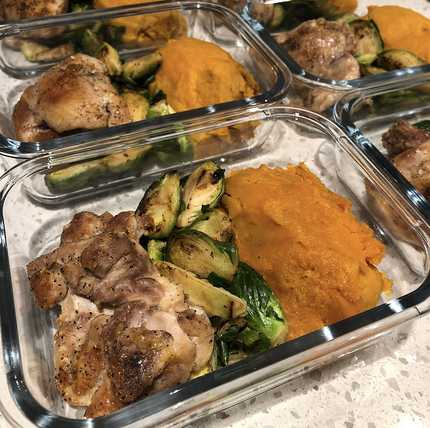
Yes, this meal turned out as amazing as it sounds and looks! For those who get easily intimidated by cooking, this is an extremely SIMPLE one pot meal! The only prep you need to do is cut your brussels sprouts in half and mince the garlic cloves (or just buy pre-minced garlic and you're set). For those who are wondering what ghee is, it's just clarified butter, which means it is butter with all the milk solids removed (so it's free of lactose and casein protein). This creates a higher smoke point and also gives it a nutty, more rich and intense flavor. It's not hard to make by yourself, but you can purchase it at the store as well. I mention all of this because if you haven't tried ghee yet, I definitely recommend using it in this recipe if you can! A little bit of ghee, salt, and pepper truly went a long way into making a delicious tasting meal. This is a recipe you want to save to cook up on a night when you don't have much energy or time to make a meal. I will for sure be making this one frequently! 

Crispy Garlic Butter Chicken and Brussels
Ingredients:
  • 8 chicken thighs – skin on or off, your choice!
  • 1 lb. brussels sprouts, cut in half
  • 1/2 teaspoon sea salt
  • 1/4 teaspoon black pepper
  • 3/4 cup chicken stock
  • 2 teaspoons ghee
  • 3 garlic cloves, very finely minced
Directions:
  1. Add the chicken to a non-stick frying pan over medium-high heat skin side up. (If using skinless thighs, add a teaspoon of oil.) Sprinkle half the salt and pepper over the chicken and let it cook for 5 minutes, or until it has browned on the bottom. Flip the chicken over and sprinkle on the remaining salt and pepper. Cook until the skin is crispy or the top is brown, about 6-7 minutes. Remove the chicken from the pan.
  2. While the chicken is cooking, cut the brussels in half. Add the brussels sprouts to the pan and let them cook until they are brown on one side, about 5 minutes. Push them to the side of the pan and arrange the chicken on the other side of the pan. Pour the chicken stock into the pan (not over the crispy chicken) and let it simmer until the pan is dry and the chicken is fully cooked, about 15 minutes.
  3.  Pile the brussels sprouts on one side of the pan and add the butter and garlic. Let the garlic cook for 2 minutes then spoon some garlic butter over the tops of the chicken. Mix the rest of the garlic butter into the brussels sprouts.
  4. Serve with lots of extra black pepper.

Original recipe found here
0 Comments

Super Fast Instant Pot Baked Sweet Potatoes

2/4/2019

0 Comments

 
​Another video for your viewing pleasure! Figured it was time to share how I have been making bulk sweet potatoes for meal prep literally every week these days. The best part is that it is super FAST and super EASY to do, which is why this one has been my go-to. The video really says it all, so I'll just add my notes and commentary. I typically buy larger sweet potatoes and stuff my Instant Pot to the max, so I always cook on manual for 30 minutes. However, like I noted below, if your sweet potatoes are smaller in size then 25 minutes should be plenty enough. The skins on the sweet potatoes naturally break open when cooked through, and once cooled I'll either put them into meals or store in one big container to have with dinners for the week. If you are someone who needs to mix up how they eat sweet potatoes then don't go anywhere yet! This is just like a plain chicken bulk prep where once you have it made you can dress it up as you want throughout the week. You can make this cooked sweet potato into a mash by adding some spices, cooking fat, and coconut or almond milk. If you want to step the mash game up even more you can steam some cauliflower, butternut squash, carrots, or pumpkin and blend that into the mash as well. I've added cooked sweet potato to smoothies and gluten-free oatmeal, made sweet potato pancakes, mashed them with bananas to make a fun snack, and my favorite is making a sweet potato bowl -- add an egg or two on top, some nuts, seeds, dried fruit, coconut shavings, spinach, chicken or other protein... the possibilities are really endless! Although these aren't true baked sweet potatoes, I do think they come pretty close to the real thing. Plus, you don't have to spend and hour or two waiting and checking on them in the oven until they are done. With no prep involved, just pop these in your Instant Pot first thing in the morning or when you get home, and continue on with your life. 

Super Fast Instant Pot Baked Sweet Potatoes
Ingredients:
  • 2-4 pounds of sweet potatoes
  • 1 cup of water
Directions:
  1. Pour 1 cup of water into your Instant Pot.
  2. Place your steamer basket over the water in your Instant Pot. 
  3. Add as many sweet potatoes as you want cooked (or in my case, that can fit into your Instant Pot). 
  4. Cook on manual, high pressure, for 25-30 minutes*.
  5. Immediately quick release the pressure as soon as the cooking cycle has completed.
  6. Remove sweet potatoes from your Instant Pot with tongs and let cool down. The skins should naturally break open and the sweet potatoes should be clearly soft throughout. 

Notes:
*If your sweet potatoes are larger in diameter cook for at least 30 minutes. If they are smaller in diameter then 25 minutes should be plenty enough!
0 Comments

Chicken Shawarma over Sweet Potato & Cauliflower Rice

2/4/2019

0 Comments

 
Picture
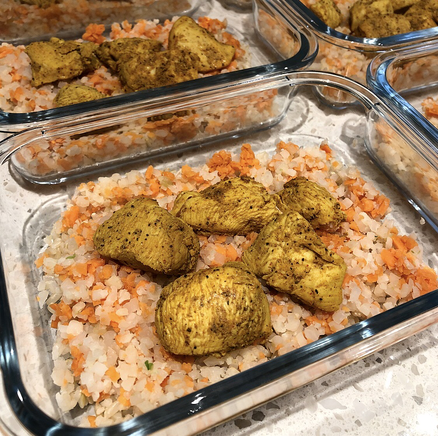
Stop making boring plain chicken for meal prep and pick an easy, flavorful recipe from the blog like this one! Seriously though, this chicken was packed with all the spices and flavor, and the only prep you need to do is throw everything together the night before to let marinate over night. The recipe below gives directions for cooking on the grill, oven, or stove. I personally chose the stove top, but if it was summer time I would have for sure preferred the grill! I loved how this chicken turned out and it will pair really well with rice. I could have probably dressed up the sides a bit more and cooked the cauliflower rice with some more spices, fats, or different vegetables, but I was super lazy with this one. Sometimes it's just easier to simply heat up a few bags of Green Giant® Riced Veggies Cauliflower & Sweet Potato and call it a day. Just being real though. If you make this chicken let me know how you completed the meal and what sides you paired it with! I would love to know :) 

Chicken Shawarma 
Ingredients:
  • 2 lbs boneless skinless chicken thighs (I used chicken breasts)
Marinade:
  • 3 tbsp fresh lemon juice
  • 3 tbsp olive oil
  • 4 cloves garlic , minced
  • 2 tsp salt , fine salt, not flaked
  • 2 tsp black pepper
  • 4 tsp ground cumin
  • 4 tsp ground coriander
  • 2 tsp paprika
  • 1 tsp turmeric
  • 1/2 tsp ground cloves
  • 1/2 tsp cayenne pepper , or more to taste
Directions:
  1. Add the chicken shawarma marinade ingredients to a large ziplock bag along with the chicken thighs. 
  2. Marinate chicken for 1 - 8 hours, or overnight.
Cooking on the grill:
  1. Remove the chicken from the fridge about 20 minutes before cooking and allow to come to room temperature.
  2. You'll need a hot gas or charcoal grill. Place the chicken thighs onto the hot grill grates and close the lid and let them cook for 3-4 minutes. Turn the chicken thighs and cook the other side for a further 3-4 minutes or until they are fully cooked
  3. Using a thermometer check that the thickest part of each chicken thigh has an internal temperature of 165F
Cooking on the stove:
  1. I prefer to cook boneless Skinless chicken thighs in a well seasoned cast iron skillet, if you can get the cast iron grill pan that will give you lovely grill marks on your chicken.
  2. Cook the chicken thighs for about 4-6 minutes per side, and until fully cooked at the thickest part of each chicken thigh.
  3. Using a thermometer check that the thickest part of each chicken thigh has an internal temperature of 165F
Cooking in the oven:
  1. Line a sheet pan with parchment paper for easy clean up, don't use foil as the chicken will stick to it.
  2. Preheat oven to 400F
  3. Bake for about 25 - 35 minutes or until the chicken is fully cooked at the thickest part of each chicken thigh. 
  4. Using a thermometer check that the thickest part of each chicken thigh has an internal temperature of 165F

Original recipe found here
0 Comments

Paleo Turkey Chili over Roasted Sweet Potatoes

2/4/2019

0 Comments

 
Picture
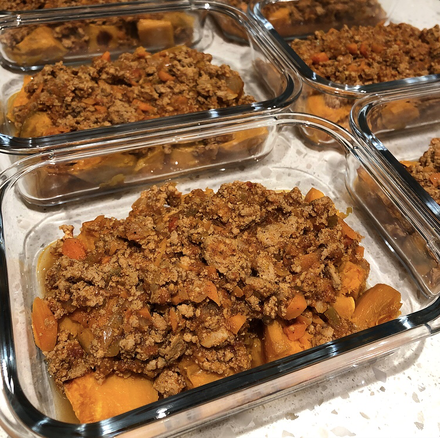
Another amazing chili recipe that does not have an overwhelming taste of tomatoes! This one turned out really tasty and the roasted sweet potatoes were the perfect pair. The spices were slightly different then your average chili recipe too and I really enjoyed the twist! I recommend preparing all the veggies the night before if you want to make your meal prep day even easier. That way you can wake up, throw everything in the slow cooker, and get on with your day. My preferred way to chop the peppers, onions, and carrots was to throw them in a food processor and pulse a few times. That is just way less time consuming and you can get those veggies down to rice size if you prefer. I ended up doubling everything below, so I threw everything in my Instant Pot since it's bigger then my crockpot. Plus, I utilized the 'saute' function to brown the turkey, which meant one less pan to clean. Since I doubled everything, I increased the cooking time to 8 hours in the slow cooker just to be safe. If you are looking for a super simple and delicious meal to make then I definitely recommend giving this one a try! 

Paleo Turkey Chili 
Ingredients:
  • 2 lbs ground turkey
  • 2 tablespoons olive oil
  • 1 cup onion, minced
  • 1 tablespoon garlic, minced
  • 1 cup peppers, chopped in small pieces
  • 1 cup carrots, chopped in small pieces
  • 40 oz canned crushed tomatoes
  • 1 tablespoons paprika
  • 1/4 teaspoon red pepper flakes (omit for less spicy)
  • 1 teaspoon pepper
  • 2 teaspoons chili powder
  • 1 teaspoon cumin
  • 1/2 teaspoon salt
  • 1/4 teaspoon cinnamon
  • 1/2 teaspoon turmeric
Directions:
  1. Heat oil in a pan. Cook turkey over medium high heat until browned, approximately 10 minutes
  2. While turkey is browning, chop all vegetables + prepare spices. 
  3. Add browned turkey + all ingredients to the crockpot.
  4. Stir all of the ingredients together in the crockpot until thoroughly mixed
  5. Cook on low for 6 hours. Serve over steamed sweet potato noodles or cauliflower rice for a paleo/whole 30 option, or rice for non-paleo/whole 30 eaters!

Original recipe found here

My Roasted Sweet Potatoes
Ingredients:
  • 4-6 Sweet Potatoes (Depending on how much you want to make. 5 medium sized sweet potatoes usually gets me 6 oz of sweet potato fries for 6 meals. I think my idea of medium sized is bigger than most though.)
  • Olive oil spray
  • Sea salt (I love using Garlic Sea Salt!)
  • Optional: Cinnamon, Paprika, any other Spices
Directions:
  1. Preheat oven to 425 degrees
  2. Skin and cut the sweet potatoes into whatever shape you want. I either do fries, wedges or circles.
  3. Spray baking pan with olive oil. Lay down sweet potato fries flat (do not just dump a pile on the pan).
  4. I fill my Misto with olive oil and lightly spray the fries, then add some sea salt (or whatever spices you enjoy).
  5. Bake for 15-20 minutes. Take out of the oven and move them around or flip them over. Bake for another 15-20 minutes.
  6. Keep an eye on them, if they are thin bake for less time, and vice versa. Key is to move them around or flip them over half way through baking them. I usually make mine thicker, so I bake them for at least a total of 40 minutes.
0 Comments
    Picture

    Erika Copeland

    Sharing the recipes I prepare to help others eat more nutritious food and begin their journey to a healthier life.

    Instagram

    categories

    All
    AIP
    Beef
    Breakfast
    Brussels
    Burgers
    Casserole
    Cauliflower Rice
    Chicken
    Crockpot
    Kombucha
    Low FODMAP
    Meal Prep Tips
    Nutrition Blog
    Pork
    Pressure Cooker
    Quiche
    Sausage
    Shrimp
    Snacks
    Steak
    Sweet Potatoes
    Treats
    Tuna
    Turkey
    Vegan
    Video
    Whole30

    Archives

    December 2021
    November 2021
    September 2021
    August 2021
    July 2021
    June 2021
    May 2021
    April 2021
    March 2021
    February 2021
    January 2021
    December 2020
    November 2020
    September 2020
    August 2020
    July 2020
    June 2020
    May 2020
    April 2020
    March 2020
    February 2020
    January 2020
    December 2019
    November 2019
    October 2019
    September 2019
    August 2019
    July 2019
    June 2019
    May 2019
    April 2019
    March 2019
    February 2019
    January 2019
    December 2018
    November 2018
    October 2018
    September 2018
    August 2018
    July 2018
    June 2018
    May 2018
    April 2018
    March 2018
    February 2018
    January 2018
    December 2017
    November 2017
    October 2017
    September 2017
    August 2017
    July 2017
    June 2017
    May 2017
    April 2017
    March 2017
    February 2017
    January 2017
    December 2016
    November 2016
    October 2016
    September 2016
    August 2016
    July 2016
    June 2016
    May 2016
    April 2016
    March 2016
    February 2016
    January 2016

Powered by Create your own unique website with customizable templates.
  • Home
  • All Recipes
  • Goal
  • About
  • FAQ
  • Contact