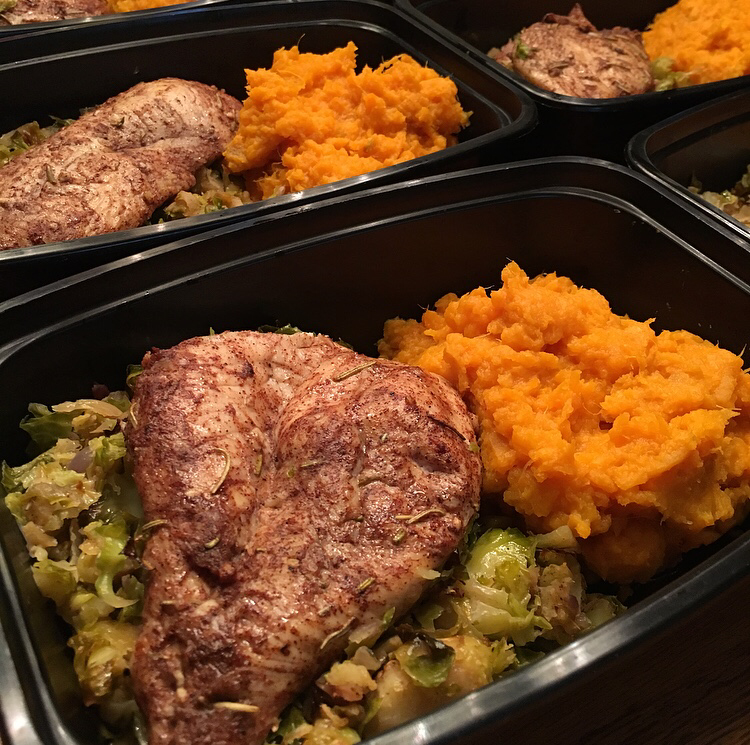
 Finally a recipe that is not done in the Instant Pot or slow cooker. Well, at least not the main recipe...I still made the sweet potato mash in the Instant Pot. Anyways, I was super busy this weekend and have an even busier week ahead, so I ordered lunches from Territory Foods and quickly got this meal prepped for my other lunch this week. I have to admit, ordering just one meal from Territory Foods really helps when life gets busy and stressful. I highly recommend having a back-up plan for meals when you simply don't have the time or energy to expend meal prepping. Anyways, this meal got me really excited for all the fall recipes! This one was comforting, delicious, and extremely simple to make. I omitted the sweet potatoes from the original sheet pan recipe below, but made the rest as is. I did end up doubling everything too, so I ended up making that recipe in two batches and got about 8 meals out of it. Side note, I almost always throw my Brussels sprouts in the food processor, which is way more convenient then slicing them individually. I even threw the apple and onion in there too and that saved a lot of time I would have spent on cutting. I also doubled the Super Fast Instant Pot Sweet Potato Mash recipe below and kept that in the Instant Pot for 10 minutes. Instead of adding coconut oil, I just threw the drained sweet potato back into the pot, added a cup of homemade unsweetened applesauce, and used a masher to mash everything together. Easy and quick meal prep day for me and this meal turned out tasting amazing!
Sheet Pan Chicken with Sweet Potatoes Apples and Brussels Sprouts Ingredients:
Original recipe found here Super Fast Instant Pot Sweet Potato Mash Ingredients:
Original recipe found here
0 Comments
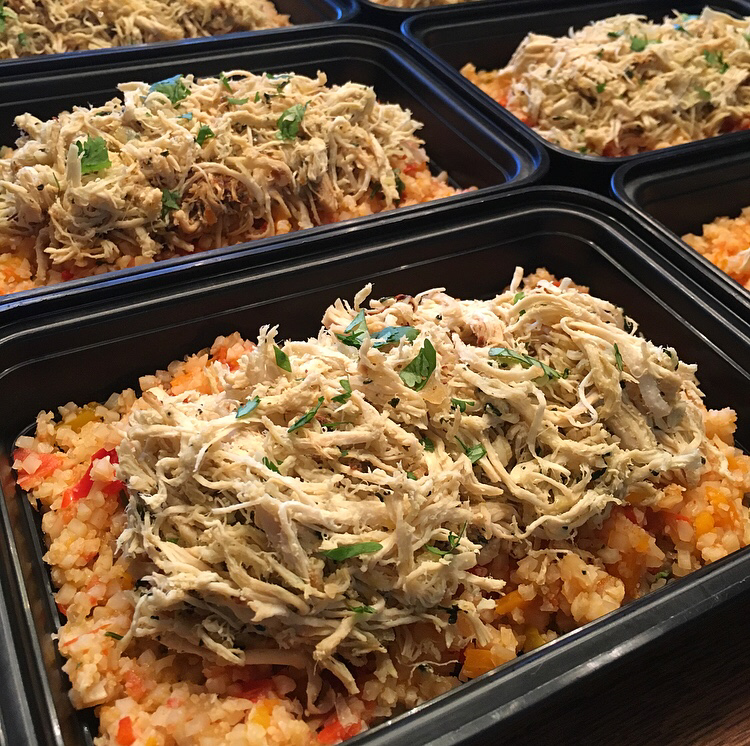 This meal turned out as flavorful and delicious as it looks! For the Chicken Vaca Frita I used just over 3 lbs of chicken breasts, only 2 large onions, and closer to 3 Tbsp of bacon fat, but made everything else as the recipe calls for. While the chicken was in the Instant Pot, I made the Mexican Cauliflower Rice. For that recipe I doubled (maybe even tripled) the amount of cauliflower, so I doubled all the spices, diced 3 bell peppers, and made everything else as the recipe calls for. I actually just threw everything in the food processor too, so I technically didn't slice and dice much, but I saved a lot of time. The cauliflower rice was done and portioned out into all my meal containers by the time the Chicken Vaca Frita was complete. This was a super fast and easy meal prep that really came out tasting amazing! If you don't have tallow or bacon fat, just use coconut oil or ghee and still give this a try.
Instant Pot Chicken or Turkey Vaca Frita Ingredients:
Original recipe found here Mexican Cauliflower Rice Ingredients:
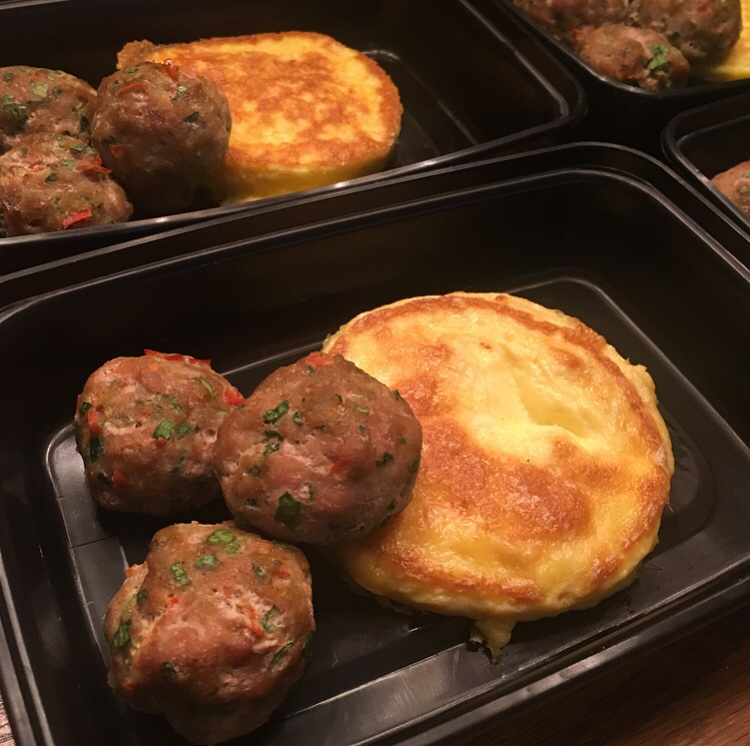
Original recipe found here 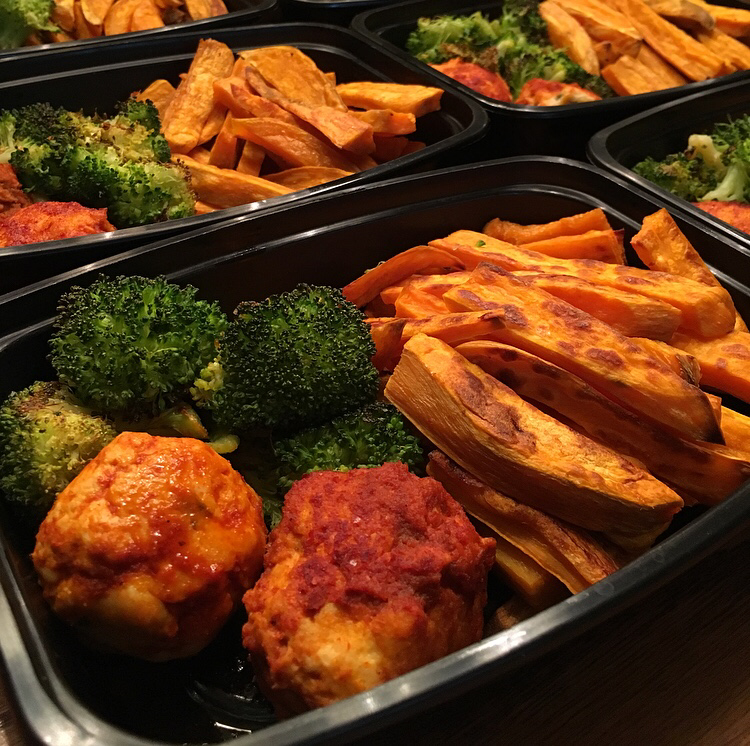 I apologize for all the Instant Pot recipes lately, but that appliance really saves me a lot of time on meal prep day. If you want to try this recipe and do not have an Instant Pot, you can sear these meatballs on a skillet, then bake in the 400 degree F oven for 15 minutes! Even if you do have an Instant Pot though, I still suggest searing the meatballs on a skillet instead of on the saute mode in the Instant Pot. Maybe it was just me, but the saute mode did not work well when I tried to quickly brown the meatballs. The ghee naturally spreads to the outsides of the pot, so some of the meatballs just stuck to the pot and were difficult to brown while keeping a meatball shape. Also, since I was trying to turn over the meatballs that were stuck to the pot, my hand just kept getting hit with hot ghee and that was not pleasant. I ended up just searing on a skillet and that was a lot easier, cleaner, and made me way less cranky. Anyways, I doubled this recipe below to get enough meatballs for the whole week, and also a few meals for my mother as well. I also ended up just adding a cup of PaleoChef Wing Sauce to make sure I had enough sauce in the pressure cooker and to cover all the meatballs. The meatballs turned out tasting delicious though! (Thank goodness because ground chicken is messy to begin with and that saute fiasco really was not pleasant whatsoever.) Also, I found out that greasing your hands with oil before making the meatballs helps the ground chicken from not sticking to your hands as much. I am not sure why I've never thought of doing that before! Anyways, I did not do a good job of selling this recipe, but the meal seriously did turn out tasting really yummy and I look forward to eating this all week. If you give it a try let me know what you think!
Instant Pot Buffalo Chicken Meatballs Ingredients:
Original recipe found here My Roasted Sweet Potatoes Ingredients:
 If you are looking to switch up your egg muffin in the morning then give this one a try! To get 12 muffins I doubled the recipe below, with the exception of still only using 2 Tbsp of Maple syrup and totally omitting the egg whites (after adding 8 whole eggs, there was plenty enough mix to fill the 12 muffin containers). Besides waiting on the bacon to cook and spiralizing the sweet potato, there is very little prep for this recipe. I thought they turned out looking and smelling amazing, but I make these morning muffins for my mom's breakfast, so I didn't actually give them a try. I can't imagine she will not enjoy these though! Let me know if you give them a try and what you think.
Egg Muffins with Maple Sweet Potato Noodles, Bacon, and Almond Butter Ingredients:
Original recipe found here 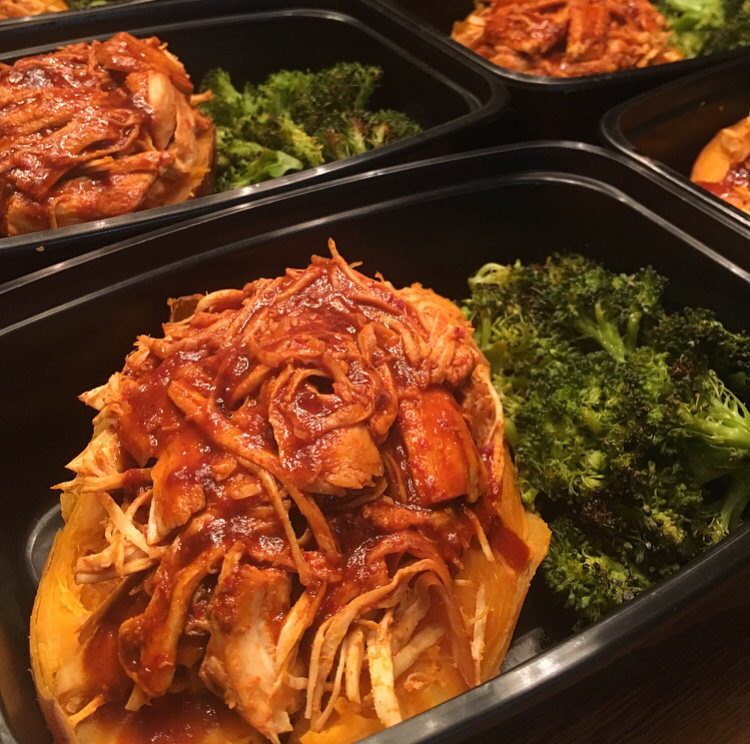 Although this recipe says slow cooker, I ended up throwing this recipe in the pressure cooker for 15 minutes instead and that made for an even quicker meal prep. When the chicken was done, I shredded it, measured, and portioned it out into my baked sweet potatoes. I left the sauce in the Instant Pot on saute mode, added the Tbsp of arrowroot starch, and stirred pretty often to thicken up the sauce. Once I thought the sauce was thick enough, I turned the Instant Pot off and poured the sauce over the portioned out chicken. You can also throw all your shredded chicken back into the sauce and serve that way if you prefer. It definitely looks better that way, but it still tastes amazing either way. This recipe might be my new go-to buffalo chicken recipe it turned out that good! Along with the baked sweet potatoes, I roasted some fresh broccoli with a little olive oil and sea salt to complete the meal. Very basic, simple, and easy meal to throw together for meal prep that still tastes amazing!
Slow Cooker Buffalo Chicken Sweet Potatoes Ingredients:
Original recipe found here 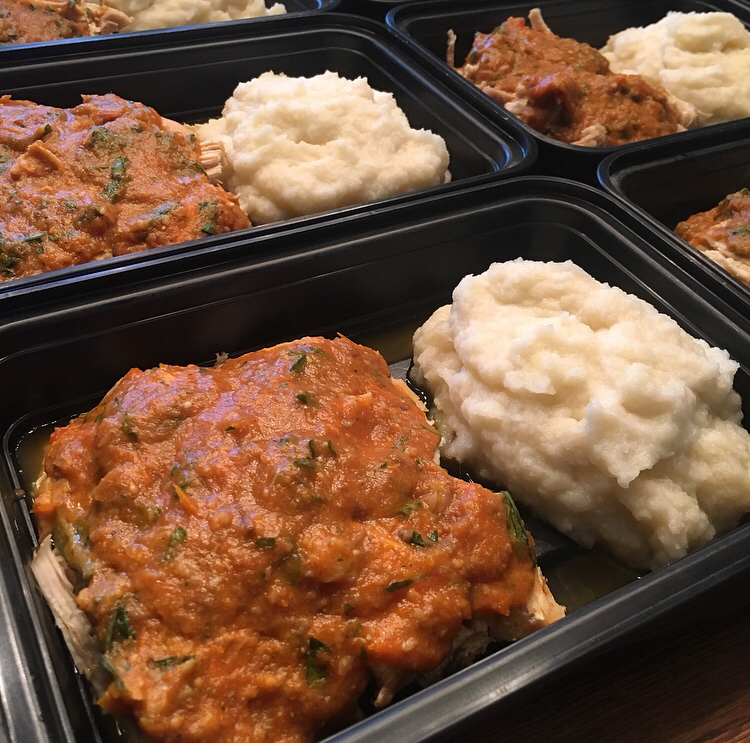 Another NomNom Paleo recipe! My friend shared this one with me recently and said she loved it, and it certainly did not disappoint! This meal was super delicious and full of all the flavors and nutrients. I ended up omitting the olives (I just don't like olives) and I forgot to get tomato paste at the store, so I did not add that either. Since I didn't have tomato paste though, I bumped up the cherry tomatoes to 500 g (a lot, but I also had 3 lbs of chicken). I also decided to go with step 12 and use the immersion blender to thicken up the sauce, which is why my meal turned out looking the way it did. I measured and portioned out my chicken before adding the sauce back on, but you can also shred the chicken and just throw it back in the sauce if you prefer that. Check out the original recipe below to see how the meal looks without using the immersion blender - it's a lot different. Anyways, I paired this with the garlic cauliflower mash that I have posted multiple times now, and thought they went really well together. That cauliflower mash is seriously one of my favorites because it so easy and quick to make and tastes delicious. Overall, I highly recommend giving this Summer Italian Chicken recipe a try If you have a pressure cooker!
Pressure Cooker Summer Italian Chicken Ingredients:
Original recipe found here Garlic Cauliflower Mash Ingredients:
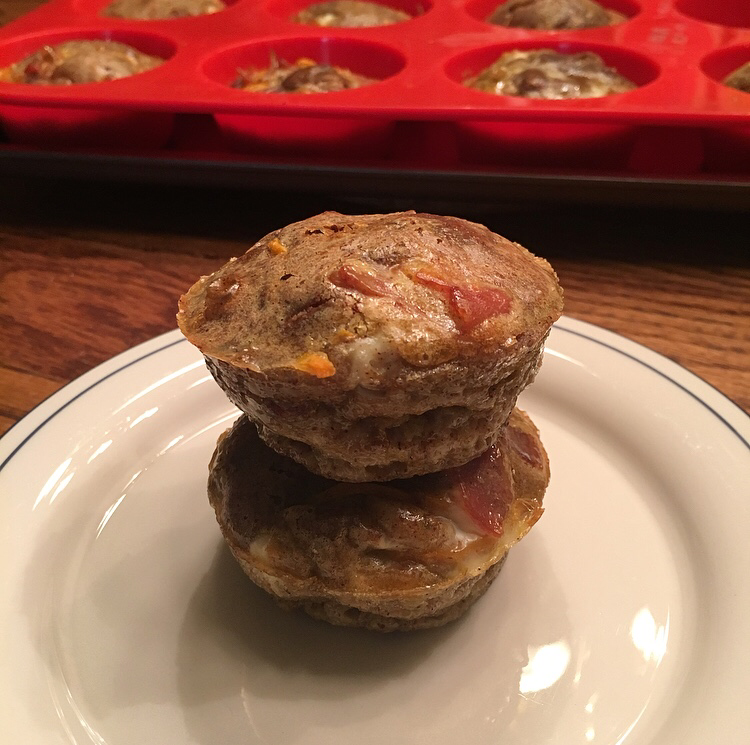
 I came across this breakfast meatball recipe and decided it was probably time to try a breakfast recipe that wasn't in the shape of a muffin. These meatballs were extremely easy to prepare and make, especially since I threw the bell pepper and spinach in the food processor. I make these breakfast recipes for my mom and she is not a fan of eating her greens, so the smaller the vegetables are the better. I made this recipe into 21 tiny meatballs and baked them for 20 minutes with an additional 5 minutes under the broiler. I also taste-tested one of the meatballs and thought they were delicious! I paired the meatballs with an egg that was scrambled with a little bit of culinary coconut milk and used this random Silicone Egg Ring I found to make the egg into a perfect circle. That part is totally not necessary, I just wanted to try it out. If you are looking to switch up your breakfast routine then this is a great recipe to try out!
Paleo Breakfast Meatballs Ingredients:
Notes *Any ground meat would work with this recipe. **If you use a higher fat meat, you can omit the extra virgin olive oil. Original recipe found here 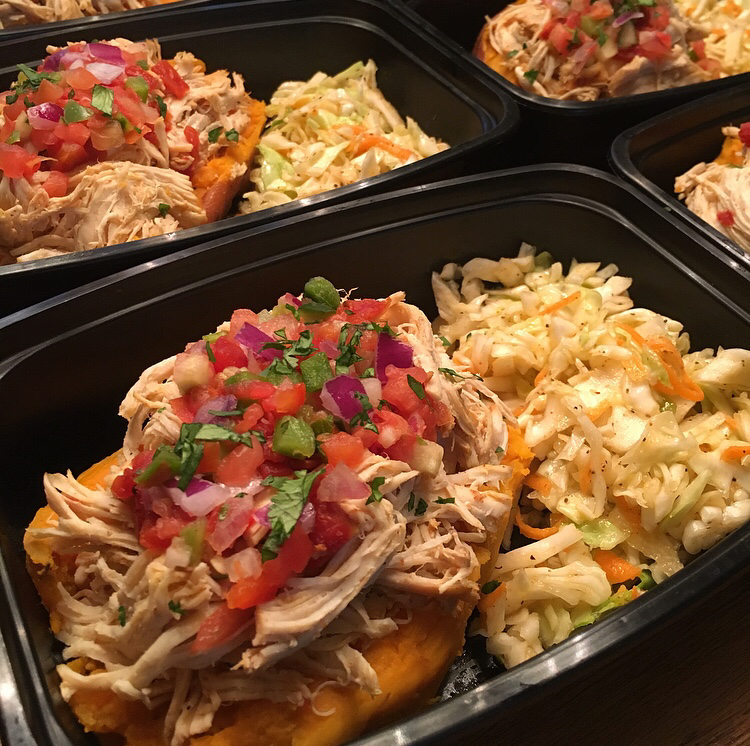 Two Instant Pot recipes this week made for a quick meal prep day! For this recipe I used Primal Palate Organic Taco Seasoning, but I also listed a taco seasoning you can make on your own. Also, to save time I baked the sweet potatoes in the oven while the chicken was in the pressure cooker and I did not end up making the avocado-jalapeno sauce or guacamole to garnish. Both of those probably would have made this meal taste delicious, but I just topped with some salsa and red onion instead. I though this meal turned out tasting pretty good and was full of flavor, but I do think the chicken should have been marinated or rubbed in the taco seasoning before cooking. I also forgot to put the Instant Pot in saute mode after I shredded the chicken, so I did not end up using a lot of the leftover tomato sauce in the pot. To pair with the Mexican Stuffed Sweet Potato I made up my own coleslaw and I thought it turned out really great! I'll have to make another batch of that mid-week though since coleslaw does not keep well after a few days. Anyways, this is definitely a flavorful meal that I really enjoyed! Let me know if you give this one a try and what you think.
Instant Pot Mexican Stuffed Sweet Potatoes Ingredients: Sweet Potatoes
Recipe Notes: If you don't have an Instant Pot, follow these instructions to bake your sweet potatoes: Preheat oven to 400º F. Prick sweet potatoes all over with a fork then place directly on oven rack in middle position. Bake for 40-45 minutes or until easily pierced with a fork. Remove sweet potatoes from oven and set aside. To make chicken in a slow cooker instead of an Instant Pot: In the pot of a slow-cooker, combine all ingredients. Do not add water. Cook on low for 6 to 8 hours, or cook on high for 4 to 6 hours. After about 3/4 of the time, shred the chicken breasts with two forks and leave in the slow-cooker for the rest of the time. Original recipe found here Paleo Coleslaw Ingredients/Toss:
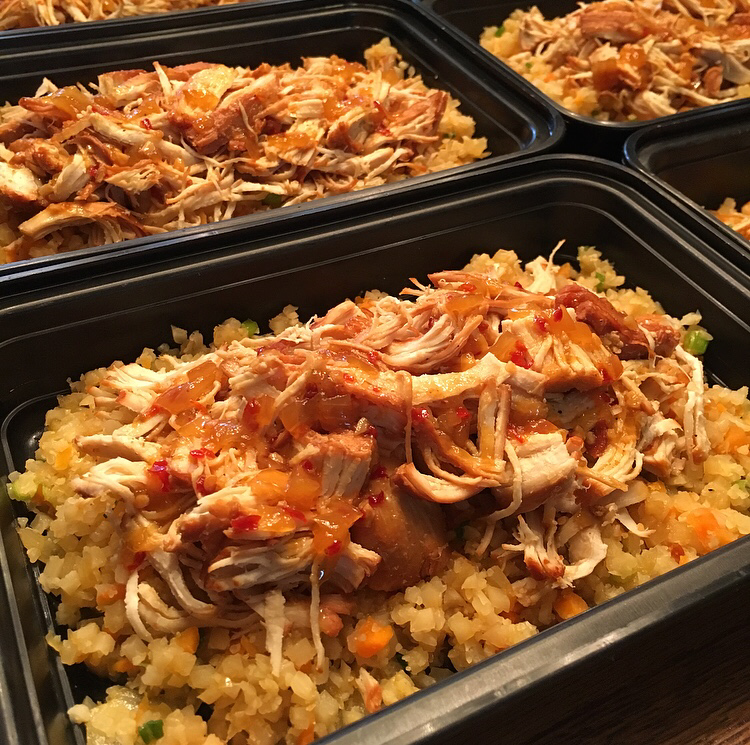 A friend shared with me that they made this Crockpot Garlic Honey Chicken over Cauliflower Fried Rice for meal prep and I realized how incredibly similar it looked to this Teriyaki meal I made this week. I guess I really enjoy this kind of meal. Both were super easy recipes to make though and both turned out tasting incredibly delicious! I ended up using closer to 3lbs of chicken breast, but made the rest of the recipe as is. Also, this is my favorite cauliflower rice recipe too! If you are not a fan of cauliflower rice or have a hard time eating your veggies, I definitely recommend you giving this recipe a try!
Instant Pot Chicken Teriyaki Ingredients:
Original recipe found here Paleo Cauliflower Fried Rice Ingredients:
Original recipe found here  Changed up my mom's breakfast this week with these sweet potato muffins! They were really simple to make, but the batter was pretty sticky from all the cashew butter, so it was not as quick as I thought it would be. I only added 1-2 Tbsp of 100% maple syrup and I also added a scoop of Paleo Protein to get some more protein in these muffins. There are also ingredients and directions for making frosting if you want to top these muffins off, but I chose not to add any. Unfortunately I had to resist all temptation to taste test these since I made these for my mom to eat for breakfast all week. They turned out looking and smelling amazing though and I have a feeling this one will be a repeat. Let me know if you give this recipe a try and what you think!
Paleo Blender Sweet Potato Muffins Ingredients:
For the high protein frosting
Original recipe found here |

Erika CopelandSharing the recipes I prepare to help others eat more nutritious food and begin their journey to a healthier life. categories
All
Archives
December 2021
|
