LiveSqueezy
  • Home
  • All Recipes
  • Goal
  • About
  • FAQ
  • Contact

Pressure Cooker Summer Italian Chicken and Garlic Cauliflower Mash​

10/16/2017

0 Comments

 
Picture
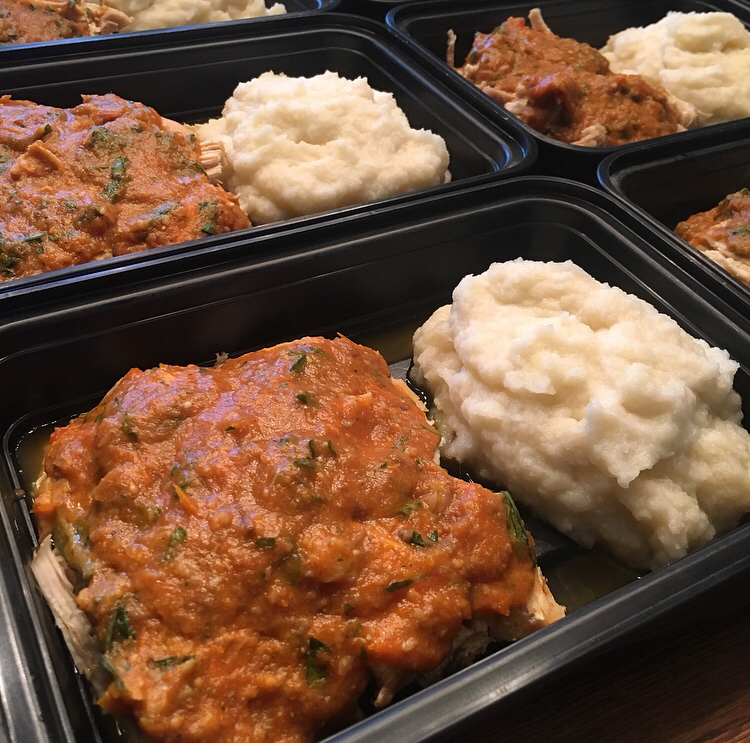
Another NomNom Paleo recipe! My friend shared this one with me recently and said she loved it, and it certainly did not disappoint! This meal was super delicious and full of all the flavors and nutrients. I ended up omitting the olives (I just don't like olives) and I forgot to get tomato paste at the store, so I did not add that either. Since I didn't have tomato paste though, I bumped up the cherry tomatoes to 500 g (a lot, but I also had 3 lbs of chicken). I also decided to go with step 12 and use the immersion blender to thicken up the sauce, which is why my meal turned out looking the way it did. I measured and portioned out my chicken before adding the sauce back on, but you can also shred the chicken and just throw it back in the sauce if you prefer that. Check out the original recipe below to see how the meal looks without using the immersion blender - it's a lot different.  Anyways, I paired this with the garlic cauliflower mash that I have posted multiple times now, and thought they went really well together. That cauliflower mash is seriously one of my favorites because it so easy and quick to make and tastes delicious. Overall, I highly recommend giving this Summer Italian Chicken recipe a try If you have a pressure cooker!

Pressure Cooker Summer Italian Chicken
Ingredients:
  • 8 boneless skinless chicken thighs (~2.5 pounds) (I used boneless chicken breasts instead)
  • Kosher salt
  • 1 tablespoon ghee, avocado oil, or olive oil
  • 1 small onion, coarsely chopped
  • 2 medium carrots, coarsely chopped
  • ½ pound (227 grams) cremini mushrooms, stemmed and quartered (I used baby bella mushrooms)
  • 3 garlic cloves, peeled and smashed
  • 1 tablespoon tomato paste
  • 2 cups (400 g) cherry tomatoes
  • ½ cup (60 g) pitted green olives (I omitted these)
  • ¼ teaspoon freshly cracked black pepper
  • ½ cup (14 g) loosely packed fresh basil leaves, thinly sliced
  • ¼ cup  (7 g) loosely packed fresh Italian parsley, coarsely chopped
Directions:
  1. Grab your chicken and sprinkle ¾ teaspoons kosher salt all over them. You can do this part up to two days in advance, and keep the chicken covered in the fridge.
  2. Press the "Sauté" button on the Instant Pot or heat a stovetop pressure cooker over medium heat. Add your fat of choice.
  3. When the fat is shimmering, add the onions, carrots, and mushrooms, and a ½ teaspoon kosher salt.
  4. Sauté the vegetables until the softened, about 3 to 5 minutes.
  5. Stir in the garlic and tomato paste, and cook for about 30 seconds or until fragrant.
  6. Add the salted chicken, cherry tomatoes and green olives to the pot. Give it all a good stir.
  7. Turn off the sauté function, and lock the lid on the pressure cooker.
  8. I position my Instant Pot under my stovetop exhaust vent before I program the pressure cooking so that when the chicken’s done and I immediately release the pressure, the vent will suck up all the steam. Your kitchen cabinets will thank you. (Stick a cutting board underneath your cooker if your stovetop grates aren’t even—and remember not to turn on your stove!)
  9. If you’re using an Instant Pot, press the “Manual” or “Pressure Cook” button and set the cooking time to 7 minutes for chicken breasts (if your chicken boobs are bigger than 8 ounces each, you can cut them in half or increase the cooking time to 9 minutes) and 10 minutes for thighs. Bone-in thighs will take 15 minutes to cook under high pressure. (For those of you using a stovetop pressure cooker, crank the heat to high to bring the contents to high pressure. Once high pressure is reached, reduce the heat to low, or just enough to maintain high pressure. Set a timer for 6 minutes for breasts and 9 minutes for thighs.)
  10. When the chicken is finished cooking, turn on the stovetop exhaust fan before turning the pressure cooker valve to release the steam.
  11. Remove the lid right away to prevent overcooking. Add the freshly cracked black pepper and adjust the seasoning with additional salt as needed.
  12. If you want a thicker gravy, remove the chicken and blend up the vegetables and cooking liquid with an immersion blender.
  13. Stir in the fresh herbs, and serve immediately.

Original recipe found here

​
Garlic Cauliflower Mash
Ingredients:
  • 1 cauliflower head (I used 2 bags (16 oz) of frozen cauliflower)
  • 4 garlic cloves
  • 2 Tbsp coconut oil (you can also use ghee or olive oil)
  • Salt and pepper
Directions:
  1. Chop cauliflower into large florets.
  2. Steam the cauliflower in a large pot with boiling water, garlic cloves, and salt. Steam until fork tender.
  3. Drain and transfer cauliflower and garlic cloves into a blender or food processor.
  4. Add the ghee and black pepper. Blender until smooth. Add salt if needed.
0 Comments


Leave a Reply.

    Picture

    Erika Copeland

    Sharing the recipes I prepare to help others eat more nutritious food and begin their journey to a healthier life.

    Instagram

    categories

    All
    AIP
    Beef
    Breakfast
    Brussels
    Burgers
    Casserole
    Cauliflower Rice
    Chicken
    Crockpot
    Kombucha
    Low FODMAP
    Meal Prep Tips
    Nutrition Blog
    Pork
    Pressure Cooker
    Quiche
    Sausage
    Shrimp
    Snacks
    Steak
    Sweet Potatoes
    Treats
    Tuna
    Turkey
    Vegan
    Video
    Whole30

    Archives

    December 2021
    November 2021
    September 2021
    August 2021
    July 2021
    June 2021
    May 2021
    April 2021
    March 2021
    February 2021
    January 2021
    December 2020
    November 2020
    September 2020
    August 2020
    July 2020
    June 2020
    May 2020
    April 2020
    March 2020
    February 2020
    January 2020
    December 2019
    November 2019
    October 2019
    September 2019
    August 2019
    July 2019
    June 2019
    May 2019
    April 2019
    March 2019
    February 2019
    January 2019
    December 2018
    November 2018
    October 2018
    September 2018
    August 2018
    July 2018
    June 2018
    May 2018
    April 2018
    March 2018
    February 2018
    January 2018
    December 2017
    November 2017
    October 2017
    September 2017
    August 2017
    July 2017
    June 2017
    May 2017
    April 2017
    March 2017
    February 2017
    January 2017
    December 2016
    November 2016
    October 2016
    September 2016
    August 2016
    July 2016
    June 2016
    May 2016
    April 2016
    March 2016
    February 2016
    January 2016

Powered by Create your own unique website with customizable templates.
  • Home
  • All Recipes
  • Goal
  • About
  • FAQ
  • Contact