LiveSqueezy
  • Home
  • All Recipes
  • Goal
  • About
  • FAQ
  • Contact

Penang Curry Chicken with Sweet Potato Glass Noodles

12/26/2017

0 Comments

 
Picture
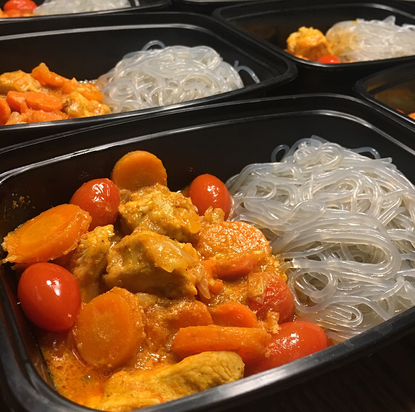
This meal was the bomb!! I ordered lunches from Territory Foods last week and they delivered a delicious new meal called Penang Curry Chicken with Paleo Noodles. It was so delicious and different that I tried to recreate it for my meal prep this week. After a quick google search, I found that Wegman's sold Sweet Potato Glass Noodles, so that is where I found that ingredient. I then came up with this recipe below on my own to try and mimic what I ate last week, and let me tell you I was pretty dang close. My version turned out tasting almost exactly the same and just as delicious! The amount of curry powder and salt to use is up to you. I just used enough to coat and rub over all the chicken pieces, then I let that marinate in the fridge for a few hours before making this recipe. Besides the sweet potato noodles, this is a pretty simple ingredient recipe and is super easy to make. Everything is done in one pan and boiling the sweet potato noodles took no more then 8 minutes. I really don't mind eating sweet potatoes every week, but I do like to change up how I make them and this meal really changed it up. For those who have never tried sweet potato glass noodles before, they really don't taste like anything or sweet potato at all for that matter, so that curry sauce (or any sauce for that matter) is definitely needed. Anyways, I thought this one turned out amazing and if you give it a try, please let me know how you like it or if you have any suggestions for it! 

Penang Curry Chicken with Sweet Potato Glass Noodles
Ingredients:
  • 2½ - 3 lbs boneless chicken breasts, rinsed, patted dry, and cut into ½ inch pieces
  • 1-2 Tbsp Curry Powder
  • 1 onion, finely chopped
  • 3-4 cloves garlic, sliced thin
  • 1-2 tablespoon olive oil or coconut oil
  • 4-5 carrots, sliced 
  • 1 cup (200 g) cherry tomatoes 
  • Salt, to taste
  • Sweet Potato Glass Noodles (This 3.5 oz package has 4 servings of 22g of carbs, so I ended up buying 4 packages to make 8 meals with 2 servings/44g of carbs in each meal.)
Curry Sauce:
  • 1 can full-fat coconut milk
  • 3 tablespoons Thai red curry paste
  • Juice of 1/2 lemon
  • Salt, to taste
  • Grated lemon zest for garnish, if desired
Directions:
  1. Coat or rub the chicken with curry powder and salt.
  2. Heat up large pan to medium heat. Melt coconut oil in pan and saute garlic and onion in the oil until fragrant.
  3. Add in paste and heat up thoroughly. Add in coconut milk and mix well.
  4. Add in carrots. Let simmer slowly for 5-10 minutes.
  5. Add in chicken, mix and let simmer slowly for 10-15 minutes.
  6. While the chicken is cooking, boil water in another pot and add sweet potato noodles. Boil for about 6-8 minutes and immediately drain and rinse with cold water.
  7. Mix in cherry tomatoes and sweet potato noodles with the chicken and curry sauce. Let simmer for a few minutes and check flavor. Add in some salt (if desired) and squeeze in lemon juice.
  8. Serve immediately. Garnish with lemon zest. Enjoy!

This recipe was by me, inspired by a Territory Foods meal I ate last week.
0 Comments

Five Ingredient Carnitas over Cauliflower Rice

12/26/2017

0 Comments

 
Picture
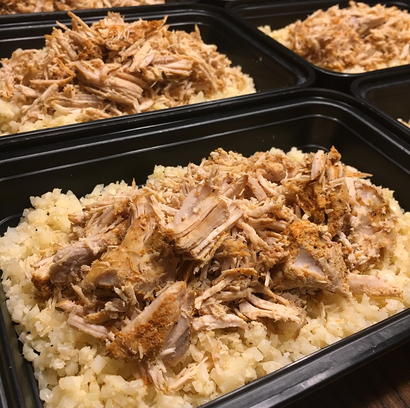
Although the recipe name below says Instant Pot, I ended up throwing this one in the slow cooker. After purchasing and using the Instant Pot so much recently, I forgot how nice it is to just throw a meal in the slow cooker early in the day and not worry about having to finish it up until 8 hours later. Anyways, this meal looks a little bland, and it could definitely be topped with some tomatoes/salsa and guacamole/avocado, but it honestly did turn out tasting very flavorful and delicious! I didn't see any boneless pork shoulder at the store, so I used center cut pork chops instead. I also did not broil the pork when I was done, although I do know adding some ghee and broiling the pork would have made this even tastier. For the Mexican seasoning I used Primal Palate Taco Seasoning, but if you don't want to purchase a special seasoning I also listed a recipe for making your own taco seasoning below using spices you already have in your kitchen. For the cauliflower rice I simply bought a few bags of frozen Riced Veggies Cauliflower and heated it on the stove top with some olive oil, garlic salt, some of the taco seasoning, and juice from 1 lime. Don't let this bland picture fool you, this meal was packed with flavor and was extremely easy, simple, and quick to throw together for meal prep! 

Five Ingredient Instant Pot Carnitas
Ingredients:
  • About 3 pounds boneless pork shoulder, cut into two-inch chunks
  • 1 1/2 tablespoon Mexican seasoning* (I used Primal Palate Taco Seasoning instead)
  • 1 teaspoon sea salt
  • Freshly ground black pepper
  • Juice of 2 oranges
  • Juice of 1 lime
  • 1 tablespoon ghee
Directions:
  1. Put the pork chunks in the Instant Pot and toss them with the Mexican seasoning, salt, and a few grinds of black pepper.
  2. Combine the citrus juices in a liquid measuring cup, then add enough water to reach the one cup line. Pour the liquid into the Instant Pot.
  3. Put the lid on the Instant Pot and make sure the valve is set to “Sealed”. Press “Manual” and adjust the time to 50 minutes. The Instant Pot will automatically begin cooking and will start counting down from 50 minutes once high pressure is reached. Once the cooking time is over, press “Keep Warm/Cancel” and let the pressure release naturally.
  4. Remove the lid and push the “Sauté” button. Use two forks to roughly shred the meat while it’s in the pot. (At this point, you can finish the carnitas in the Instant Pot as described here, or finish them in the broiler as described in the Notes section.**) Let the liquid bubble away until it’s almost gone, stirring occasionally; this will take 20-30 minutes. When there’s almost no liquid left, stir in the ghee. Continue to cook until the pork is browned in spots, about 5 minutes more. Press “Keep Warm/Cancel” to turn the Instant Pot off. Serve hot with rice or cauliflower rice, lime slices, and avocado.
NOTES
*The original recipe used Frontier Mexican Seasoning, but I used Primal Palate Taco Seasoning, but you can make your own taco seasoning (recipe below) or just use chili powder. Reduce or omit the sea salt if your spice blend is already salted.
**To make these carnitas in a slow cooker, omit the water in Step 2. Cook on low for 8-10 hours. Remove the meat and shred with two forks. Spread the meat out on a foil-lined baking sheet and moisten with a little of the cooking liquid. Broil for about five minutes, until browned to your liking. You can also finish these in the broiler after making them in the IP if you'd like.

Original recipe found here

Make your own taco seasoning:
  • 2 Tbsp Chili Powder
  • 2 tsp Cumin
  • 1/2 tsp Paprika
  • 2 tsp dried Oregano
  • 1 tsp Onion Powder
  • 1 tsp Garlic Powder
  • 2 tsp Salt
  • 1 tsp Black Pepper
  • 1/2 tsp Cayenne Pepper
  • 1/2 tsp ground Coriander
Process:
  1. Combine all ingredients in a small bowl and mix until combined
  2. Use 1 1/2 Tbsp per 1 pound ground meat (or more to taste)

Original recipe found here
0 Comments

Paleo Waffles, Eggs, and Bacon

12/25/2017

0 Comments

 
Picture
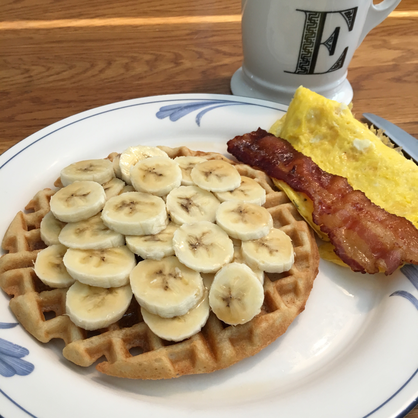
I’m typically in charge of making waffles on Christmas morning for everyone, which means I make a "normal" boxed waffle brand and a paleo waffle for myself. Not this year though! This year I made everyone paleo waffles and everyone loved them! I recently found this new Paleo Pancake & Waffle Mix by Bob’s Red Mill at my local natural food market, so I obviously had to buy it and give it a try. I was seriously so impressed with how they turned out. I have made plenty of paleo waffles before and none of them compare to how these turned out. Mainly they just didn't come out messy and actually resembled a normal waffle, but they also just tasted normal and delicious too. I used a smaller waffle iron (not a Belgium one), and this recipe made exactly 3 waffles, which is 20g Carbs, 25g Fat, and 15g of Protein. I ended up topping with bananas and a Tbsp of pure maple syrup for some more carbs, but you can obviously top it however you like. This mix does have Coconut Sugar in it though, so if you want to avoid added sugar I recommend sticking to Birch Benders Paleo Pancake & Waffle Mix. I actually have not used that mix to make waffles yet, but I have made these Paleo Blueberry Pancake Muffins with it as a staple breakfast option for my mom, which she loves. Anyways, if you are craving a waffle or are making breakfast for a large group, and want to find a paleo option that everyone will love, then I definitely recommend giving this recipe a try! 
 
Paleo Waffles
Ingredients:
  • 1 Cup Bob’s Red Mill Paleo Pancake & Waffle Mix
  • 2 Eggs
  • 1/4 Cup Water
  • 1 Tbsp Coconut Oil, melted
Directions:
  1. Preheat waffle iron to medium heat for at least 10 minutes. 
  2. In a large bowl, whisk together all ingredeitns until smooth.
  3. Follow waffle iron manufacturer's instructions for measuring and cooking waffles.
Note: This recipe is from the back of the package and says that this makes 2 waffles, but it ended up making me 3 waffles using a smaller waffle iron. 
0 Comments

Homemade BBQ Pulled Chicken over Sweet Potato Mash with Roasted Broccoli

12/18/2017

0 Comments

 
Picture
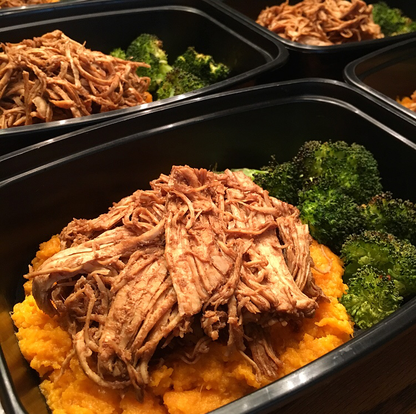
Disclaimer: This is a different BBQ chicken recipe then the last recipe I posted despite it looking like the exact same meal. I think it is safe to say I enjoy a BBQ chicken and sweet potato combination...

I was out of the country all last week, so after a long day of traveling home I knew I would not want to spend my first day back being in the kitchen. I went ahead and ordered lunches from 
Territory Foods (formally known as Power Supply), which is a meal delivery service in my area that I utilize when I can't meal prep everything myself. For more information on Territory Foods and what it's like when I order from them check out this blog post, and if you have never ordered from them and want to try it out, use this link to get $50 off your first order! Anyways, when I purchase lunches from Territory Foods, I typically still try to prep one additional meal for the week, and this is the meal I made. I didn't have a plan going into Sunday, so I just looked through my blog for a recipe that I knew would be easy, had very few ingredients, and that I could quickly throw together. As far as homemade paleo BBQ sauces go, this one is by far the easiest one to make and is delicious! This is definitely a recipe worth bookmarking if you are one who doesn't like purchasing expensive paleo BBQ sauces from the store or online. Both the chicken and sweet potato mash were done in the Instant Pot, but I am sure both can be done in the slow cooker as well. This is definitely an example of my go-to kind of meal for when I need something quickly prepped, but it is still a meal I really enjoy eating and could eat everyday if needed. 

Homemade BBQ Pulled Chicken
Ingredients:
  • 3 pounds boneless, skinless chicken thighs (I used chicken breasts)
  • ½ teaspoon sea salt
  • ½ teaspoon garlic powder
  • ½ cup water
  • ½ cup apple butter, with no sweetener added (check ingredient label!)
  • ½ cup balsamic vinegar
  • 2 tablespoons blackstrap molasses
  • 2 teaspoons garlic powder
  • 2 teaspoons ground ginger
  • 2 teaspoons sea salt
Directions:
  1. Add the chicken, salt, granulated garlic, and water in the Instant Pot®.
  2. Close and lock the lid. Press MANUAL for high pressure. Set cooking time to 25 minutes. Once the time is up, quick release the pressure (using the instructions on page 7).
  3. Pour out as much water/broth as you can. Reserve the broth for future soup making, if desired.
  4. Whisk the apple butter, balsamic, molasses, garlic, ginger, and salt together. Pour over cooked chicken with remaining juice.
  5. Press the SAUTÉ button on the Instant Pot®. Let the chicken and sauce simmer to evaporate some of the juices. Once some of the liquid has evaporated, CANCEL the sauté function. Shred the chicken, if desired, before serving.

Original recipe found here

Super Fast Instant Pot Sweet Potato Mash
Ingredients:
  • 2 pounds of sweet potatoes, peeled and cut into 1″ cubes*
  • 1 cup of water
  • 1-2 tbsp of coconut oil or ghee (to your tasting)
  • salt and seasonings to taste
Directions:
  1. Peel your sweet potatoes and cut them into 1″ cubes.
  2. Add sweet potatoes, garlic cloves, and water to the instant pot. Close pot and set to sealing.
  3. Cook on manual, high pressure, for 4 minutes*.
  4. Immediately quick release the pressure as soon as the 4 minute cooking cycle has completed.
  5. Use oven mitts to carefully remove the inner pot from the Instant pot, carrying it to a colander in your sink to drain the potatoes.
  6. Quickly wash out the inner pot and dry it with a kitchen towel.
  7. Immediately place the clean inner pot back into the instant pot, add the coconut oil/ghee and press the sauté button.
  8. Once the coconut oil starts to sizzle, add your potatoes back to the pot along with any seasonings** you desire. Use a wooden spoon to stir and turn your sweet potatoes, cooking until a desired consistency is reached. This step should only take a few minutes before you are ready to serve your sweet potato mash! Enjoy!
Notes
*I always use at least 6-7 lbs of sweet potatoes, 2 cups of water, and cook it for 10 minutes. 
**I always add at least 1 tsp of salt.


Original recipe found here
0 Comments

BBQ Shredded Chicken with Garlic Sweet Potato Mash

12/4/2017

0 Comments

 
Picture
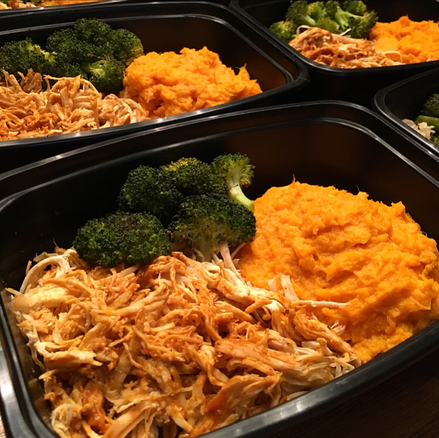
Not the most quality picture, but this is an important meal prep post so keep reading! This is the one blog post you should definitely bookmark, well besides the main LiveSqueezy page of course. Here are my recipes for the super easy meal prep we all resort to when we don't feel like cooking. First, the classic slow cooker shredded chicken. This chicken can be a little bit tastier with a little cooking fat, chopped onion and garlic, and a few spices. Now you have a ton of plain shredded chicken that you can dress up however you want throughout the week, or throw into the freezer to have ready whenever you need. Ideas for dressing up plain shredded chicken:
  • Mix with your favorite BBQ, buffalo/hot sauce, mustard, salsa, etc.
    (My favorites: coconut aminos, mustard, balsamic vinegar, Tessemae's Paleo sauces, Steve's Paleo Good's (love the Wing sauce), The New Primal marinades, or Primal Kitchen sauces and marinades.) Also, check out this EASY Buffalo Chicken!
  • Make a chicken or egg salad
    (Mix with avocado and/or together with the yolk(s) from a hard boiled egg. Here's a recipe for inspiration. Primal Kitchen Mayo is also a good pair for chicken salad.)
  • Simply just top it on your favorite salad
  • Throw it in a soup, omelette, casserole, or with rice/cauliflower rice 
    (This Buffalo Chicken casserole and Fried Cauli Rice are my favorites!)
Hopefully those ideas get your mind going and you came up with even more creative ideas that you enjoy. Feel free to post your own ideas and tips below to help others too (and myself)!

For this week's meal prep I simply dressed my shredded chicken with Steve's PaleoChef Peach BBQ sauce since I already had a bottle in the kitchen. The next easiest bulk meal prep recipe to make is this pressure cooker sweet potato mash. If you are someone who likes to meal prep, cook in bulk, or just save time in the kitchen, then the pressure cooker is absolutely worth the investment. Anyways, I have now posted this sweet potato mash recipe way too many times, which is the biggest indicator that it's not only my favorite, but it's also extremely efficient, simple, and delicious. Although I post it a lot, I try to vary it up slightly each time. This week I added some garlic cloves into the mix (I know, huge difference). You can play around with this recipe by adding different spices and cooking fats, or adding coconut milk or unsweetened applesauce at the end. You can also add in other vegetables/squashes, like cauliflower or butternut squash, to roast in with the sweet potatoes as well. Get creative! I like to make a TON of sweet potato mash so I can have some for dinner too if I want. I love to make up my own Sweet Potato Bowl and add almond butter, paleo/gluten free granola/muesli, and blueberries. I have also tried topping it with a couple eggs, shredded coconut, ghee, spinach, and bacon. There are so many possibilities! 

Hopefully these ideas help your meal prep get a little easier or different! I know I post a ton of recipes and it might seem overwhelming, so if you are new to meal prep or just hate being in the kitchen, these are some ways to have the basics prepped to get you through your week. As always, feel free to reach out if you have any specific questions. Happy meal prepping!

Pressure Cooker (or slow cooker) Shredded Chicken
Ingredients:
  • 3-4 Pounds Boneless, Skinless Chicken Breasts Or Thighs
  • 1 teaspoon Sea Salt
  • 1/2 teaspoon Black Pepper
  • 1-2 Tablespoon Avocado Or Coconut Oil (or your favorite cooking fat)
  • 1 Yellow Onion, Chopped
  • 4-5 Garlic Cloves, Chopped
  • 1 cup Chicken Broth
Directions:
  1. Place all of the chicken into the pot of your pressure cooker or slow cooker. Sprinkle the chicken with sea salt, pepper, oil, onion, and garlic. Using a pair of tongs, lift and turn the chicken to distribute the seasonings evenly. Pour the broth down the side of the pot.
  2. If you’re using a pressure cooker, cook on high pressure for 30 minutes and release the pressure using the natural or quick-release method.
  3. If you’re using a slow cooker, cover and cook on low for 5–6 hours or on high for 3–4 hours.
  4. Shred the chicken and return it to the pot with the juices. Serve immediately or divide the chicken up into equal portions and chill or freeze.

Original recipe found here

Super Fast Instant Pot (Garlic) Sweet Potato Mash
Ingredients:
  • 2 pounds of sweet potatoes, peeled and cut into 1″ cubes*
  • 4-6 cloves of Garlic
  • 1 cup of water
  • 1-2 tbsp of coconut oil or ghee (to your tasting)
  • salt and seasonings to taste
Directions:
  1. Peel your sweet potatoes and cut them into 1″ cubes.
  2. Add sweet potatoes, garlic cloves, and water to the instant pot. Close pot and set to sealing.
  3. Cook on manual, high pressure, for 4 minutes*.
  4. Immediately quick release the pressure as soon as the 4 minute cooking cycle has completed.
  5. Use oven mitts to carefully remove the inner pot from the Instant pot, carrying it to a colander in your sink to drain the potatoes.
  6. Quickly wash out the inner pot and dry it with a kitchen towel.
  7. Immediately place the clean inner pot back into the instant pot, add the coconut oil/ghee and press the sauté button.
  8. Once the coconut oil starts to sizzle, add your potatoes back to the pot along with any seasonings** you desire. Use a wooden spoon to stir and turn your sweet potatoes, cooking until a desired consistency is reached. This step should only take a few minutes before you are ready to serve your sweet potato mash! Enjoy!
Notes
*I always use at least 6-7 lbs of sweet potatoes, 2 cups of water, and cook it for 10 minutes. 
**I always add at least 1 tsp of salt.


Original recipe found here
0 Comments

One-Pot Apple Cider Braised Chicken with Brussels Sprouts and Bacon

12/4/2017

0 Comments

 
Picture
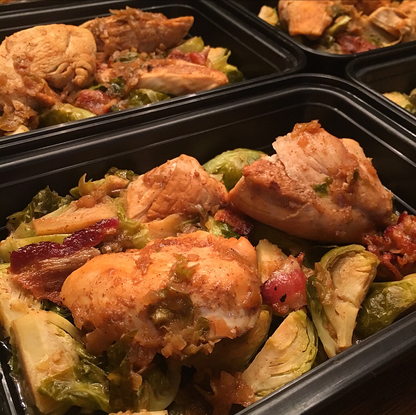
This meal turned out incredible! I was sold as soon as I read the ingredients and looked at the original recipe's picture, but it truly tasted as delicious as it sounds and looks! I used closer to 3 lbs of chicken breasts and 1.5 lbs of Brussels, so I increased the apple cider to 3 cups. Also, my local food market is still selling fresh apple cider, so I didn't even have to search around for a quality one, which was super awesome. I kept the bacon at 5 slices, but you can increase that number if you want more bacon in your meals. I don't really have much else to say about this one. This was a one-pot meal and I did the slicing and dicing as the meal was cooking. Overall, pretty simple and easy meal to make and it turned out absolutely delicious. I am such a sucker for the fall recipes and this one did not disappoint! Make it!

​One-Pot Apple Cider Braised Chicken with Brussels Sprouts and Bacon
Ingredients:
  • 5 pieces nitrate-free bacon
  • 2 pounds chicken drumsticks and or chicken thighs (I used chicken breasts)
  • 1/2 cup leeks, diced
  • 3 cloves garlic, minced
  • 1 teaspoon cinnamon
  • 1/2 teaspoon sea salt, more to taste
  • 1/2 teaspoon black pepper, more to taste
  • 1 pound Brussels sprouts, quartered
  • 1 bundle fresh thyme
  • 2 cups fresh apple cider (I used 3 cups)
  • 2 teaspoons dijon mustard, more to taste (I used 3 teaspoons of Woodstock Organic Dijon Mustard)
  • 1 tablespoon maple syrup
Directions:
  1. In a large dutch oven, cook bacon until crispy over medium heat. Remove from pan and set aside on a plate lined with a paper towel. Pour out all but 2 teaspoons bacon fat.
  2. Heat the bacon fat over medium-high heat.
  3. Pat the chicken dry and season generously with salt and pepper.
  4. Sear chicken until brown on both sides in the dutch oven. This should take about 5 minutes per side.
  5. Take chicken out of the pan and set aside on a plate.
  6. Add the leeks, garlic, a pinch of salt, a pinch of black pepper, and cinnamon. Stir well, making sure to scrape up the brown bits at the bottom of th pan. Cook until leeks are translucent.
  7. Add in the brussels sprouts and stir until combined. dijon mustard and thyme. Stir well.
  8. Pour in the apple cider and mix until everything is well combined. Make sure all of the brown bits from the bottom of the pan have been scraped up. Cover and bring the sauce to a boil. Lower the heat, and add back in the chicken. Cover and let simmer for 15 minutes, or until the chicken is fully cooked through.
  9. Take the chicken, brussels sprouts, and thyme sprigs out of the pan. Set the thyme aside, and place the chicken and brussels sprouts on the desired serving dish.
  10. Add maple syrup to the sauce and bring to a high simmer over medium-high heat. Whisk frequently until the sauce has become thick enough to coat the back of a spoon, this should take around 5-8 minutes. Taste and adjust mustard, sea salt, and black pepper based on desired taste.
  11. Pour the sauce over the chicken. Garnish with bacon and thyme and serve warm!

Original recipe found here
0 Comments

No Bake Cinnamon Vanilla Breakfast Protein Bites

12/4/2017

0 Comments

 
Picture
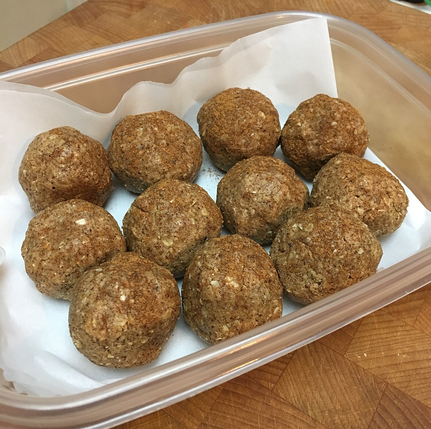
These looked extremely simple to make and involved no baking, so I gave them a try for my mom's breakfast meal prep this week. Now I don't think I will make these that often because they are loaded with maple syrup/honey, but they did turn out tasting like a treat! I ended up  using 100% maple syrup over honey and found that I had to add in additional maple syrup and almond butter because my mix was still dry. That might not be the case if you use honey instead though, I am not sure. Either way, I would reduce the gluten free oats to 1/2 cup next time to see if that would eliminate having to add in more syrup and almond butter. Other then that though, these were super easy to make and are a great grab-and-go breakfast or snack option! 

No Bake Cinnamon Vanilla Breakfast Protein Bites
Ingredients:
  • 1 heaping TBSP ground cinnamon
  • 1/4 cup (around 65-75 grams) Vanilla Protein Powder (I used this Paleo Protein)
  • 1/3 cup maple syrup or honey if you are not vegan
  • 1/2 cup almond meal or peanut flour (you can also just finely grind raw almonds) ·
  • 1/3 cup nut butter (creamy no stir works best)
  • 3/4 cup of gluten free quick oats 
  • 1 tsp Vanilla extract
Directions:
  1. Grind up your oats or cereal in a food processor and transfer into a mixing bowl. This is optional. You can keep them whole as well and adjust the addition of honey.
  2. Add your almond meal, protein powder, cinnamon, and nut butter. Stir ingredients all together. • Add in your honey and vanilla then mix again well with hands. •
  3. You might need to add more honey or nut butter if batter gets to dry. 
  4. Roll into 1-1.5 inch balls and place on cookie tray or plastic ware with parchment paper underneath.
  5. Let them freeze for 20-30 minutes then transfer into a Ziploc bag.
  6. Dust with additional cinnamon and vanilla protein if desired.
  7. Keep in fridge or freezer for up to 6 weeks.

Original recipe found here
0 Comments
    Picture

    Erika Copeland

    Sharing the recipes I prepare to help others eat more nutritious food and begin their journey to a healthier life.

    Instagram

    categories

    All
    AIP
    Beef
    Breakfast
    Brussels
    Burgers
    Casserole
    Cauliflower Rice
    Chicken
    Crockpot
    Kombucha
    Low FODMAP
    Meal Prep Tips
    Nutrition Blog
    Pork
    Pressure Cooker
    Quiche
    Sausage
    Shrimp
    Snacks
    Steak
    Sweet Potatoes
    Treats
    Tuna
    Turkey
    Vegan
    Video
    Whole30

    Archives

    December 2021
    November 2021
    September 2021
    August 2021
    July 2021
    June 2021
    May 2021
    April 2021
    March 2021
    February 2021
    January 2021
    December 2020
    November 2020
    September 2020
    August 2020
    July 2020
    June 2020
    May 2020
    April 2020
    March 2020
    February 2020
    January 2020
    December 2019
    November 2019
    October 2019
    September 2019
    August 2019
    July 2019
    June 2019
    May 2019
    April 2019
    March 2019
    February 2019
    January 2019
    December 2018
    November 2018
    October 2018
    September 2018
    August 2018
    July 2018
    June 2018
    May 2018
    April 2018
    March 2018
    February 2018
    January 2018
    December 2017
    November 2017
    October 2017
    September 2017
    August 2017
    July 2017
    June 2017
    May 2017
    April 2017
    March 2017
    February 2017
    January 2017
    December 2016
    November 2016
    October 2016
    September 2016
    August 2016
    July 2016
    June 2016
    May 2016
    April 2016
    March 2016
    February 2016
    January 2016

Powered by Create your own unique website with customizable templates.
  • Home
  • All Recipes
  • Goal
  • About
  • FAQ
  • Contact