LiveSqueezy
  • Home
  • All Recipes
  • Goal
  • About
  • FAQ
  • Contact

Pineapple Ginger Chicken

7/29/2019

0 Comments

 
Picture
This meal seriously turned out SO delicious! I will definitely be throwing this into my meal prep rotation of favorites. Not too many ingredients or prep with this meal either - heat up the chicken breasts on the stove top and throw the sauce ingredients in a blender. Since I made this for meal prep, I increased the chicken breast amount significantly and threw them on a large baking sheet to bake in the oven, instead of going through batches on the stove top. I also doubled the sauce ingredients and still tossed it with the cooked chicken in a large skillet, as the recipe calls for. While the chicken was baking I heated up some coconut oil in another pan, simmered some extra grated ginger and garlic, then tossed cauliflower rice. Once cooked through, I added some extra fresh parley and salt and removed from heat. I thought this ginger garlic cauliflower rice was perfect with the Pineapple Ginger Chicken, and there was plenty of sauce to throw over top as well. Slip in some regular rice if you need it and you have yourself a well-balanced, simple, and tasty meal to enjoy! This one will not disappoint :) 

Pineapple Ginger Chicken
​Ingredients:

Chicken
  • 2 tbsp olive oil extra virgin
  • 4 chicken breasts
  • 1 tbsp dried parsley
  • salt & pepper
Pineapple Ginger Sauce
  • 1/2 cup water
  • 1/2 cup coconut aminos
  • 1 cup fresh pineapple diced
  • 5 medjool dates pitted
  • 1 to 1 1/4 inch knob of ginger
To Finish
  • 1 cup fresh pineapple diced
  • fresh parsley for topping chopped
Directions:
Chicken
  1. Add olive oil to saute pan or cast iron skillet. Heat pan to medium high heat.
  2. Add chicken to hot pan. Sprinkle salt, pepper, and dried parsley on top of each breast. Cook until browned, about 5 minutes. Flip. Cook other side until browned, about 5 minutes. Turn chicken over so your herbed side is facing up. Turn off heat.
Pineapple Ginger Sauce
  1. Peel your ginger knob. (You don't need to dice it as it will blend just fine once peeled.)
  2. Add all sauce ingredients to blender. Blend until smooth.
To Finish
  1. Pour blended sauce into the pan with your chicken. Add cup of chopped pineapple around chicken. Reduce heat to medium low or low. Cover and simmer for 5 minutes. Sauce will reduce a bit.
  2. Top with fresh chopped parsley and serve!

Original recipe found here
0 Comments

Sheet Pan Fajitas over Cilantro Lime Cauliflower Rice

7/22/2019

0 Comments

 
Picture
An absolute must-try! Although I clearly used chicken for this meal, the recipe below is for steak and seriously tastes delicious both ways. I've made this with both steak and chicken for friends and family and it's always a huge hit. For meal prep however, I opted for chicken since it's a little nicer on my wallet. If making this with chicken, I recommend slicing or pounding the chicken thin, and baking it at 375 degrees until cooked. It took me about 15 minutes to bake, then I finished with 5 minutes of broil. For everything else though I still followed the recipe as-is. Keep an eye while broiling the peppers and onions because they can burn fast! Also keep an eye on the steak too because that also cooks in no time. Since I made this recipe for meal prep, I doubled the marinade (oil and seasonings) to split between the vegetables and meat, and also doubled (probably even tripled) the vegetables and meat as well. I thought this meal turned out especially amazing over the Cilantro Lime Cauliflower Rice, which you can mix with regular rice as well. I've also had this meal with corn tortillas which turned out delicious too. Dress this up with salsa, guacamole/avocado, and/or whatever else your heart desires to make the most tasty fajitas! This really is a must-try recipe :) ​

Best Sheet Pan Fajitas with Steak 

Ingredients:
  • 3 large bell peppers preferably 1 red, 1 orange, 1 yellow, seeded and sliced into 1/2" strips
  • 1 large red onion halved and sliced into 1/4" pieces
  • 1/4 cup avocado oil
  • 2-3 cloves garlic minced or pressed
  • 3 teaspoons chili powder
  • juice of 1 lime
  • 2 teaspoon oregano
  • 1 teaspoon ground cumin
  • 2 teaspoons salt
  • 2 lb. thinly sliced flank steak or “fajita” steak
  • lettuce cups or tortillas
Directions:
  1. Prepare all ingredients before cooking: slice peppers, slice steak, peel and seed avocados, chop garlic, etc.
  2. Preheat your broiler with oven racks in thirds; place baking sheet on top rack.
  3. In a small bowl, stir together avocado oil, garlic, seasonings, and salt. 
  4. Put peppers and onions in a large bowl and pour half of garlic-seasoning mixture over; toss well to coat. 
  5. Carefully but quickly remove baking pan and scatter peppers and onions over. 
  6. Return to oven and cook for 7 minutes, or until beginning to soften and brown.
  7. Place sliced steak in the large bowl and pour remaining garlic-seasoning over; toss well to coat.
  8. After peppers and onions are cooked, quickly but carefully remove baking pan from oven and use a spatula to make a space between peppers. Place steak in a single layer, being careful not to crowd if possible. 
  9. Return to oven and cook 4 minutes or until uniformly brown on top and medium rare. Steak will likely show medium-rare temperature on underside; it will not show on top.
  10. Remove pan from oven and serve in tortillas or lettuce cups with guacamole, more fresh salsa, and garnish with fresh chopped cilantro and/or red onion, if desired.

Notes:
You can marinate your steak ahead of time if you prefer; this will result in an even more flavorful and tender steak. Simply coat your sliced steak in half the garlic-seasoning mixture and chill; marinate for up to 12 hours. Take out of fridge about 30 minutes before cooking.

Original recipe found here


Cilantro Lime Cauliflower Rice
Ingredients:
  • 1 head of cauliflower (I used two bags of frozen cauliflower rice)
  • 2 limes
  • 2 cloves of garlic
  • 1 handful chopped cilantro
Directions:
  1. (If making own cauliflower rice) Remove the leaves from the cauliflower, and cut the head in half. Remove the cauliflower from the core so you only have the florets. Place half the cauliflower into the processor and process until only small pieces remain. Remove from the processor and place into a pan. Process the remaining cauliflower repeating the steps.
  2. Mince the garlic and add to the cauliflower in the pan. Cook over medium heat for about 5 minutes, stirring constantly. When cauliflower is slightly toasted, and garlic cooked, remove from heat.
  3. Toss with cilantro and juice from the whole lime.

Original recipe found here
0 Comments

Slow Cooker Squash & Ground Beef Curry

7/15/2019

0 Comments

 
Picture
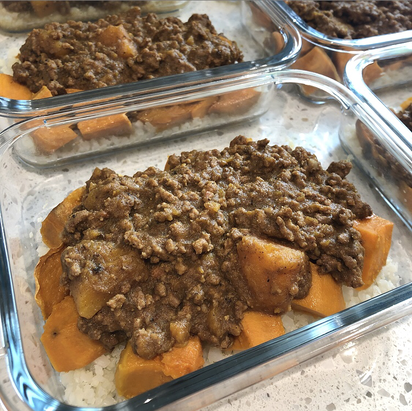
​Sometimes I really wish my pictures did the meal more justice... Anyways, I probably say this for every curry meal I post, but if you enjoy a curry meal then you will enjoy this one! I didn't actually make this recipe as-is though, so I am not sure I can give an accurate review for it. Instead of the acorn squash, I used butternut squash, and instead of all of the spices listed after the lemon, I used the spices listed in the notes section. Both of those swaps were out of convenience though since it's much easier to find already cubed butternut squash at the grocery store, and I didn't already have all the spices listed on the original recipe. Whichever way you decide to make this recipe though, I definitely suggest browning the meat first, and also adding some salt. Other then that, I thought this meal was especially good over some roasted sweet potatoes! I also threw in some cauliflower rice just to add some more vegetables to this recipe, but I can see a mixture of cauliflower rice and regular rice being good too. Let me know if you try this recipe out and how you choose to make it! ​

Slow Cooker Squash & Ground Beef Curry
Ingredients:
  • 2 lb Ground Beef
  • 1 whole Acorn Squash, cut into 1/2 inch cubes (I used Butternut Squash instead)
  • 13 1/2 oz Coconut Milk, (one can)
  • 15 oz Pumpkin Puree, (one can)
  • 1 1/2 cup Water
  • 1 1/2 Tbsp Ginger Root, peeled and diced
  • 5 cloves Garlic
  • 1 whole Lemon, quartered
  • 1/2 Tbsp Garlic Powder
  • 1/2 Tbsp Onion Powder
  • 1/2 Tbsp Turmeric Powder
  • 1 tsp dried Cilantro
  • 1 tsp dried Basil
  • 1 tsp dried Dill
  • 1 tsp ground Cinnamon
  • 1/2 tsp ground Ginger
  • 1/4 tsp ground Cloves
  • 1/2 cup Cilantro, (optional) for topping
Directions:
  1. Break up the ground beef into small pieces, as small as you can make them.
  2. Add the ground beef and all other ingredients (except the fresh cilantro) to your slow cooker. Squeeze the lemons into the slow cooker before adding them.
  3. Cover and cook on low for 4-6 hours or on high for 2-3 hours. If you're nearby, break up the chunks of ground beef halfway through the cooking time. If you're not, do so at the end.
  4. Serve with cauliflower rice (you'll need about 1 1/2 - 2 cauliflower heads' worth of rice) and topped with fresh cilantro (optional).
Notes
1. If you're not on the autoimmune protocol, replace the AIP curry blend (dried garlic, onion, turmeric, basil, dill, cilantro, cinnamon, ginger, and cloves) with 2 tablespoons of your favorite curry powder.
2. Another spice option is to make your own AIP Curry Powder, like this one, which combines much fewer spices, and spices that you are more likely to already have in your kitchen:
  • 1 T. granulated garlic
  • 1 T. granulated onion
  • 1 T. turmeric
  • 2 t. cinnamon
  • 1 t. powdered ginger
  • ½ t. ground clove

Original recipe found here
0 Comments

Slow Cooker Pulled Pork with Pineapple Coleslaw

7/1/2019

0 Comments

 
Picture
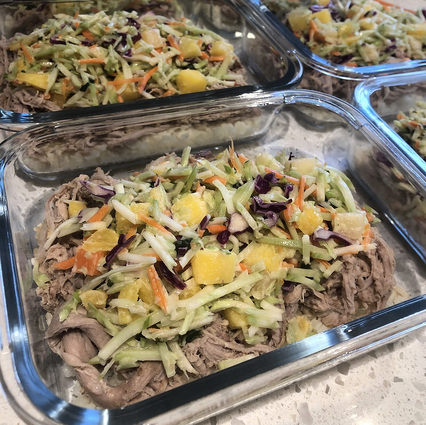
This meal turned out amazing! I was a bit hesitant to make this coleslaw recipe, but I am SO glad I gave it a try. Paired with the pork, it really made this meal super delicious and complete! Although I have been eating as paleo as it gets for the past 5 or so years now, I have never tried Primal Kitchen Mayo, or any mayo for that matter - just haven't found the need for it and avoided all recipes that called for it. Anyways, I decided it was time to give it a try with this coleslaw and it was totally worth it. However, I certainly didn't use anywhere near 1/2 cup like the recipe calls for below. I actually ended up using 1 1/2 bags of broccoli slaw (mix of broccoli, carrots, and red cabbage), 1 Tbsp Apple Cider Vinegar, 1 Tbsp Avocado Oil, 2 Tbsp Mayo, some salt, and a container of Pineapple Mango Salsa from Wegman's (approx. 8-10 servings). Super easy vegetable side to prepare for meal prep this week! I also had another 1 1/2 bags of broccoli slaw and an extra container of Pineapple Mango Salsa, so I could whip up a fresh batch of coleslaw later in the week. If I didn't convince you on the coleslaw, then at least grab a
fresh pineapple salsa from your local grocery store to top on this pork, or prepare your own with the instructions below. I also snuck in some plain cauliflower rice under all that pork too in case you're brainstorming other ways to get some vegetables into this meal. If you don't like any of those options, then the pork itself also turned out delicious and is worth trying. I made it in the Instant Pot on the slow cook option, so I could "saute" the extra sauce down at the end. We also had leftover pork for dinner some nights and dressed it up with some BBQ sauce to make a totally different meal, which was also really enjoyable. I'll end my ramblings there. Plenty of flexibility with this recipe to prepare it however you please! 

Slow Cooker Pulled Pork with Pineapple Coleslaw
Ingredients:

For the pulled pork:
  • 3–4 pound pork shoulder (bone-in or boneless)
  • 1/2 cup chicken broth
  • 1/2 cup balsamic vinegar
  • 1/8 teaspoon salt
  • 1/8 teaspoon pepper
For the coleslaw:
  • 1–2 bags of coleslaw cabbage (or 1 bag coleslaw and 1 bag shredded purple cabbage)
OR
  • 1/2 head of green cabbage
  • 1/2 head of purple cabbage
  • 1 tablespoon apple cider vinegar
  • 1 tablespoon avocado oil (or olive oil)
  • Enough mayo to make it the consistency of your preference (about 1/2 cup)
For the pineapple salsa:
  • 1 large tub of pre-made pineapple salsa from Whole Foods
OR
  • 2 cups fresh pineapple, diced
  • 1/4 cup red onion, finely chopped
  • 1/4 cup red pepper, finely chopped
  • 1/2 cup fresh cilantro, chopped
  • 1 Serrano pepper, seeded and finely chopped
  • Juice of 1 lime
  • 1/8 teaspoon of salt
  • Optional: BBQ to top the pulled pork
Directions:
For the pulled pork:
  1. Place pork in the slow cooker
  2. Season meat with salt and pepper
  3. Pour in chicken stock and balsamic
  4. Cover and cook on low for 6-8 hours or until pork pulls apart easily
  5. Remove from slow cooker and shred
For the pineapple coleslaw:
  1. Add cabbage to a large bowl
  2. Prepare the pineapple salsa if making it yourself
  3. Add pineapple salsa to the bowl
  4. Add oil, vinegar, mayo
  5. Stir to combine so that coleslaw is evenly mixed
  6. For best results, refrigerate an hour prior to serving to let the flavors combine
  7. Top pulled pork with BBQ sauce and coleslaw and serve!
Notes:
If you’re using this for meal prep, you may want to double the coleslaw recipe depending on how large your pork shoulder is.

Original recipe found here
0 Comments
    Picture

    Erika Copeland

    Sharing the recipes I prepare to help others eat more nutritious food and begin their journey to a healthier life.

    Instagram

    categories

    All
    AIP
    Beef
    Breakfast
    Brussels
    Burgers
    Casserole
    Cauliflower Rice
    Chicken
    Crockpot
    Kombucha
    Low FODMAP
    Meal Prep Tips
    Nutrition Blog
    Pork
    Pressure Cooker
    Quiche
    Sausage
    Shrimp
    Snacks
    Steak
    Sweet Potatoes
    Treats
    Tuna
    Turkey
    Vegan
    Video
    Whole30

    Archives

    December 2021
    November 2021
    September 2021
    August 2021
    July 2021
    June 2021
    May 2021
    April 2021
    March 2021
    February 2021
    January 2021
    December 2020
    November 2020
    September 2020
    August 2020
    July 2020
    June 2020
    May 2020
    April 2020
    March 2020
    February 2020
    January 2020
    December 2019
    November 2019
    October 2019
    September 2019
    August 2019
    July 2019
    June 2019
    May 2019
    April 2019
    March 2019
    February 2019
    January 2019
    December 2018
    November 2018
    October 2018
    September 2018
    August 2018
    July 2018
    June 2018
    May 2018
    April 2018
    March 2018
    February 2018
    January 2018
    December 2017
    November 2017
    October 2017
    September 2017
    August 2017
    July 2017
    June 2017
    May 2017
    April 2017
    March 2017
    February 2017
    January 2017
    December 2016
    November 2016
    October 2016
    September 2016
    August 2016
    July 2016
    June 2016
    May 2016
    April 2016
    March 2016
    February 2016
    January 2016

Powered by Create your own unique website with customizable templates.
  • Home
  • All Recipes
  • Goal
  • About
  • FAQ
  • Contact