LiveSqueezy
  • Home
  • All Recipes
  • Goal
  • About
  • FAQ
  • Contact

Ham Pizza Egg Muffins

9/25/2017

0 Comments

 
Picture
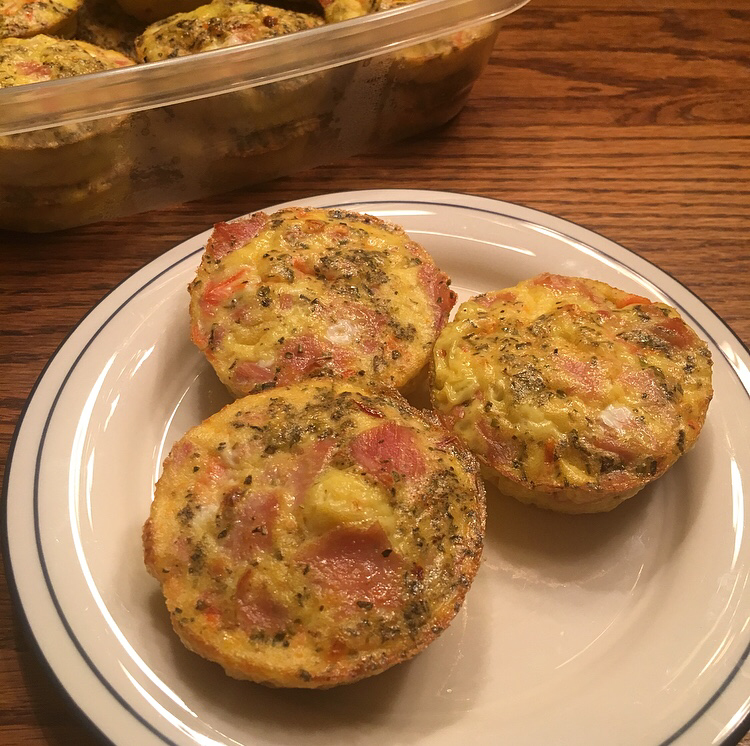
The original recipe is for Sausage Pizza Egg Muffins, which I made for my mom back in June and she did not end up enjoying them. That was mainly my fault though because I picked an Italian sausage that I had never tried before and it definitely had a very bold and spicy flavor to it. Anyways, I decided to remake this recipe to my mother's liking and used ham instead of sausage and used diced tomatoes instead of sun dried tomatoes. This version is a little quicker and easier to make too since you don't have to wait for the sausage to brown. Not only were these simple to prep, but they turned out looking and smelling amazing. There is no way my mom will not enjoy this version!

Ham Pizza Egg Muffins
Ingredients:
  • 6 slices of ham, sliced into bits (I used Applegate ​brand)
  • 2 cloves garlic, minced (optional)
  • dash of crushed red pepper
  • ⅔ cup tomatoes, diced
  • 2 tsp Italian seasoning blend
  • 1 tsp onion powder
  • 9 eggs
  • ¼ tsp fine grain sea salt
  • 1-2 tsp coconut oil for sauteing, plus extra for greasing muffin cups
Directions:
  1. Preheat your oven to 400 degrees and grease a 12 cup muffin tin well with coconut oil to prevent sticking.
  2. Heat a medium or large skillet over medium heat and add 1-2 tsp coconut oil to the skillet. Add the garlic, ham bits, tomatoes, and a dash of crushed red pepper. Cook and stir for about 2-4 minutes, then remove from heat and set aside.
  3. In a very large bowl, whisk together the eggs, onion powder, Italian seasoning, and salt. Then, pour the entire ham mixture into the eggs and combine.
  4. Fill muffin cups ¾ of the way to the top (they'll rise over the cups, which is fine) until the mixture is used up and bake in the preheated oven about 15 minutes, or until the eggs are set and the muffins just begin to brown.
  5. Remove from oven and let cool a few minutes before serving. If making ahead, you can refrigerated them in a sealed container for up to 5 days. Enjoy!

​Original recipe found here
0 Comments


Leave a Reply.

    Picture

    Erika Copeland

    Sharing the recipes I prepare to help others eat more nutritious food and begin their journey to a healthier life.

    Instagram

    categories

    All
    AIP
    Beef
    Breakfast
    Brussels
    Burgers
    Casserole
    Cauliflower Rice
    Chicken
    Crockpot
    Kombucha
    Low FODMAP
    Meal Prep Tips
    Nutrition Blog
    Pork
    Pressure Cooker
    Quiche
    Sausage
    Shrimp
    Snacks
    Steak
    Sweet Potatoes
    Treats
    Tuna
    Turkey
    Vegan
    Video
    Whole30

    Archives

    December 2021
    November 2021
    September 2021
    August 2021
    July 2021
    June 2021
    May 2021
    April 2021
    March 2021
    February 2021
    January 2021
    December 2020
    November 2020
    September 2020
    August 2020
    July 2020
    June 2020
    May 2020
    April 2020
    March 2020
    February 2020
    January 2020
    December 2019
    November 2019
    October 2019
    September 2019
    August 2019
    July 2019
    June 2019
    May 2019
    April 2019
    March 2019
    February 2019
    January 2019
    December 2018
    November 2018
    October 2018
    September 2018
    August 2018
    July 2018
    June 2018
    May 2018
    April 2018
    March 2018
    February 2018
    January 2018
    December 2017
    November 2017
    October 2017
    September 2017
    August 2017
    July 2017
    June 2017
    May 2017
    April 2017
    March 2017
    February 2017
    January 2017
    December 2016
    November 2016
    October 2016
    September 2016
    August 2016
    July 2016
    June 2016
    May 2016
    April 2016
    March 2016
    February 2016
    January 2016

Powered by Create your own unique website with customizable templates.
  • Home
  • All Recipes
  • Goal
  • About
  • FAQ
  • Contact